“All these rules can lead to some interesting and unusual battles and will make a change from the stereotyped affairs of both forces deploying on the baseline” (Bath, 84).
In the strategic rules, we endeavor to limit interference with tactical play. We do impinge on the wargames table, however, in the deployment phase, notably, in the drawing of baselines and, further, in a measured force deployment in the opening turns of battle.
In the citation above, Bath refers to an ingenious matchbox system for strategic as well as tactical maneuver and an engaging scouts mini-game to simulate intelligence gathering. In the Valormr Campaign, we incorporate scouts into the contact dice and forgo the matchbox array for overt moves on the hexagon map. To achieve variation in deployment, we combine orders of march with opposing dice throws. The results range from alert forces deploying on opposite ends of the battlefield to careless leading units marching straight into the opponent’s fields of fire.
Contact and Deployment
“Deployment” is the sixth of six parts of “Contact and Deployment” in the Valormr Campaign.
Baselines on the Wargames Table
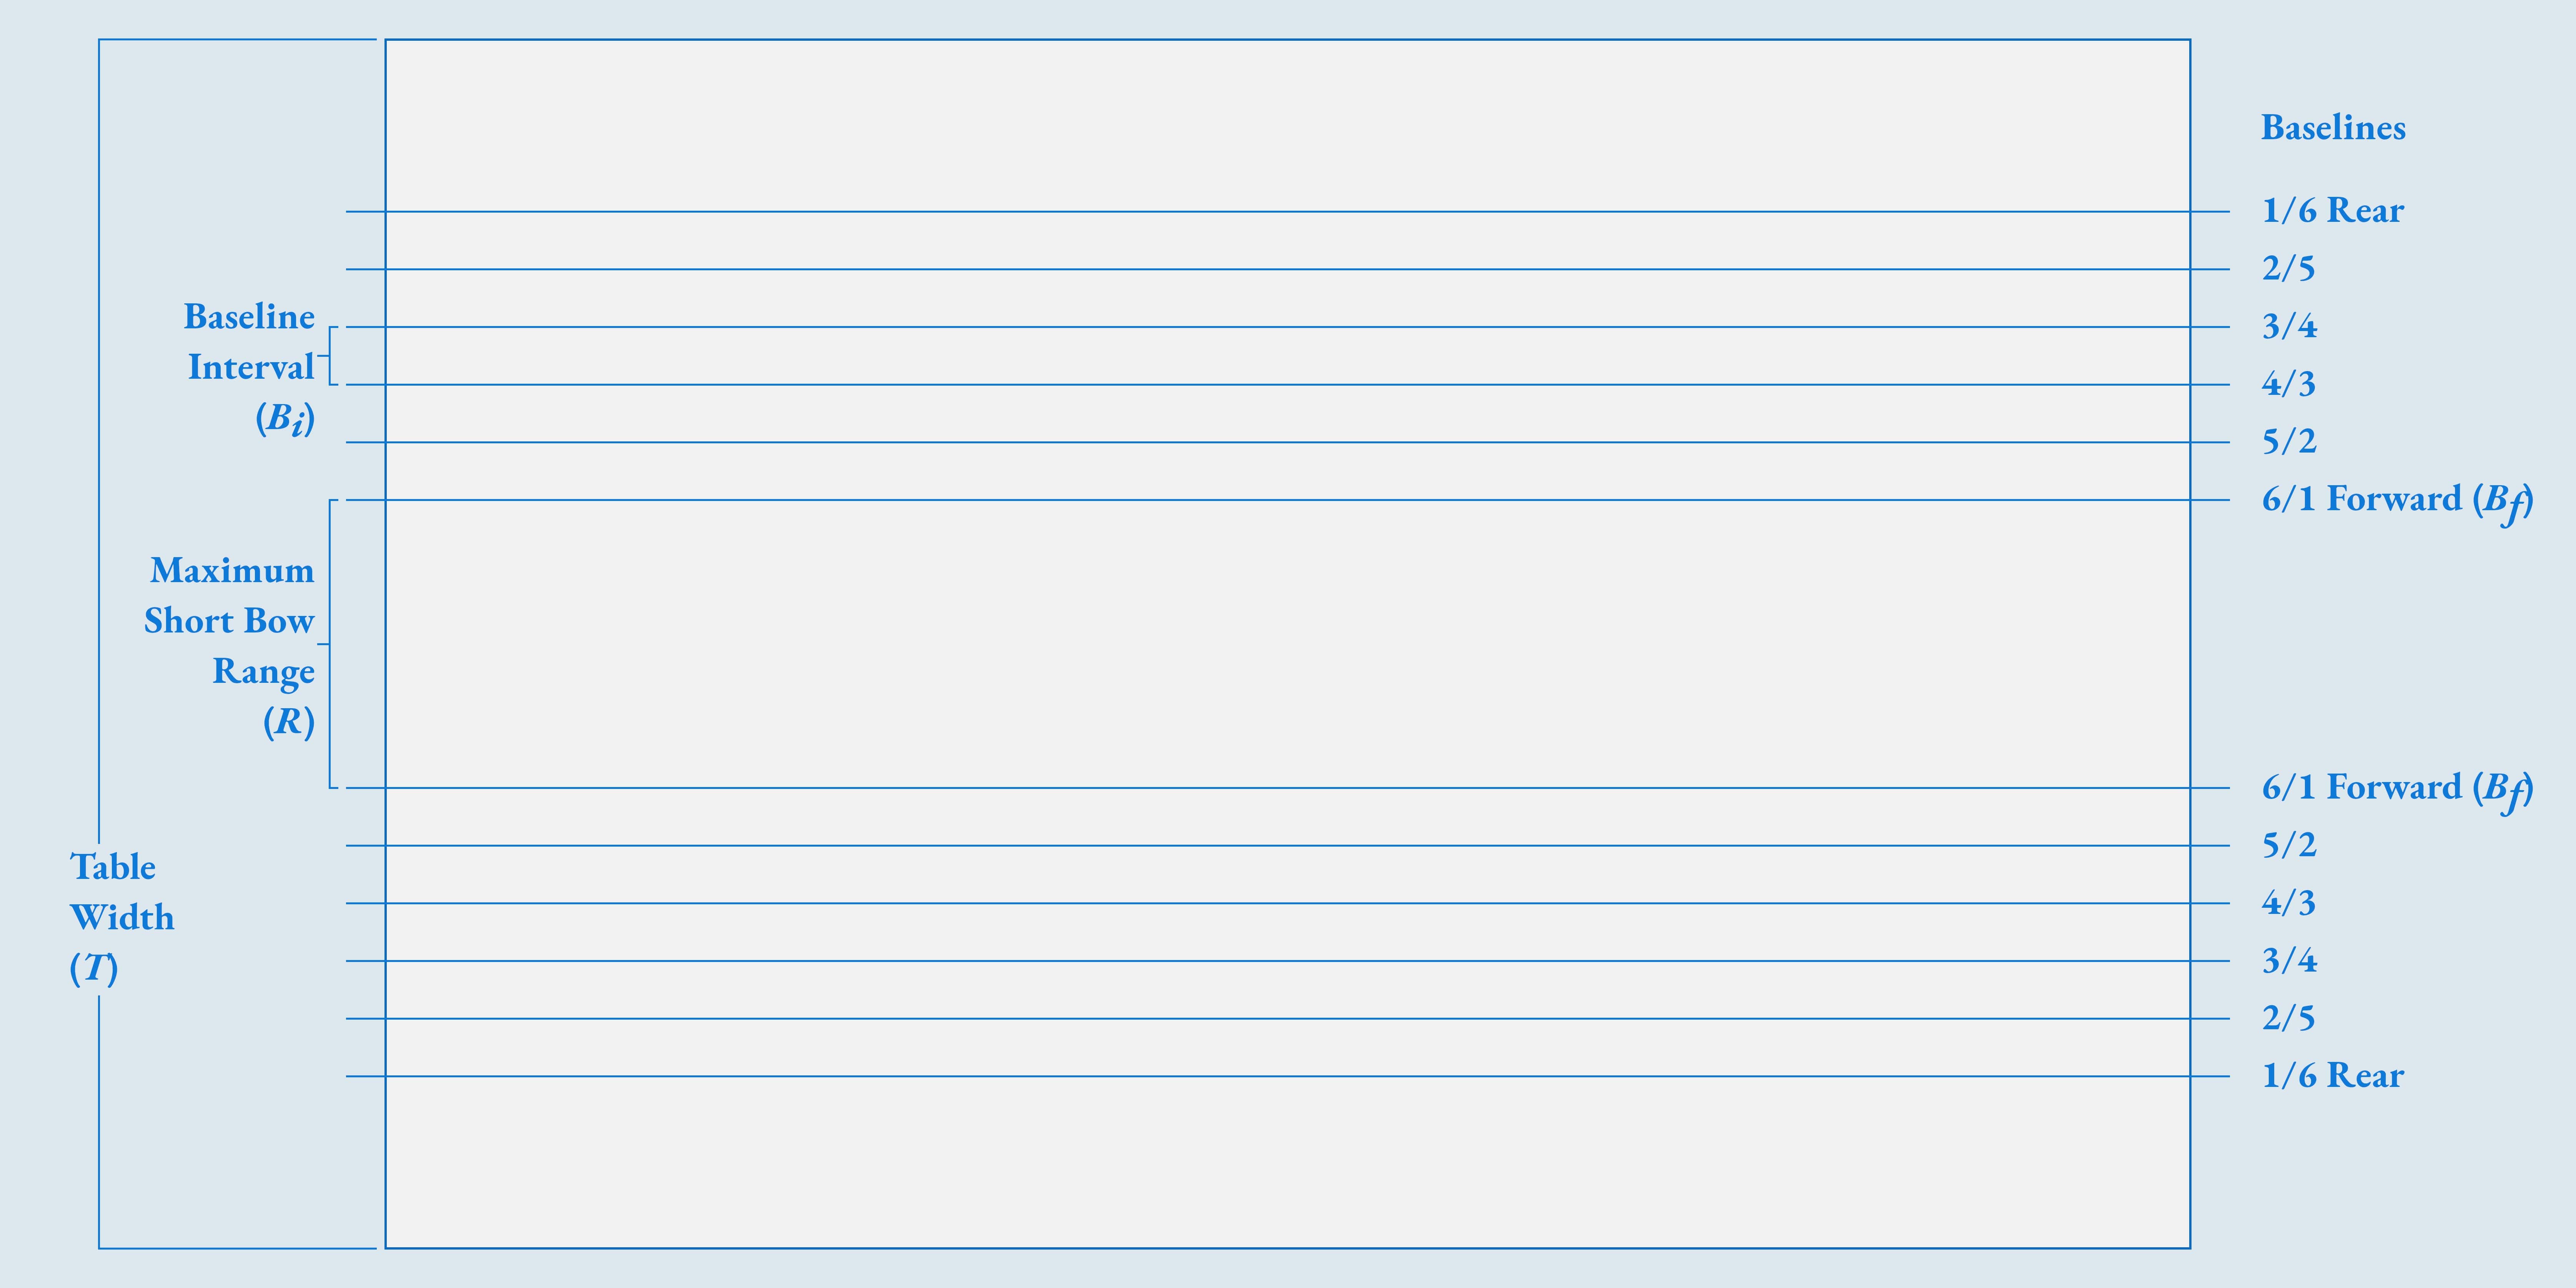
Instead of one baseline for each side at opposite edges of the wargames table, we’re going to mark six. We make a calculation to determine each side’s forward baseline, then mark additional baselines at even intervals to the rear baseline.
Calculate Forward Baselines
There are two input values for this calculation. The first is the width or length of your wargames table (T), depending on which way forces face off across the battlefield. Here, I use width. The second is the maximum range of a short bow scaled to inches (R) according to your tactical wargames rules. Subtract the short bow range from the table width and divide by two.
Bf = (T − R) ÷ 2
The result is the distance from either edge of the table toward the middle, where the forward baselines (Bf) are marked. Between the two forward baselines is maximum short bow range.
Calculate Baseline Intervals
Now, take the distance from either edge of the table to the forward baselines (Bf), divide it by seven and round to the nearest half.
Bi = Bf ÷ 7, round to nearest ½
The result is the interval between baselines (Bi). We divide by seven instead of six because we want twice the distance behind the rear baseline.
Marking Baselines
From both edges of the table, measure Bf and mark the forward baselines.
From each forward baseline back toward the edge, mark five more baselines at the interval Bi. The sixth baselines, closest to the table edges, are the rear baselines. Number the baselines on both sides from 1 to 6, forward to rear, and again from 1 to 6, from rear forward.

Minimum Distance Behind Rear Baseline
This calculation works on tables at least 28½″ wide. For widths from 32″ to 35″ inclusive, the calculation leaves less than twice the interval behind the rear baseline. That might not be enough, since it isn’t uncommon that a regiment deploys in this space. If your table falls in this range, make the calculation for the forward baselines as above, but for the interval between baselines, use 1¾″, which leaves more room behind the rear baseline.
Precalculated Intervals by Table Length
The following table shows the baseline interval by table width or length. The calculations are based on a short bow range of 150 yards at a scale of 20 yards to the inch. All values are in inches.
| Precalculated Intervals by Table Length | |
|---|---|
| Table Width or Length (T) | Interval (Bi) |
| 28.5 to 31.5 | 1.5 |
| 32 to 35 | 1.75 |
| 35.5 to 38.5 | 2 |
| 39 to 45.5 | 2.5 |
| 46 to 52.5 | 3 |
| 53 to 59.5 | 3.5 |
| 60 to 66.5 | 4 |
| 67+* | 4.5 |
| * A wargames table 67″ or longer might use a 1:10, inch to yards, ground scale. | |
Deployment Dice
To start the deployment phase, all commanders roll a dice. The results determine which player has deployment initiative, each commander’s baseline, and to what extent—beyond that of the base deployment—the commander may deploy forces prior to the first tactical turn. Two of the modifiers account for high or low dice throws from the contact phase. Modifiers cannot raise the score higher than 6 or lower it to less than 1.
| Deployment Dice Modifiers | |
|---|---|
| Criteria | Modifier |
| Highest unmodified contact dice | +1 |
| Scored a 1 or less on modified contact dice | −1 |
| Maneuver | +1 |
| All opponents in clear terrain | +1 |
| All opponents in mountain terrain | −1 |
Deployment Initiative
The commander with the higher score has deployment initiative throughout initial and subsequent deployment. In case of a tie, the commander with the higher unmodified score wins the initiative. Still a tie, dice for it.
Deployment Baseline
Each commander deploys behind the numbered baseline that matches the modified deployment dice. The direction of count depends on the deployment dice.
- The commander with the highest score counts baselines from the rear baseline forward.
- Lower-scoring commanders count baselines from the forward baseline to the rear.
- In case of a tie for highest, all commanders count baselines from the forward baseline to the rear. That is, on a tie of 1s, the forces stumble upon one another at their forward baselines; a tie of 6s, they each halt at their rear baselines.
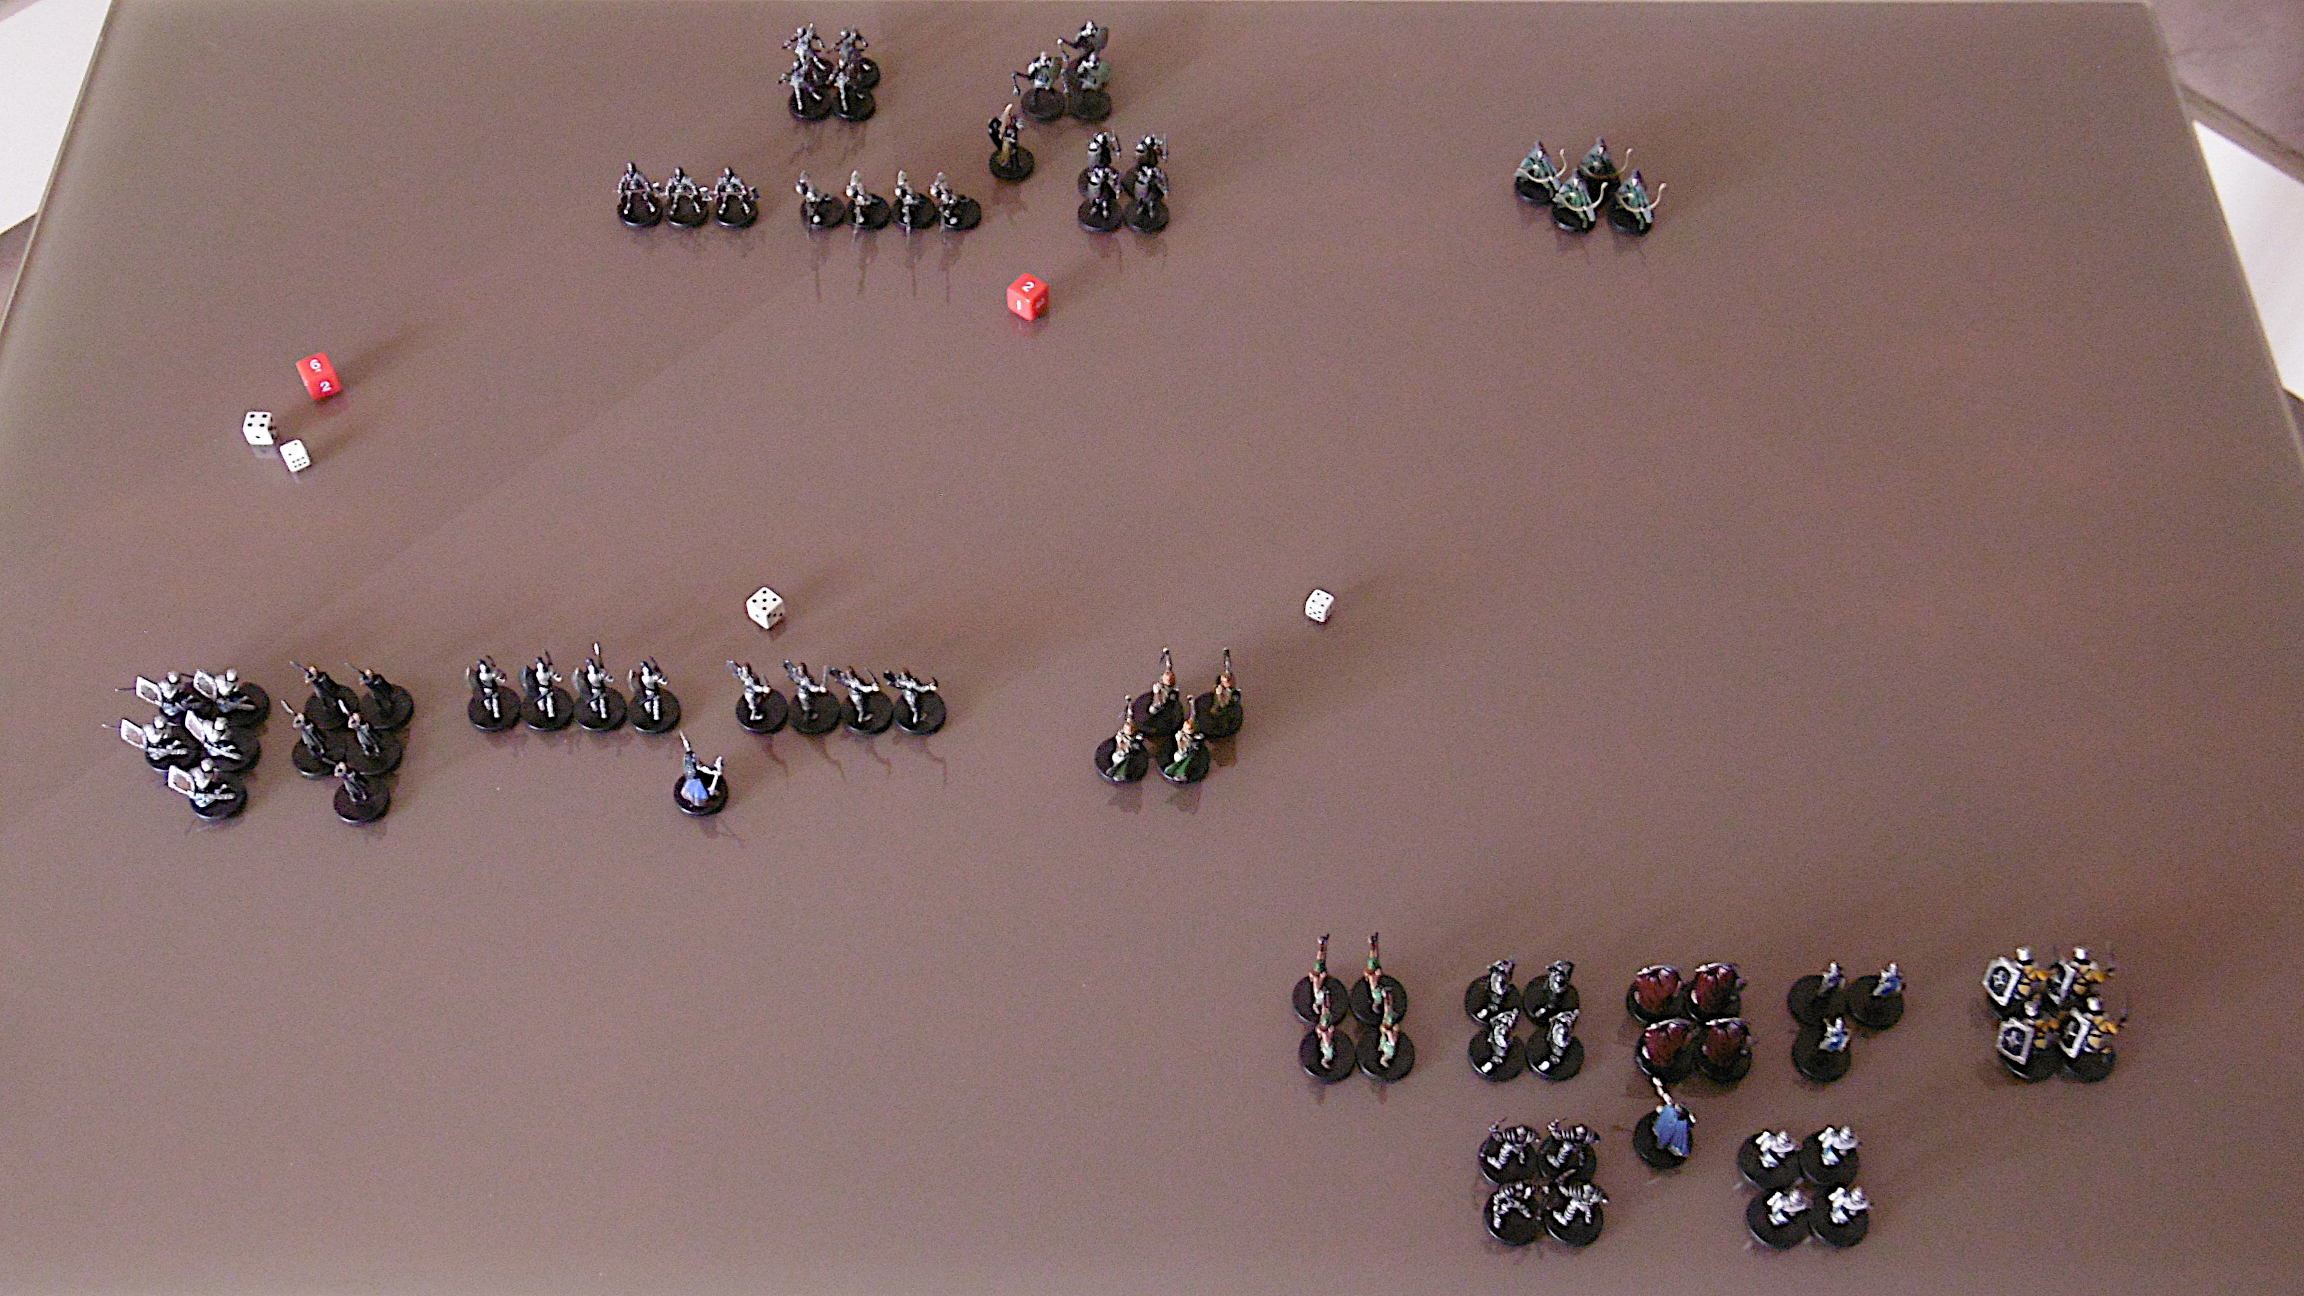
Three or More Forces on the Battlefield: In the case where more than two forces are in map contact and the engagements are not split into separate battles, the numerous forces are deployed according to their arrangement on the strategic map. Following the story from “Avoid, Delay, Evade, and Withdraw,” the photo below shows Hadewych opposite Ingegerd and Aeskrvald, who, on the strategic map, occupy the hexes to her fore and to her left forward flank.

Scoring high on the contact dice (left), Hadewych (top) managed to find more suitable terrain (not shown). To her deployment dice of 2, she adds 1 for the highest contact dice and another for all opponents in clear terrain, deploying on the fourth baseline counting from forward. With a roll of 5 plus 1 for her opponent in clear terrain, Ingegerd (lower left) deploys on her forward baseline. Aeskrvald threw a 4 and has the same plus 1 for terrain, so he deploys on the fifth baseline, counting from forward to rear.
Initial Deployment
Each commander has a base deployment derived from the tactical march formation. To determine his or her initial deployment, the commander adds the base deployment and a number of units equal to the turn deployment—also derived from the march formation (see Summary table below)—multiplied by the difference in the deployment dice.
When more than two forces are on the field, each commander subtracts the lowest deployment dice from his or her own dice to determine the multiplier.
Initial deployment precedes the first turn of the battle. It is conducted in two rounds. The order of the first round is from highest deployment dice to lowest. In the second round, from lowest to highest. In the first round, each commander may deploy any portion, or none at all, of his or her initial deployment. On the second round, commanders must deploy the balance of their initial deployment.
The intent is to allow commanders with higher deployment dice scores to influence the deployment in the first round, while enabling them to observe the full deployment of lower scorers before deploying their remaining forces in the second.
| Summary of Orders of March and Deployment Schedules by Terrain | |||
|---|---|---|---|
| Terrain | Tactical March Formation* | Deployment Schedule | |
| Base | Turn | ||
| Mountain or Track |
Column of figures (2 × 20 troops) |
One company | Two companies |
| Road | Column of figures (4 × 10 troops) |
Three companies | Four companies |
| Forest, Swamp, or Hill |
Column of companies | One battalion | One battalion |
| Clear | Column of battalions | One regiment | One regiment |
| * Tactical march formations are fully explained in “Orders of March.” Base Deployment: Based on the tactical march formation. A number of units that are deployed on enemy contact. Turn Deployment: Also determined by the tactical march formation. A number of units that may be deployed at the beginning of the second and subsequent turns of the battle until the regiment is fully deployed. Initial Deployment: A number of units equal to base deployment plus turn deployment multiplied by the difference in the contact dice. Deployed prior to the first turn of battle. |
|||
Subsequent Deployment
The initial deployment completed, the first turn of battle takes place. The commanders deploy a number of units equal to their turn deployment in a deployment round before the second turn of battle. The order of deployment in these subsequent deployment rounds is from lowest to highest deployment dice. The deployment round takes places before each turn until all commanders have deployed their full forces.
Advanced: March Table
“Here, at the outset, only the leading elements of both armies will be present on the field; the rest will arrive at measured intervals, dependent on march tables” (Bath, 74).
A march table is a schedule of movement showing a unit’s location at specific times along a planned route.1 I take Bath’s usage to imply an abbreviated table, showing only units in an order of march. In the simple campaign, our march tables show only regiments. We assume the commander has sufficient foresight to order companies within the march formation in the way best suited for tactical deployment, so the player chooses in the battle’s opening turns which units to deploy next. In an advanced game, the commander might create a march table, showing each company, prior to marching, thereby determining the order in which units are deployed, turn by turn, on the battlefield.
Notes
1 British Military Terminology (PDF), Military Intelligence Service, Washington: U. S. War Department, 1943. March table: “a combined location and movement schedule for a march,” also, movement table, British (40).