Subscribe, Comment, and Coming Up

In addition to a working search function on the site, I’m pleased now to offer the enthusiastic reader an email subscription to new articles as well as a useful comment system.

Subscribe to New Articles: Now you can get notification of new articles by email or feed reader. Clicking Subscribe in the header menu takes you to the appropriate section in the sidebar.

Easy Commenting with Notification: Previously, making a comment on an article was “particularly onerous,” as one friendly reader put it. Now it’s easy. Type your comment, enter your email address, and click the button. You have the option to get an email notification of new comments on the article. Otherwise, your email address is unused.

Coming Up on DONJON LANDS

I’m working on a few articles for the near future. One is a follow-up to “Strategy on the Jousting Matrix.” I further the analysis, taking into account my brutal defeat in the live tourney with Dan Collins on last week’s Wandering DMs episode.

Another is the next in the series outlining a B/X campaign. After areas under human control in “Thirteen Graves,” we look at “Monstrous Denizens of the Pale Moor.”

And I’m finally going to come clean with all my talk about the “Rending” and the “Greater Ones” and just what do I mean when I say DONJON LANDS. “Song of the World Dragon” is a creation myth of Earth’s far future—a world with magic, monsters, and a ring around it, with stars that aren’t fixed but dance and swirl.

Your Comments Welcome

Whether by email or in the comment section, I am open to your suggestions or requests. Let me know what you’d like to read.

Migration Success

DONJON LANDS is back online. The CMS migration was successful. There were traps, there were illusions, there was… some… waiting—and a wandering monster! But all planned actions scored a hit.

In the migration, I strove to recreate the design from the old system. You might notice minor improvements allowed by the new. A biggish improvement is the search function, which now finds things like a clever party. Also, making a comment should be less onerous. Soon, I hope to implement email subscription to new posts and replies to comments.

The web feed addresses have changed. Feed readers and blog rolls can subscribe to the RSS feed or the Atom feed. I apologize for the inconvenience. [18:03 27 July 2022 GMT]

Temporarily Offline Wednesday

DONJON LANDS will be offline for some time on Wednesday, July 27, while I migrate the content management system. If all goes well, the process could take a few hours. If less than well, a couple days…

Migration Success: the site is back online. [12:28 27 July 2022 GMT]

Thirteen Graves

Continuing from “A Forsaken Peninsula,” we take the next step through Designing a Wilderness (Cook and Marsh, X54).

Reading Map

This is the fourth article of a short series outlining a B/X D&D campaign.

D. LOCATE AREAS UNDER HUMAN CONTROL.

Oft repeated on Emmius’s Tabula is “Amt” in conjunction with names of marked political regions. An amt is an administrative area akin to a province or county. Such small regions ruled by counts or nobles of similar rank seem appropriate.

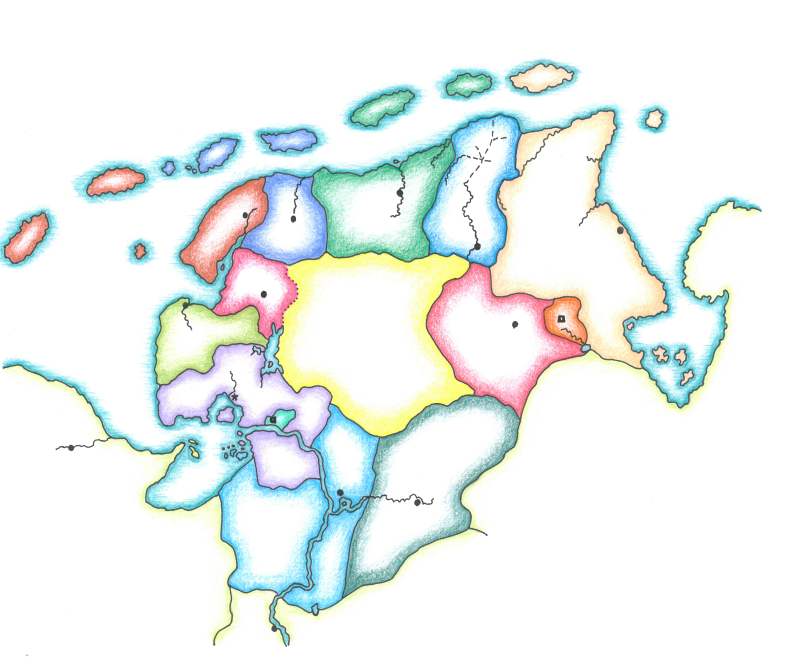
Emmius shows ten provinces bordering the central region. Including the two small, more remote provinces—one on the river east of the Dollart, another on the opposite side of the map (left of the eastern inlet)—brings the count to 12. Twelve is a good number. Too good for a campaign with warlocks and witches, when we’re so close to 13. I’m going to carve one more county off the central region’s west end. It’s a “soft” border: the county claims, though does not control, the central region, which is the Pale Moor.

Competition

Going further with that notion, we already know that the warlock discovered much wealth and magic in the Pale Moor. So, the counties compete in some way for the forsaken interior’s resources, but they are confounded by the moor’s denizens. To increase the tension, we’ll add a curse: any who die within the confines of the Pale Moor return as undead, which also hinders incursion into the interior.

Opposition

Now, we have counties that desire something. Let’s also give them something to fear: an outside force. From the Valormr Campaign, we know that the dwarven empire of Throrgrmir lies to the east, and to the west, Darkmeer, a collection of belligerent fiefs. While Throrgrmir is a potential ally, Darkmeer is a certain enemy to civilized realms. Some time—decades or centuries—has passed since the Throrgrmir war. Darkmeer has recovered its losses and now threatens the counties with invasion, subjugation, and enslavement.

Character

Our thirteen counties should each have its own character to differentiate one from another. Space prohibits going into great detail, but we can sketch an overview of the political landscape and let the DM fill in the blanks. A handy way to divide the counties is by alignment.

Law: The counties united in an alliance against Darkmeer, a common threat. The alliance formed a duchy and elevated the ruler of the strongest county, whose seat is our base town (Emden on the Tabula), to the office of duke. The duke’s domain is shown in purple on the map, the other lawful counties in blues.

Thirteen Graves
Map of the Forsaken Peninsula Showing Political Boundaries.

Chaos: Among the counties were some abstentions from the alliance. Notably, the county that claims the Pale Moor did not join and considers itself an independent state, as does the large county on the moor’s eastern border. These counties, and others shown in reds, are chaotic.

Neutrality: A few counties that joined the alliance are less keen on subjugation to a higher ruler. Some may pay homage to the duke, but when it comes to either defending the larger realm against chaos or making fruitful gains in the Pale Moor, their fealty is uncertain. Neutral counties are shown in greens and oranges.

Atlantis of the Clay

We don’t ignore the mythical source of our inspiration (see “Atlantis of the Clay”). An order of knights once held land on the west bank of the western inlet, where now is a bay. The order charged itself with the protection of the counties against the threat of chaos. Some decades ago, the land was submerged by a sudden deluge, possibly an act of divine retribution for some transgression. Villages were covered in mud. Castles were flooded, their lower floors inundated with silt. Many knights were lost. Survivors reaffirmed the order and its mission, and the strongest county gave to the order a tract of land on the river, where the knights established a palatinate.

Titles

Taking title names from English’s Germanic roots, I exchange duke for herzog, or feminine herzogin, and count for landgrave or landgravine. A vassal to a landgrave is a graf or grafin. A more martial province is ruled by a margrave. The head of the knightly order and ruler of the palatinate is a pfalzgraf. Then, for the ambiance in it, I want to play with words a little and, instead of counties, the political districts are graves.

Secret

Secret #4: Members of the ruling family of the chaotic grave that claims the Pale Moor are witches and warlocks, who consort with demons. Maybe they are possessed, maybe willing. Their goal is not to annex the Pale Moor but to reopen the gate beneath the ancient demon city.

Added a secret. [07:16 9 August 2022 GMT]

Man vs. Machine: Chainmail Jousting Live Tournament

“If ever Dan challenges you to a game of Chainmail Jousting, don’t do it. Just don’t do it! He has a system…”—Paul Siegel, Wandering DMs

I was properly warned. But when I got an email from Wandering DMs co-host Dan Collins earlier this week with the subject line: “Jousting Sunday?,” did I heed the warning? Of course not, I’m an adventurer after all.

This week on Wandering DMs, Dan and I tilt in the lists. My strategy is based on an analysis of Chainmail’s Jousting Matrix, outlined here. I rank each aiming point and defensive position using a simple point system.

Dan’s strategy is based on the Nash equilibrium. It’s a math thing. Essentially, as Dan explains, the goal of calculating the Nash equilibrium is to “optimize the possibly-infinite sequence of ‘if you know that I know that you know that I know’ decisions.” Or, as I understand it, Dan fed the Jousting Matrix to the machine, which coughed up the optimal strategy for winning a joust, and Dan turned the results into a weighted table.

It’s an age-old scenario: a human does a thing well until some other human builds a machine that does it better, faster, stronger… I’m not talking Steve Austin. I’m talking less fictional characters against automated opponents: John Henry vs. the steam drill, Garry Kasparov vs. Deep Blue, Jeopardy! champions vs. Watson.

In all these cases, the machine wins! Have I got a chance…?

Watch live, Sunday, July 24, at 1:00 p.m. EDT: “Jousting in Original D&D | Live Tournament,” on Wandering DMs. Root for the human.

A Forsaken Peninsula

How many times I’ve stepped through the process I cannot count. Maybe there are other ways. Maybe those ways are better. But the D&D Expert Rulebook’s Designing a Wilderness (X54) has the advantage of brevity and, after long use, familiarity. Furthermore, even after all these years, the lettered steps never fail to spark the imagination.

After determining the campaign hook in “Warlock of the Pale Moor,” we embellish the old map, original source of our inspiration.

Reading Map

Outlining a B/X D&D campaign. As sometimes happens at the outset, I thought to do this all in one article…

A. DECIDE ON A SETTING.

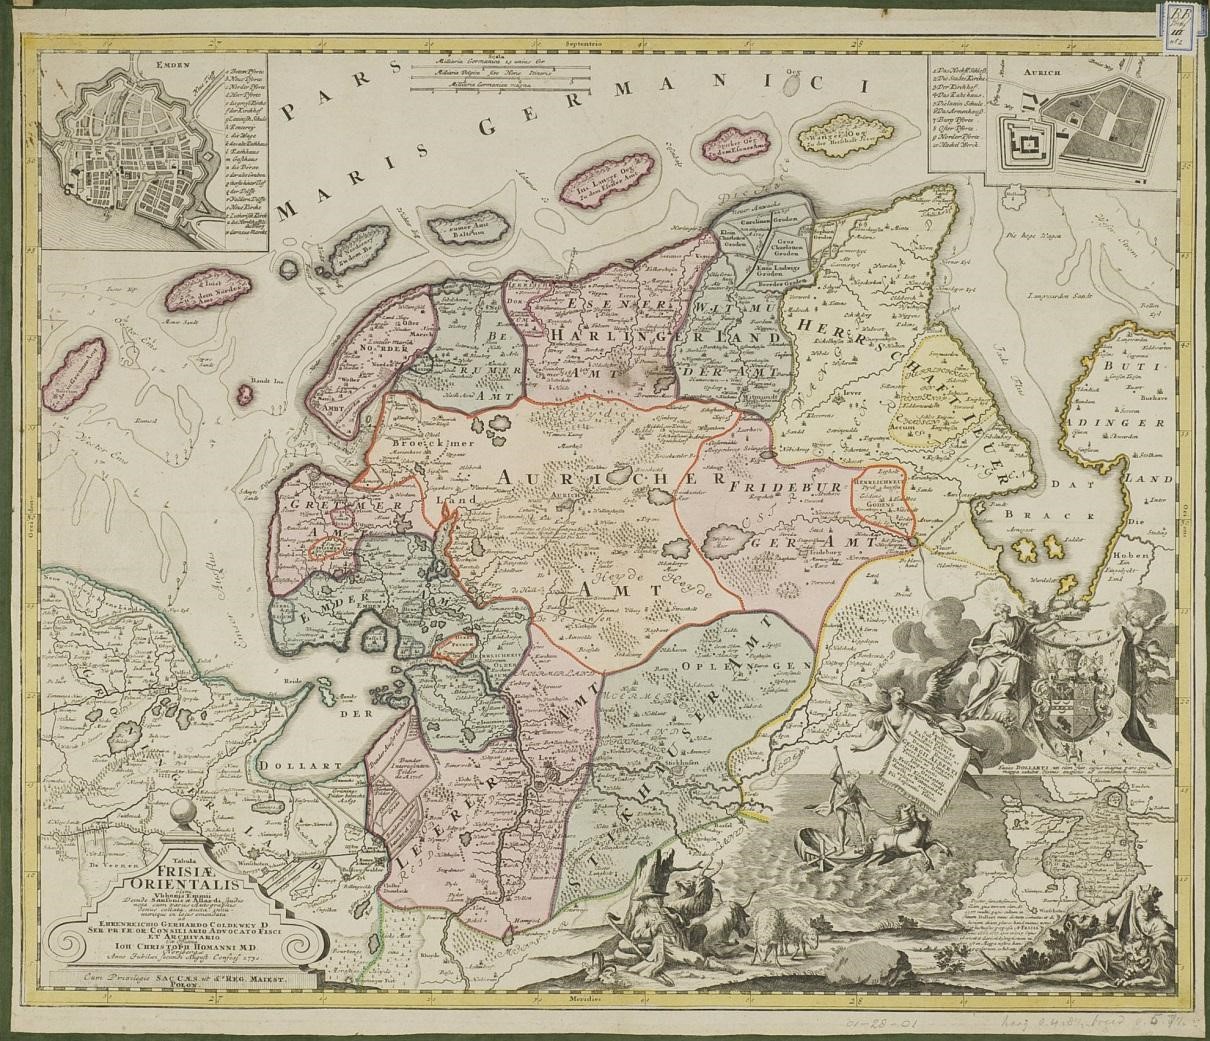
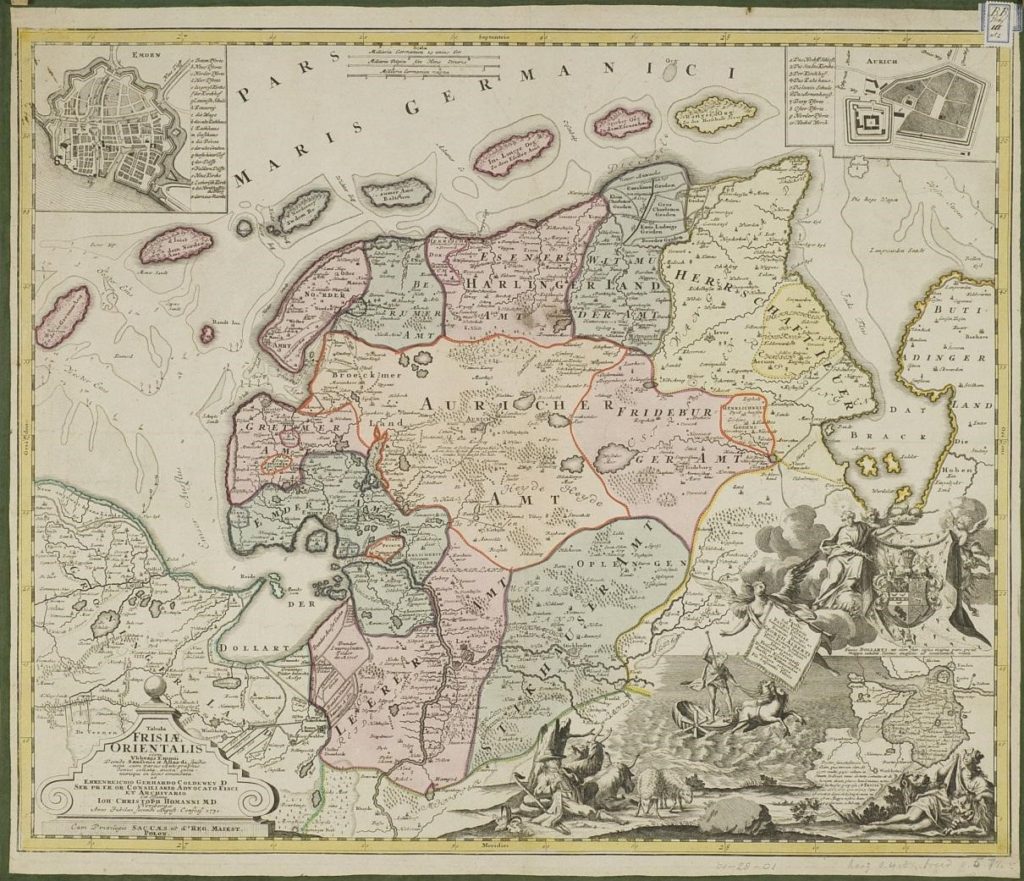
The setting is based on a historical map, Ubbo Emmius’s Tabula Frisiae Orientalis. On the map, a broad, lowland peninsula lies between two inlets, east and west. It shares a long land border with the mainland in the south and is accompanied by a chain of islands in the north.

Tabula Frisiæ Orientalis - Ubbo Emmius 1730
Tabula Frisiae Orientalis, Ubbo Emmius, 1730.
Find this map in high-resolution on the University of Groningen website at https://facsimile.ub.rug.nl/digital/collection/Kaarten/id/1410.

The map’s political boundaries (in color) define a large central region that extends to the peninsula’s west coast and is otherwise surrounded by smaller areas. To incorporate our campaign hook—opposition to the warlock and infernal hordes—I imagine that the center is a forsaken wilderness. The surrounding areas are civilized fiefs, inhabitants of which dare not enter the interior for fear of the aforementioned hordes. Each of the islands belongs to one or another of these fiefs. Beyond the colored boundaries, a few other domains, extending off the map, make land neighbors of lesser importance to the campaign. All this keeps the setting contained, focusing on the Pale Moor.

B. DRAW A MAP OF THE AREA.

We could just print Emmius’s map at a suitable scale and lay a hexagon grid over it, possibly borrowing the transparent hex sheet from the 1987 Forgotten Realms Campaign Setting box. Or we could use that as the starting point and tailor a new map to the campaign needs.

Moreover, nothing says we can’t make the peninsula larger than its real-world instance. But, as the area is part of the greater DONJON LANDS setting, I use its actual size. Another DM might do different.

Emmius’s scale (top center) is in German and Belgian miles. Forgoing the conversion, I conjure a modern satellite map. Between the points where the coast meets map’s edge, east and west, I get a distance of about 72 miles and, from north to south, around 60.

Some might balk at these dimensions. Fourty-two hundred square miles is not large for what we usually think of as a campaign area. But I am sufficiently intrigued by the map’s offerings. Plus, I’m interested to find out if we can run a campaign up to domain-level play in such a small area.

At the standard six miles to a quarter-inch hex, the map would measure a minuscule 3" × 2½", and the “postcard campaign” would become all the rage. One mile per hex would make it 18" × 15", out-sizing a US tabloid or international A3 page. Going to the extreme, if we up the one-mile hexes to a half-inch, we’d have a beautiful poster map 36" × 30" for the game room wall.

A tug on the reins and we find a happy medium at six miles per inch. The map area is 12" × 10", which fits nicely on a tabloid/A3 page with space for a legend. The larger page size allows more data. While the campaign area lacks breadth, it might compensate with detail.

One-inch hexes lack granularity. Three miles to the half-inch hex might work. Smaller one-mile hexes would be 16″. Tiny but tempting. Because, if we draw a beautiful map, we can let go the reins, print our work at 300%, and have it mounted.

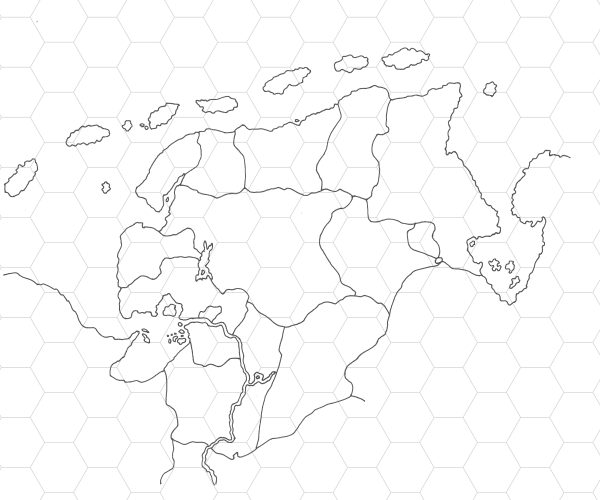
Forsaken Peninsula - one-inch hexes
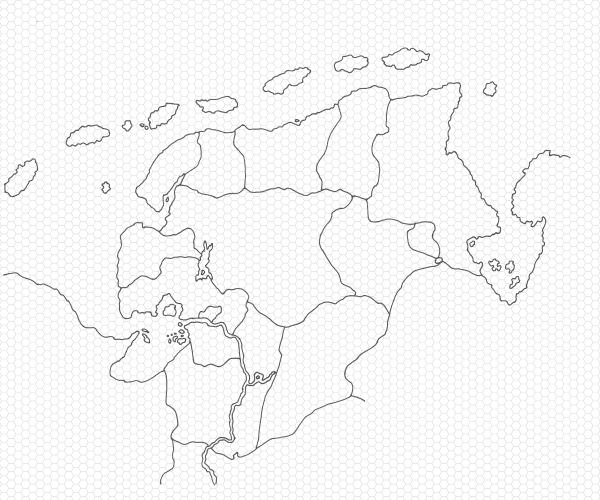
Forsaken Peninsula - half-inch hexes
Forsaken Peninsula - sixth-inch hexes
A Preliminary Map, Showing Coastlines and Counties.
Each version employs a different hex size: one-inch, half-inch, and sixth-inch.

C. PLACE THE DUNGEON AND THE BASE TOWN.

Magic words. “Place the dungeon and the base town” hold power. Whether read silently to oneself or spoken aloud, they deliver a zap! to the mind that brings the process of wilderness design alive. This small step joins the wilderness environment and the adventure locale to create the microcosm that is to be a campaign setting.

Primary Dungeon

On Emmius’s map, the upper right inset shows the domain of Aurich, which is near the center of the interior region—ideal placement for the campaign’s principle adventure locale. We may well preserve the domain’s design: fortress with walled garden. We might embellish the garden with a necropolis, excavated by the warlock, built by the demons in ancient days or, earlier, from the time of the Greater Ones.1

Base Town

The upper left inset depicts Emden, a port city protected on its land flanks by a formidable wall. An obvious base town. I’m thinking to scale it down from city to a large town, leaving room for it to grow into a larger metropolis through the efforts of high-level PCs. We call this the “base town,” but PCs might begin their careers in smaller towns or villages, especially at campaign start.

Secondary Dungeon

Of course, we don’t forget the Pale Moor Keep itself. Laying the Valormr campaign map over the Tabula, I find the fortress in the lower east corner of the Pale Moor, in close proximity to what might be a village marked by Emmius as Straitholt. The landmark, which lies within a wooded area, serves as the location of the now ruined keep.

Secret

Secret #3: Deep below the former demon city is a gate to the Abyss. Its closing marked the downfall of the infernal metropolis. In his tower on the surface above, the warlock either works to reopen the gate or to keep it closed.


1 I should apologize for obtuse references to unexplained aspects of the DONJON LANDS setting. Instead, I promise a forthcoming article that will shed more light.

Added a secret. [07:10 9 August 2022 GMT]

Warlock of the Pale Moor

Inspired by the map and the myth from last week’s “Atlantis of the Clay,” let’s make a campaign. To keep the task manageable, we’ll do only a broad overview. A DM can fill in details to suit.

I intend to follow the steps for Designing a Wilderness provided in the D&D Expert Rulebook. To begin campaign design, though, I refer to an early article from Ray Winninger’s Dungeoncraft column. Again for brevity’s sake, I won’t go through Winninger’s entire process, but the second installment of Dungeoncraft (Dragon #256) is a great way to get started. (See below Old-School D&D Campaign Building and Mapmaking Resources.)

Campaign Hook

After laying down the First Rule of Dungeoncraft, which is worth repeating to oneself every morning and every evening: “Never force yourself to create more than you must” (20), Winninger tutors the campaign builder to begin with a compelling hook. This is the “concept that captures your players’ imaginations and draws them into the game” (21). Winninger divides campaign hooks into five categories:

  • Culture
  • Environment
  • Class or Race
  • Opposition
  • Situation

Even attentive readers may be forgiven for not recognizing the landmass depicted on Ubbo Emmius’s 1730 Tabula Frisiae Orientalis as the location, far into our own future, of the Keep on the Pale Moor.

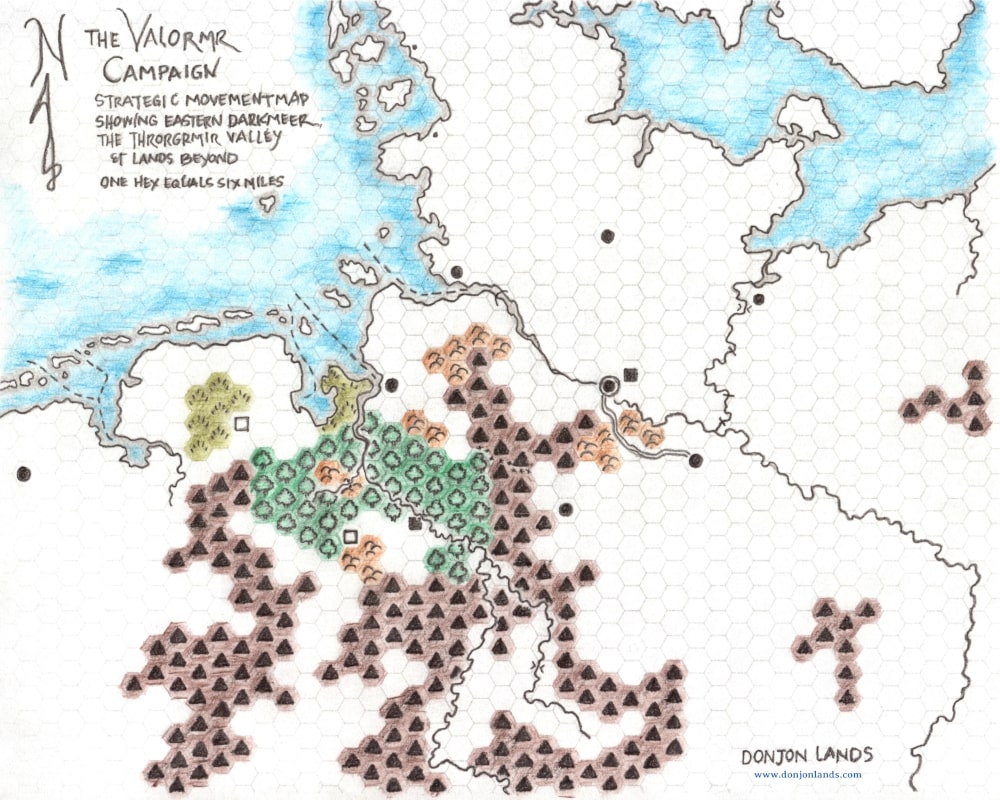
Tabula Frisiæ Orientalis - Ubbo Emmius 1730 Valormr Strategic Map
On the The Valormr Campaign Strategic Movement Map, we find the East Frisia Penninsula in the middle left.

From the Valormr Campaign, we know the keep was constructed by Chaos Armies commander Hadewych the Arbiter to serve as a staging area and supply outpost during the Battle of Throrgrmir. We also know the Forces of Law stormed the fortress as part of a successful plan to cut off Chaos’s supply route.

From my campaign journal, second week of spring, “Day 4, morning: Law storms Keep on the Pale Moor. Garrison destroyed. Warlock saves.”

“Saves” refers to a method, part of a simulator used to expedite the lesser battles, in which heroes and wizards are determined to survive or perish when their unit is defeated. This was the warlock’s second save.

At Valormr’s opening, the warlock was stationed with the Chaos garrison at Port-of-Sands, a day’s march east. When the Forces of Law took the port, the garrison was destroyed, and the warlock, making his first save, retreated to the keep.

Two days later, having saved again following the keep’s storming, the warlock, so I now imagine, fled into the Pale Moor… Here I see the silhouette of an opposition campaign hook.

The Valormr Campaign uses Chainmail, wherein a warlock is a wizard “able to manage” four spells. To fill out the opposition hook, I’ll read the denomination in the traditional sense: the warlock is a practitioner of the black arts who calls on demons and devils to work his malevolent magic. So, while the “warlock” may be the campaign’s arch villain (and probably further advanced in experience levels), he is accompanied by demons and devils, witches, warlocks, and other evil magic-users, as well as evil clerics and—for the old-school in it—an “evil high priest” or two.

Potential allies are lawful clerics and other members of the established church. We might invent or borrow a B/X paladin. Furthermore, I imagine the church has got its hands in secular politics. Through its influence, witchery—any dealings with infernal beings—is unlawful, the crime punishable by death.

… Fleeing deep into the moor’s boggy interior, the warlock discovered the vestiges of an ancient city, sunk beneath the mires. Within cyclopean chambers, dank and dark, much wealth and magic remained. The warlock fell upon grotesque skeletons of unknown beasts, stone vats coated in foul residues, and deep pits containing vile creatures, still living. In perilous forays, he unearthed large tomes, whose covers were embossed with gruesome faces, the pages made from human skin, and the glyphs inscribed thereon protected by dire curses.

Secrets

Winninger closes the article with the Second Rule of Dungeoncraft: “Whenever you design a major piece of the campaign world, always devise at least one secret related to that piece.” For the warlock and his discovery, I have two secrets:

Secret #1: The warlock was a traitor. After his narrow escape from Port-of-Sands and seeing the forces—including a wizard in command of a flying carpet—arrayed against the single battalion which garrisoned the keep, the warlock made a secret deal with the opposition commander. He would open the gates in exchange for safe-conduct.

Secret #2: The city is much more ancient than one might suppose, having been built in the time of the Greater Ones. After the Rending, the ruins were taken over by demons and rebuilt in their grand and chaotic fashion. Even that was long ago. Demonic sanctuaries are since caved in. Any donjons of the Greater Ones are long fallen. Only the warlock’s tower, formidable though crumbling, marks the ground, beneath which much more may yet remain.

Old-School D&D Campaign Building and Mapmaking Resources

This is not an exhaustive list. These are a few resources that I have found useful or inspiring over the years.

  • D&D Expert Rulebook, Designing a Wilderness, X54 (1981)
  • AD&D Wilderness Survival Guide, Starting from Scratch, 103-6 (1986)
  • Campaign Sourcebook and Catacomb Guide, 51-83 (1990)
  • Creative Campaigning, Alternate Campaigns, 3-39 (1993)
  • Ray Winninger’s Dungeoncraft (Dragon, 1999-2002)

While Winninger re-treads some ground covered in the Campaign Sourcebook (above), he integrates campaign-building with mapmaking and does so in an efficient manner, with the goal to get from campaign concept to character creation as quickly as possible while covering all the major concerns along the way.

What resources have you used, whether from D&D or other RPGs, for campaign building and mapmaking?

Atlantis of the Clay

A few months ago I was looking at some old Dutch maps—as one does, when I ran across an article called “Maps of Meaning.” In it, authors Meggy Lennaerts and Jan van der Molen of the University of Groningen Library tell the story of German cartographer Ubbo Emmius, who advocated for historical accuracy in mapmaking in the 16th and 17th centuries.

Incredible to us in our days of satellite imagery, half a millennium ago maps were rarely accurate and often based on less than fact. One such historical inaccuracy, which is discussed in the article, is the bay now called Dollart and the myth of the Atlantis of the Clay.

Sixteenth-century maps showed, correctly, the Dollart, an inlet that formed the west coast of East Frisia (Frisiea Orientalis). Today, the water is so shallow as to reveal the mud at low tide. Many early cartographers included an inset, showing the area of the bay as a lowland dotted with villages. The insets were labeled “the Reiderland,” and indicated a flood which occurred in the year 1277. The information was based on a 1574 map by Jacob Vermeersch.

“[Ubbo Emmius] criticized [established cartographers] for affording local folklore a credibility that it did not merit.” Emmius omitted the deluge in his 1616 map of the area, discounting fables and legends, preferring to rely on primary sources.

According to the myth of the Atlantis of the Clay, the Reiderland was submerged beneath the sea due to the transgressions of its inhabitants. We have discovered since that, while the land did indeed suffer inundation, the flood occurred in 1509—only 65 years before the first map showing it to have been three hundred years prior.

Tabula Frisiae Orientalis - Ubbo Emmius (1730)
Tabula Frisiae Orientalis, Ubbo Emmius, 1730.

What caught my eye was Emmius’s 1730 (posthumous) map. We see the Reiderland flood inset (lower right), added by the publisher after the cartographer’s death in 1625. We note, as well, nicely delineated borders dividing a landmass surrounded by an island-strewn sea. We remark additional insets in the upper corners: one a city (left), the other a fortress (right). When we identify these two, respectively, as base town and ruined castle, the historical map transforms into something more magic. That is, a map depicting an area we may explore in a fantasy adventure campaign.

When we identify these two, respectively, as base town and ruined castle, the historical map transforms into something more magic.

While the date is incorrect, and the flood’s cause may have more to do with nature’s whim than human foible, still, the Reiderland’s 33 villages lie beneath the silt of the tidal flat in this Atlantis of the Clay.

The Phalanx and the Shield Wall

In three issues of The Strategic Review, Gary Gygax describes the spear and its kin: the javelin, lance, and pike, for fantasy adventure gamers (Vol. 1, No. 1, 1975) and details several other pole arms, giving use, length, and a drawing of each (Nos. 2, 4). He revisits the topic in a 1979 Dragon article, “The Nomenclature of Pole Arms” (#22), which is reprinted in Best of Dragon Volume II (1981) and, as an appendix, in AD&D Unearthed Arcana (1985). The corpus is often called Gygax’s “treatise” on pole arms.

The Pandemonium Society recognized the early rendition as a useful resource. Study of the historical use of pole arms, notably the pike, leads inevitably to the phalanx formation and house rules such as those Phenster describes in “Phalanx Fighting.” When we realize we can get two or more weapons in the same frontage normally reserved for one, the tactical advantage is clear.

Phalanx Formation [E]

Whatever its historical meaning, a phalanx, for the Pandemonium Society, is a combat formation in which a spearman—or any combatant armed with a long, thrusting weapon—fights from behind an ally. The phalanx formation is best achieved when the opponent is prevented from closing with the spearman by some means, multiple allies in the fore rank for example.

A pole arm at least eight feet long can attack through one rank; 12 feet or longer, through three ranks; 16 feet, four ranks; 20 feet, five.

Additional Weapons

Phenster’s article mentions two weapons not given in Holmes. For completeness sake, I give them here, each with its weapon class, qualities (see “Weapon Damage and Attack Priority”), and cost, the last of which I determined by my own fiat.

Short Sword [E]

Length: 1-1/2' to 2', weapon class: ordinary (damage: d6), weapon quality: short, cost: 7 g.p.

Long Spear [E]

Length: 10' to 15', weapon class: ordinary (damage: d6), weapon quality: long, two-handed, cost: 3 g.p.

Spear Against Charging Opponents [E]

Any spear versus a charging opponent adds 1 to damage. Set (as against the ground or a wall) versus a charging opponent, it adds 2 to damage.

Maximum Weapon Length in the Dungeon

Two options for limiting overlong weapons in the dungeon’s confines are given here. The latter gets tedious in execution, therefore, I put it in the [P] Pandemonium category (see “About the Reedition of Phenster’s”).

Maximum Length by Weapon Type [E]

In Greyhawk, OD&D Supplement I, Gygax prohibits weapons in the dungeon by type: pikes and pole arms “are not usable in dungeons as a general rule due to length” (15). This works well enough in a campaign with dungeons of usual dimensions.

Maximum Weapon Length Equals Ceiling Height [P]

Hazard’s ceiling height rule is more specific, and Phenster elaborates on the penalties. Carrying a weapon longer than the dungeon’s standard ceiling height is awkward and makes more noise. The DM should reduce the party’s movement to three-quarters normal rate and increase the frequency of wandering monster checks.

Close Order, Ranks, and Quarters

Phenster uses three terms that may be unfamiliar to adventure gamers without military or wargame experience. I define each as I interpret the text, though—still shy of the battle grid—I hesitate to give specific distances. Let’s assume that the normal distance in each case is five feet. The “close” modifier, then, implies some lesser distance.

Close Order: Refers to the distance between allies (left and right) in a rank.

Close Ranks: Refers to the distance between ranks (before and behind). A phalanx formation assumes close ranks.

Close Quarters: Refers to the distance between facing opponents—that is, they are standing toe-to-toe. The situation is achieved by move, when closing to melee, or maneuver, if already engaged (see Maneuver [E]). In close quarters, opponents may attack only with a short, thrusting weapon (a dagger meets these criteria). Otherwise, one or the other may step back by maneuvering (space allowing), or one may push the other (see Shield Wall, below).

Note: As “maneuver” occurs after the melee round in no particular order, when a combatant maneuvers into close quarters, the opponent, if space allows, may also maneuver to step away at the same time.

Shield Wall [E]

Multiple attacks against a single opponent may draw us into a phalanx, but in the shield wall the formation reaches its highest potential. After opposing forces have molested each other with pointy sticks, each side digs in to shove the other backward, employing the weight of its entire phalanx. The goal is to break the opponent’s formation. Once their formation is broken, troops tend to panic, leaving the field to the victors.

To form a shield wall, at least two shield-bearing combatants must be in close order, shields touching if not overlapping.

Shield Wall AC Bonus [E]

Each member of a shield wall, except the rightmost, benefits from the shield of the member on the right, gaining an additional +1 to AC.

Tortoise: Phenster mentions that rear ranks may hold their shields overhead against missile fire. The action is, however, cosmetic, as they would already count the shield’s bonus in their AC.

Shield Wall Push [P]

A shield wall, as described below, gets away with a lot of footwork. Previously eschewing Holmes’s static combat, Phenster allows a combatant, even while engaged in melee, to move but “just not very far” (L’avant garde #35, see also Maneuver [E]). A successful push can easily move both sides quite far. Perhaps the Pandemonium Society used other rules, unpublished, in addition to those in the article. As is, some extrapolation is required, which I do. For its ambiguity, I class Push in [P] Pandemonium. DMs should be prepared to adjudicate.

A shield-bearing rank, whether part of a phalanx or not, or an individual may, following the melee round (see Maneuver [E]), step into close quarters with an opponent and push the opponent backward.

  • Each side rolls dice equal in size and quantity to their total hit dice. All troops in the formation, no matter the number of ranks, are considered. In the case of large forces, the number of dice may be reduced proportionally. For example, 100d8 versus 80d6 becomes 10d8 versus 8d6.
  • The side with the higher result pushes the other side backward a number of feet equal to the positive difference. If a formation is pushed backward a distance equal to its combat move rate in a single round, or if it is pushed a total of three times its move rate, the formation is broken.
  • A broken formation must immediately make a morale check (NPCs only) with a -1 penalty. A failed check indicates a retreat: members run away (combat move ×3) and cannot defend (-2 AC). On a successful check, the force withdraws: members can defend (but not attack) while moving at combat speed to the rear. Once withdrawn, the phalanx is considered reformed at the beginning of the next round.
Phalanx Fighting

In his Letter from the Editor (L’avant garde #46, June 1982), Steve Ruskin introduces the following article with a backhanded compliment:

“And it looks like our young friends of the Pandemonium Society are progressing (or regressing) into wargaming. This time Phenster & Co. have dug up Gygax’s pole arms treatise to field a phalanx formation. I don’t recall that anyone in the [East Middleton Wargamers] Association has tried to do such a thing at man-to-man scale. Points to the kids for this admirable attempt. Typical for Phenster’s contributions, I’m sure there are useful rules in there somewhere. Up to you to figure them out.”

Phalanx Fighting

Ivanhoe gave us some old copies of Strategic Review, which is about D&D and some other stuff, like wargames. Ivanhoe said it's like Dragon magazine but from a long time ago. We found some articles about spears and pole arms, and Cypher looked it up in the set of encyclopedias she has at home, as she likes to do. She wrote a book report about what all she found out, and we added it to Cypher's Codex, which is a 3-ring binder we keep with all her research in it.

Spears

A normal spear is from 6 to 9 feet long. You can throw it as a missile weapon or use it hand-to-hand by thrusting it at your opponent. A long spear is between 9 and 15 feet. It's too long to throw, but with a spear at least 8 ft. long, you can attack an opponent from behind a rank of allies (which you can do with any pole arm, including halberds). A 12-ft. long spear can reach through 2 ranks of fighters.

Pikes

A pike is a spear 15 feet long or even longer. It can reach through 3 or more ranks of fighters. We can't take pikes into the dungeon, usually. Hazard's rule of thumb is that we can use weapons equal in length to the dungeon's regular ceiling height or less but no longer. We tried it one time. We had 12-ft. long spears in a dungeon with ceilings 10 ft. high. They slowed us down, and we made a lot of noise. Then, when a bunch of goblins attacked us (because of all the noise) from the side corridor, we couldn't even get the spearmen into position to defend our flank.

Phalanx

We arm men-at-arms with plate mail (when we can afford it) and shields with spears and short swords. We put them in 3 ranks, 4 across, in a 10-ft. hallway. When we meet monsters, the 1st rank throws their spears if they have time. If not--like when we're surprised--they drop their spears and draw their swords. Once we're closed for melee, the 1st rank fights with short sword and the 2nd rank attacks with their spears. The 3rd rank replaces any wounded or killed in action.

If we go into a room or a wider corridor, the ranks can spread out to fill a 20' wide front (that's 5' per man) or change to a formation 2 ranks x 6 men, 30 feet wide. In close order (2 and a half ft. per man), you can't swing a sword. You have to use a short, thrusting weapon, like a short sword or a dagger.

(A sword needs at least 3' to use effectively. Most other big weapons, for example, a battle axe or a morning star, need at least 5'.)

When we're outside, exploring the wilderness or fighting a big battle for example (not in the dungeon), we can have many ranks (up to 10 or even 20) in a phalanx. We put missile weapons (javelins, slings, bows) behind the phalanx to fire over their heads at the enemy not in melee. But we have to protect the flanks with other troops (cavalry is best), because the phalanx doesn't maneuver very quickly.

Charging

A phalanx can charge, but it only moves 50% faster than normal. A spearman (or any armored fighter) gets a +1 bonus on damage due to momentum. If you attack a charging opponent with a spear, you get a +1 bonus on damage. You can also "set the spear" (brace it against a wall or the floor) against a charging opponent. Then you get +2 on damage.

Shield Wall

Another thing we like to do in a phalanx is make a shield wall. Short swords or normal spears only, because long spears need two hands to hold. When you make a shield wall, each man-at-arms stands shoulder to shoulder in close order formation. The front rank holds their shields so they overlap. A shield usually gives you 1 better armor class, but in a shield wall you get +2, except for the man on the right end. Ranks behind the front can hold their shields over their heads against missile fire attacks.

With a shield wall, the formation can push the enemy backward. We count the hit dice of every man-at-arms in the formation. The total dice are rolled and compared to the hit-dice roll of the enemy formation. (Add strength bonuses for characters too.) The difference in the two totals is the number of feet the winner pushes the loser back. If one side pushes the other side more than their combat move rate in one round, or a total of thrice their move rate, then the other side's formation is broken. The broken formation has to check morale (-1 penalty) to stay in the fight. When men-at-arms are pushing with their shields like that, they are in close-quarters combat. They can't attack, except with a dagger or their fists if they have a free hand.