A Forsaken Peninsula

How many times I’ve stepped through the process I cannot count. Maybe there are other ways. Maybe those ways are better. But the D&D Expert Rulebook’s Designing a Wilderness (X54) has the advantage of brevity and, after long use, familiarity. Furthermore, even after all these years, the lettered steps never fail to spark the imagination.

After determining the campaign hook in “Warlock of the Pale Moor,” we embellish the old map, original source of our inspiration.

Reading Map

Outlining a B/X D&D campaign. As sometimes happens at the outset, I thought to do this all in one article…

A. DECIDE ON A SETTING.

The setting is based on a historical map, Ubbo Emmius’s Tabula Frisiae Orientalis. On the map, a broad, lowland peninsula lies between two inlets, east and west. It shares a long land border with the mainland in the south and is accompanied by a chain of islands in the north.

Tabula Frisiæ Orientalis - Ubbo Emmius 1730
Tabula Frisiae Orientalis, Ubbo Emmius, 1730.
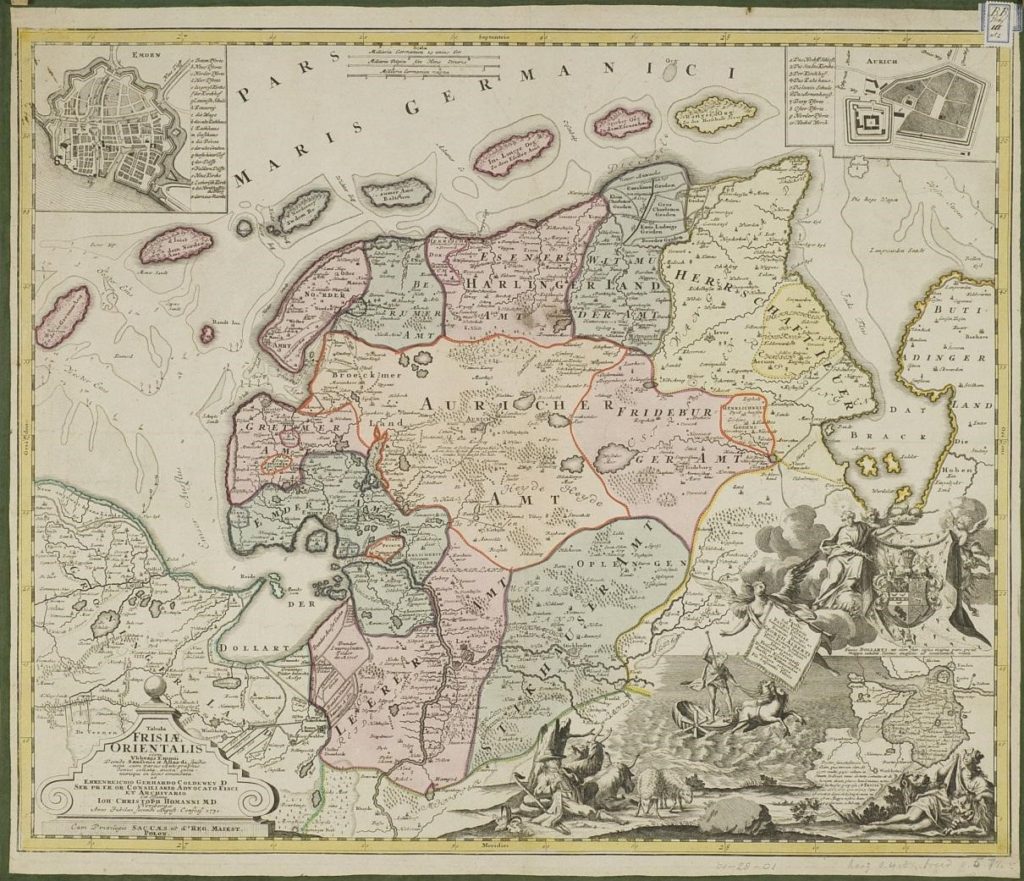
Find this map in high-resolution on the University of Groningen website at https://facsimile.ub.rug.nl/digital/collection/Kaarten/id/1410.

The map’s political boundaries (in color) define a large central region that extends to the peninsula’s west coast and is otherwise surrounded by smaller areas. To incorporate our campaign hook—opposition to the warlock and infernal hordes—I imagine that the center is a forsaken wilderness. The surrounding areas are civilized fiefs, inhabitants of which dare not enter the interior for fear of the aforementioned hordes. Each of the islands belongs to one or another of these fiefs. Beyond the colored boundaries, a few other domains, extending off the map, make land neighbors of lesser importance to the campaign. All this keeps the setting contained, focusing on the Pale Moor.

B. DRAW A MAP OF THE AREA.

We could just print Emmius’s map at a suitable scale and lay a hexagon grid over it, possibly borrowing the transparent hex sheet from the 1987 Forgotten Realms Campaign Setting box. Or we could use that as the starting point and tailor a new map to the campaign needs.

Moreover, nothing says we can’t make the peninsula larger than its real-world instance. But, as the area is part of the greater DONJON LANDS setting, I use its actual size. Another DM might do different.

Emmius’s scale (top center) is in German and Belgian miles. Forgoing the conversion, I conjure a modern satellite map. Between the points where the coast meets map’s edge, east and west, I get a distance of about 72 miles and, from north to south, around 60.

Some might balk at these dimensions. Fourty-two hundred square miles is not large for what we usually think of as a campaign area. But I am sufficiently intrigued by the map’s offerings. Plus, I’m interested to find out if we can run a campaign up to domain-level play in such a small area.

At the standard six miles to a quarter-inch hex, the map would measure a minuscule 3" × 2½", and the “postcard campaign” would become all the rage. One mile per hex would make it 18" × 15", out-sizing a US tabloid or international A3 page. Going to the extreme, if we up the one-mile hexes to a half-inch, we’d have a beautiful poster map 36" × 30" for the game room wall.

A tug on the reins and we find a happy medium at six miles per inch. The map area is 12" × 10", which fits nicely on a tabloid/A3 page with space for a legend. The larger page size allows more data. While the campaign area lacks breadth, it might compensate with detail.

One-inch hexes lack granularity. Three miles to the half-inch hex might work. Smaller one-mile hexes would be 16″. Tiny but tempting. Because, if we draw a beautiful map, we can let go the reins, print our work at 300%, and have it mounted.

Forsaken Peninsula - one-inch hexes
Forsaken Peninsula - half-inch hexes
Forsaken Peninsula - sixth-inch hexes
A Preliminary Map, Showing Coastlines and Counties.
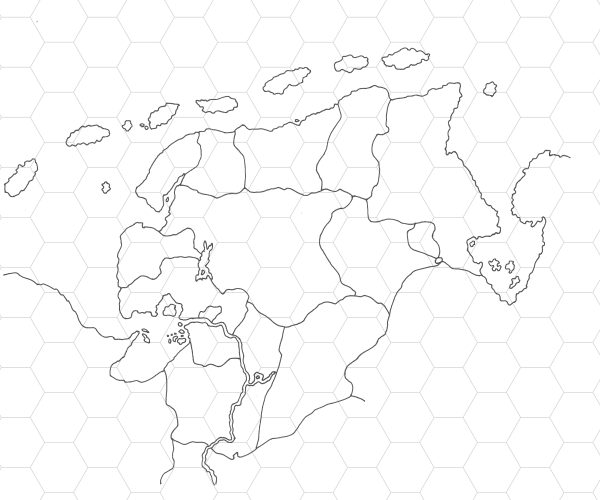
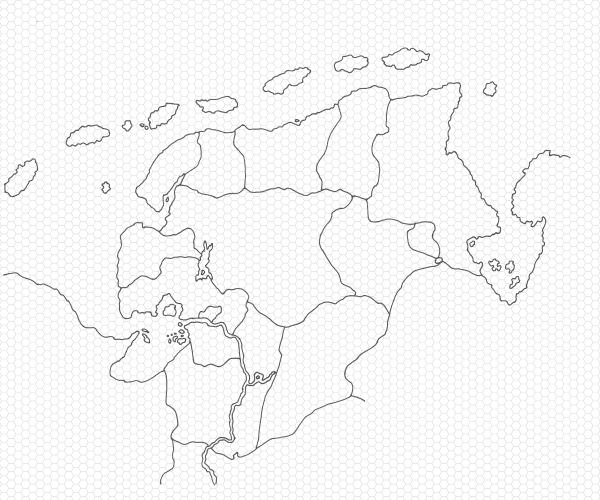
Each version employs a different hex size: one-inch, half-inch, and sixth-inch.

C. PLACE THE DUNGEON AND THE BASE TOWN.

Magic words. “Place the dungeon and the base town” hold power. Whether read silently to oneself or spoken aloud, they deliver a zap! to the mind that brings the process of wilderness design alive. This small step joins the wilderness environment and the adventure locale to create the microcosm that is to be a campaign setting.

Primary Dungeon

On Emmius’s map, the upper right inset shows the domain of Aurich, which is near the center of the interior region—ideal placement for the campaign’s principle adventure locale. We may well preserve the domain’s design: fortress with walled garden. We might embellish the garden with a necropolis, excavated by the warlock, built by the demons in ancient days or, earlier, from the time of the Greater Ones.1

Base Town

The upper left inset depicts Emden, a port city protected on its land flanks by a formidable wall. An obvious base town. I’m thinking to scale it down from city to a large town, leaving room for it to grow into a larger metropolis through the efforts of high-level PCs. We call this the “base town,” but PCs might begin their careers in smaller towns or villages, especially at campaign start.

Secondary Dungeon

Of course, we don’t forget the Pale Moor Keep itself. Laying the Valormr campaign map over the Tabula, I find the fortress in the lower east corner of the Pale Moor, in close proximity to what might be a village marked by Emmius as Straitholt. The landmark, which lies within a wooded area, serves as the location of the now ruined keep.

Secret

Secret #3: Deep below the former demon city is a gate to the Abyss. Its closing marked the downfall of the infernal metropolis. In his tower on the surface above, the warlock either works to reopen the gate or to keep it closed.


1 I should apologize for obtuse references to unexplained aspects of the DONJON LANDS setting. Instead, I promise a forthcoming article that will shed more light.

Added a secret. [07:10 9 August 2022 GMT]

Warlock of the Pale Moor

Inspired by the map and the myth from last week’s “Atlantis of the Clay,” let’s make a campaign. To keep the task manageable, we’ll do only a broad overview. A DM can fill in details to suit.

I intend to follow the steps for Designing a Wilderness provided in the D&D Expert Rulebook. To begin campaign design, though, I refer to an early article from Ray Winninger’s Dungeoncraft column. Again for brevity’s sake, I won’t go through Winninger’s entire process, but the second installment of Dungeoncraft (Dragon #256) is a great way to get started. (See below Old-School D&D Campaign Building and Mapmaking Resources.)

Campaign Hook

After laying down the First Rule of Dungeoncraft, which is worth repeating to oneself every morning and every evening: “Never force yourself to create more than you must” (20), Winninger tutors the campaign builder to begin with a compelling hook. This is the “concept that captures your players’ imaginations and draws them into the game” (21). Winninger divides campaign hooks into five categories:

  • Culture
  • Environment
  • Class or Race
  • Opposition
  • Situation

Even attentive readers may be forgiven for not recognizing the landmass depicted on Ubbo Emmius’s 1730 Tabula Frisiae Orientalis as the location, far into our own future, of the Keep on the Pale Moor.

Tabula Frisiæ Orientalis - Ubbo Emmius 1730 Valormr Strategic Map
On the The Valormr Campaign Strategic Movement Map, we find the East Frisia Penninsula in the middle left.

From the Valormr Campaign, we know the keep was constructed by Chaos Armies commander Hadewych the Arbiter to serve as a staging area and supply outpost during the Battle of Throrgrmir. We also know the Forces of Law stormed the fortress as part of a successful plan to cut off Chaos’s supply route.

From my campaign journal, second week of spring, “Day 4, morning: Law storms Keep on the Pale Moor. Garrison destroyed. Warlock saves.”

“Saves” refers to a method, part of a simulator used to expedite the lesser battles, in which heroes and wizards are determined to survive or perish when their unit is defeated. This was the warlock’s second save.

At Valormr’s opening, the warlock was stationed with the Chaos garrison at Port-of-Sands, a day’s march east. When the Forces of Law took the port, the garrison was destroyed, and the warlock, making his first save, retreated to the keep.

Two days later, having saved again following the keep’s storming, the warlock, so I now imagine, fled into the Pale Moor… Here I see the silhouette of an opposition campaign hook.

The Valormr Campaign uses Chainmail, wherein a warlock is a wizard “able to manage” four spells. To fill out the opposition hook, I’ll read the denomination in the traditional sense: the warlock is a practitioner of the black arts who calls on demons and devils to work his malevolent magic. So, while the “warlock” may be the campaign’s arch villain (and probably further advanced in experience levels), he is accompanied by demons and devils, witches, warlocks, and other evil magic-users, as well as evil clerics and—for the old-school in it—an “evil high priest” or two.

Potential allies are lawful clerics and other members of the established church. We might invent or borrow a B/X paladin. Furthermore, I imagine the church has got its hands in secular politics. Through its influence, witchery—any dealings with infernal beings—is unlawful, the crime punishable by death.

… Fleeing deep into the moor’s boggy interior, the warlock discovered the vestiges of an ancient city, sunk beneath the mires. Within cyclopean chambers, dank and dark, much wealth and magic remained. The warlock fell upon grotesque skeletons of unknown beasts, stone vats coated in foul residues, and deep pits containing vile creatures, still living. In perilous forays, he unearthed large tomes, whose covers were embossed with gruesome faces, the pages made from human skin, and the glyphs inscribed thereon protected by dire curses.

Secrets

Winninger closes the article with the Second Rule of Dungeoncraft: “Whenever you design a major piece of the campaign world, always devise at least one secret related to that piece.” For the warlock and his discovery, I have two secrets:

Secret #1: The warlock was a traitor. After his narrow escape from Port-of-Sands and seeing the forces—including a wizard in command of a flying carpet—arrayed against the single battalion which garrisoned the keep, the warlock made a secret deal with the opposition commander. He would open the gates in exchange for safe-conduct.

Secret #2: The city is much more ancient than one might suppose, having been built in the time of the Greater Ones. After the Rending, the ruins were taken over by demons and rebuilt in their grand and chaotic fashion. Even that was long ago. Demonic sanctuaries are since caved in. Any donjons of the Greater Ones are long fallen. Only the warlock’s tower, formidable though crumbling, marks the ground, beneath which much more may yet remain.

Old-School D&D Campaign Building and Mapmaking Resources

This is not an exhaustive list. These are a few resources that I have found useful or inspiring over the years.

  • D&D Expert Rulebook, Designing a Wilderness, X54 (1981)
  • AD&D Wilderness Survival Guide, Starting from Scratch, 103-6 (1986)
  • Campaign Sourcebook and Catacomb Guide, 51-83 (1990)
  • Creative Campaigning, Alternate Campaigns, 3-39 (1993)
  • Ray Winninger’s Dungeoncraft (Dragon, 1999-2002)

While Winninger re-treads some ground covered in the Campaign Sourcebook (above), he integrates campaign-building with mapmaking and does so in an efficient manner, with the goal to get from campaign concept to character creation as quickly as possible while covering all the major concerns along the way.

What resources have you used, whether from D&D or other RPGs, for campaign building and mapmaking?

Atlantis of the Clay

A few months ago I was looking at some old Dutch maps—as one does, when I ran across an article called “Maps of Meaning.” In it, authors Meggy Lennaerts and Jan van der Molen of the University of Groningen Library tell the story of German cartographer Ubbo Emmius, who advocated for historical accuracy in mapmaking in the 16th and 17th centuries.

Incredible to us in our days of satellite imagery, half a millennium ago maps were rarely accurate and often based on less than fact. One such historical inaccuracy, which is discussed in the article, is the bay now called Dollart and the myth of the Atlantis of the Clay.

Sixteenth-century maps showed, correctly, the Dollart, an inlet that formed the west coast of East Frisia (Frisiea Orientalis). Today, the water is so shallow as to reveal the mud at low tide. Many early cartographers included an inset, showing the area of the bay as a lowland dotted with villages. The insets were labeled “the Reiderland,” and indicated a flood which occurred in the year 1277. The information was based on a 1574 map by Jacob Vermeersch.

“[Ubbo Emmius] criticized [established cartographers] for affording local folklore a credibility that it did not merit.” Emmius omitted the deluge in his 1616 map of the area, discounting fables and legends, preferring to rely on primary sources.

According to the myth of the Atlantis of the Clay, the Reiderland was submerged beneath the sea due to the transgressions of its inhabitants. We have discovered since that, while the land did indeed suffer inundation, the flood occurred in 1509—only 65 years before the first map showing it to have been three hundred years prior.

Tabula Frisiae Orientalis - Ubbo Emmius (1730)
Tabula Frisiae Orientalis, Ubbo Emmius, 1730.

What caught my eye was Emmius’s 1730 (posthumous) map. We see the Reiderland flood inset (lower right), added by the publisher after the cartographer’s death in 1625. We note, as well, nicely delineated borders dividing a landmass surrounded by an island-strewn sea. We remark additional insets in the upper corners: one a city (left), the other a fortress (right). When we identify these two, respectively, as base town and ruined castle, the historical map transforms into something more magic. That is, a map depicting an area we may explore in a fantasy adventure campaign.

When we identify these two, respectively, as base town and ruined castle, the historical map transforms into something more magic.

While the date is incorrect, and the flood’s cause may have more to do with nature’s whim than human foible, still, the Reiderland’s 33 villages lie beneath the silt of the tidal flat in this Atlantis of the Clay.

Research

“Information about the previous culture may require research…. Information that may be learned through this method is noted in each room accompanied by the domain(s) to which it belongs: arcane, history, or religion.”

—from “2A. An Unheeded Warning,” heading Common Knowledge and Research

Institutions

Characters may conduct research at the Magic-User’s Guild Library and the Temple Archive. While history may be learned at either institution, arcane knowledge may only be discovered at the Magic-User’s Guild Library, and information about religion only at the Temple Archive. All knowledge concerning religion is recorded in Sacred Signs.

Access to the Magic-User’s Guild Library is free for guild members. Non-members must pay 10 g.p. per day. Only devout tithers may enter the Temple Archive. A tither gives 10% of all income (usually treasure) before taxes (including the gate tax). A devout character, generally, is one who regularly attends rituals and services, but the exact definition is left to the discretion of the bishop. A rich tithe tends to encourage leniency.

Conducting Research

Every four hours of research earns one Intelligence check. When researching arcane knowledge, a successful result yields some information.

Researching information about religion, a successful Intelligence check must be followed by a Wisdom check made by a character who reads Sacred Signs. Failure means no sense can be made from the signs. Success means the character has correctly interpreted the signs. Only then is the information imparted.

A character may work up to 12 hours, but no character can have more than two successes in a single day.

Research Question

Research usually begins with a question and a choice of research institution. The research question guides the character’s line of inquiry as well as the DM’s choice of knowledge to impart. If there is no related knowledge in the domain accessible at the institution, the check fails automatically after the required period of study. The DM should inform the player that no pertinent information about the question is available.

Without a research question, a character has a 1-in-20 chance to find something interesting at the end of the research period. If successful, the character may follow the lead to continue study and earn an Intelligence check at the end of the next period.

Player Knowledge

As the culture represented in Dreaming Amon-Gorloth is derived from Egyptian and other ancient Near Eastern mythologies, players might guess some information based on their own knowledge. This is wonderful and to be encouraged.

But, because the culture here is not an exact copy of those mythologies, only through research can the character prove or disprove the player’s hunch. Thus, using real world knowledge, the player interrogates the fantasy world.

Alternatively, the DM might confirm the player’s information, if correct, or inform the player that it works differently here.

The Research Puzzle

Research is intended not as an encounter, role-playing or otherwise, but as an extended puzzle. A bit of information alone, or a couple bits together, might be a clue to help the party to overcome an obstacle or avoid disaster. Some information is only a piece of a puzzle the players put together over the course of the campaign.

The interesting part of research is puzzling out the clues. So, while the players may spend as much time as they like in this discussion, the research periods should pass with a dice roll.

Sacred Signs

Created by Thawt and revealed to the priesthood by Amon, Sacred Signs constitute a pictographic script. Similar to Egyptian hieroglyphs, each sign or glyph represents a discreet thing, action, or idea or serves to clarify another sign. Sacred Signs are carved or painted on stone, painted on papyrus, and pressed into leathery clay tablets. Those pressed into tablets are often fired, as the information they convey is intended to endure. All religious texts are written in Sacred Signs.

Sacred Signs

Learning to read and write Sacred Signs was once reserved for the clergy. Through interpretation of the signs, the priesthood leveraged the power of the temple against that of the throne. Since the rise of the Sun King, who embodies the divine power of the Solar Goddess, non-clergy are permitted to learn Sacred Signs. The temple frowns on the practice, though, and only teaches Sacred Signs to its acolytes. Temple priests are fond of saying that anyone can learn what the glyphs represent, but only one endowed with the wisdom of the Solar Goddess may correctly interpret Sacred Signs.

Characters of other classes may learn to read Sacred Signs from a sage. Non-clerics who make it known they can read Sacred Signs suffer a -1 penalty to reaction checks when dealing with any temple priest.

Sacred Signs is a written language, not a spoken one. Like any other language, learning to read and write Sacred Signs takes an added language from high intelligence.

Embrace the Heart of Darkling

This one taunts me. It crouches on one knee at the bottom of the “Ideas” drawer. When I open the drawer, it gawks at me. Its protuberant eyes—perfect circles, all whites—fix me with unmoving stare. Dark blue lips, segmented like two worms, rim the inky hole mouth. It has not teeth nor gums, only bare jawbones that gnash the air when it speaks.

Certain has it crept from far beneath the lighted world, through cramped passageways, mayhap along the very watercourse whose banks are lined on the water-stained pages it presses under a flabby arm.

Jaws gnashing, blue lips quaver in slow undulation, and in a voice, not a whisper but so quiet one must bend into the drawer to hear, it rasps, “The horror… the horror…”


It would be a huge project. To date, Dyson Logos’s Heart of Darkling comprises 28 maps for 17 adventure locations. On the Dodecahedron, Dyson states his intention: 20 locations on the subterranean river and the lake at its mouth, the number of maps for which could exceed 40.

The taunt: to stock the score of adventure locations of Heart of Darkling to complete the underworld campaign.

Not that I myself would ever undertake such an endeavor. Should one be so daring, a Heart of Darkling campaign might be inspired by Joseph Conrad’s 1899 novella Heart of Darkness, augmented by Francis Ford Coppola’s film Apocalypse Now Redux (2001), and filled out with a study of critical analyses on both to include their themes and devices in the campaign.

As a major theme of the novella is criticism of colonialism and its exploitation of indigenous peoples, a campaign might take the opportunity to address issues with which DUNGEONS & DRAGONS now struggles. They are, generally, how the game portrays various fantastic races and how alignments are used in the game setting. This should be done well, with respect and empathy, or not at all.

Moreover, I’m not convinced that addressing such delicate issues within the game itself is a good idea. Our notions and attitudes about race and alignment in the game are ever-changing—one hopes toward the more inclusive. An attempt to portray better ways to handle these elements in a product would be only a snapshot of progress at the time of publication.

On the other hand, like Conrad’s novella, a work of art is often such a snapshot. A snapshot taken of a moving shoreline along a journey through our own hearts of darkness.

The Pillars - Heart of DarklingThe Pillars.

In conversation with the map god, he might give away his intended location, obvious when we read the text, for the climactic scene as the Pillars, where abides the charismatic ur-priest and its flock of deep-dwelling humanoids.

“The horror! The horror!”

2B. Menturoc, Ardent Champion

Herein is described a sublevel of the Deep Halls, the site of our dungeon exploration in Dreaming Amon-Gorloth. Numbered encounter areas refer to the keyed map in “Keys to the Deep Halls.”

During the war, Menturoc, Ardent Champion1 of the Solar Goddess, and the Nine Companions led an assault on 132. Gate of the Inner Redoubt (5G). The assault succeeded, and the dreaming priests were vanquished. But Menturoc and the Nine Companions fell in battle, all slain except the ardent champion, who was in a state of profound unconsciousness.

Though his wounds were slight, Menturoc appeared dead. The Radiant Host entombed the comatose body in 6. Hall of Menturoc’s Tomb and interred the Nine Companions in sarcophagi in 5. Mausoleum of the Nine Companions.

α2 A sour odor of offal pervades the corridor between areas 4, 5, and 6.

4. Shrine to the Solar Goddess

The odor in this room smacks the face. The opposite wall is painted with symbols around a blank central area. The symbols are pitted and cracked, as if by blunt instruments, and smeared with offal. The blank area is marked by two stonework protrusions. Before it, an open pit is filled with refuse and crawling with giant beetles, mandibles sawing.

This room was originally a shrine to the Scarab God. Before the redoubt’s storming, when victory was close at hand, Menturoc converted it to the worship of the Solar Goddess. He modified existing symbols to fit the chief divinity and mounted a lion’s head, carved from stone and gold-plated, on the northeast wall. Menturoc fixed a decanter of endless water within the lion’s head to make a fountain. Digging through the floor, he built a bath, where the faithful might cleanse themselves.

Returning after the war, the dreaming priests desecrated the shrine and removed the lion’s head fountain. Not taking the time to reconsecrate the shrine to the Scarab God, they now use this room to keep bombardier beetles3. Adepts dump the priests’ organic waste into the former bath. They sometimes lead a few beetles out of the level. The beetles then roam the Deep Halls until they find their way back to the feed trough.

Inspection of the mural reveals many scarab symbols showing through fading over-painted areas.

Bombardier Beetles (3-12)

The beetles stay in the pit unless lured out. If they are disturbed in any way, or if a light source remains for more than two turns without a feeding, they release a defensive cloud of noxious gas with an explosive noise.

Common Knowledge:

  • The scarab is a heretical symbol, for it was thought to push up the sun each morning—a task reserved for the Solar Goddess.

Research:

  • The scarab is the symbol of a god who represented the rising sun and the daily renewal of life in the Amwan Culture (religion).

5. Mausoleum of the Nine Companions

Stinking offal is piled high just inside the door. Beyond, nine open sarcophagi line the walls of the room. The lids are on the floor, some broken.

After removing the heads from their corpses, the dreaming priests animated the Nine Companions, who now roam the Deep Halls in search of their skulls. (See 2. Reliquary, 2A.) Now, adepts use this room to store refuse that will be fed to the beetles in 4. Shrine to the Solar Goddess.

Other than refuse in the near sarcophagi, all are empty.

Refuse Heap: Searching through the offal may reveal the following items (50% chance per turn).

Treasure (d6)
1-3 Pouch containing 50 c.p.
4-5 Gem (10 g.p.)
6 Scarab, faience (25 g.p.)

6. Hall of Menturoc’s Tomb

Murals on the north and south walls, stretching into darkness, depict ibises, papyrus plants, tablets and styluses, apes, and moon discs. In the middle of the hall, a stairway descends.

On the other side of the stair well, an anthropoid sarcophagus rests on a 10' × 6' dais, 1' high. The sarcophagus is 8' × 5' and 5' high. Carved from limestone, its cover depicts a male figure in armor and headdress, a sword upon its breast.

Each door in this room is framed by a carved motif of repeated symbols.

  • East Door: Ibises.
  • North Door: Tablets.
  • South Door: Styluses.

The murals continue on the walls of the west corridors, wrapping around the ends and coming back, to meet at the wall behind the sarcophagus, which hides the painting’s lower portion. On that wall, just above where the sarcophagus meets it, is the symbol of a tablet and stylus above an inscription in Sacred Signs [described later].

A TOOL TO REMEMBER
A TOOL TO FORGET

Menturoc’s Tomb

The sarcophagus rests against the far wall between the west corridors. It’s three exposed sides bare the following decoration.

East

An inscription:

ARDENT CHAMPION
OF THE SOLAR GODDESS
MENTUROC

North

Another inscription:

MENTUROC

VANQUISHER OF THOSE WHO DREAM
BUILDER OF THE FOUNTAIN SHRINE

FELL IN THE STORMING OF THE INNER REDOUBT

THE SOLAR GODDESS SHINES FOREVER ON THE SUN KING

South

Representation of a door, 5' × 3', carved and painted with images of a warrior wielding a sword, confronting enemies. Vanquished foes lay beneath his feet. The door is framed by a series of ram-headed humanoids with long, curling tongues extended.

Formerly a shrine to Thawt, god of wisdom, writing, and magic, this hall now houses Menturoc’s tomb, constructed by the Radiant Host.

Some time after the Radiant Host’s departure, a dreaming mage known as “the Renegade” reentered the Deep Halls. Discovering Menturoc’s comatose state, the Renegade spoke to the ardent champion in dream. The two agreed that Menturoc should remain entombed until the time is advantageous to take on the dreaming priests again.

Door to Dreams: The Renegade set a dweomer upon the tomb. Touching the false door triggers a sleep spell. In that way, Menturoc may speak with any visitors. See Menturoc’s Quest, below. The spell effects all creatures within the hall.

Menturoc’s Quest

Any characters who sleep or otherwise fall unconscious in this room slip into a dream. As the dream begins, the characters are lying on the floor in the same position as when they went to sleep. Looking around, they can see everything in the chamber, except any waking characters—that is, any creature not dreaming. Though there is no light, they can see anything within line of sight, as if physical objects are illuminated from within. They hear a hissing noise and a slither as a giant snake enters from the southern west corridor.

Dreaming characters have all equipment and resources, including hit points and spells, as at the moment of sleep. They can perform any action, as normal, but may interact only with other dreaming creatures.

Waking characters do not see into the dream. In the waking world, their dreaming companions are sound asleep. They may of course rouse their companions in the usual way. But events in dream happen quickly; play out the full encounter before the characters wake.

Upon waking, any character who took damage or cast spells in the dream must make a save vs. Death Ray. Success indicates any damage is ephemeral and any spells cast are remembered. Failure means any damage manifests in the physical body as the character wakes, and any spells cast in the dream are forgotten.

Any other resources expended in the dream, such as ammunition or oil, are present.

The states waking and dreaming are fully explained later.

Snake, Rock Python (1)

The dreaming priests discovered the sleeping trap and put a dream guard in the hall. The giant snake attacks any dreaming characters. In the first round of combat, the ardent champion exits the tomb, ducking through the door. He is armored and fights with a sword, attacking the snake in the second round.

Dreaming Ardent Champion, Menturoc

After the combat, Menturoc addresses any dreaming characters:

“If you will defeat the dreaming priests, cleanse the defiled shrine and reconsecrate it to the Solar Goddess. For it will then serve as a haven for those worthy of its protection.”

After delivering the quest, Menturoc dispells the sleep spell with his sword, a holy sword +5, and the characters wake only moments after having fallen asleep.

To complete Menturoc’s quest, the PCs must rid 4. Shrine to the Solar Goddess of the beetles and remove all refuse. A cleric of the Solar Goddess must then perform a consecration ritual. But first, the PCs must restore the lion’s head fountain, which is in 17. Pit of Heavy Hearts.

Opening the Tomb

The sarcophagus cover and its seam bare no marks or any other indication that the tomb has ever been opened. The 8' × 5' lid with the anthropoid relief, is 1' thick. It weighs three tonnes. To the DM to adjudicate attempts to remove the cover or break through it. The dreaming priests used a passwall spell (cast by a dreaming mage) to enter and remove all grave goods, including Menturoc’s armor and sword.

Common Knowledge:

  • Demons are commonly depicted as humanoids with animal heads and out-stuck tongues.
  • Often depicted on tombs, a false door is the means by which the soul departs on its journey to the underworld.

Research:

  • Demons guard a series of gates through which a soul must travel to the underworld (religion).
  • Thawt, inventor of the tablet and stylus, presented them to Amon, who said, “Thawt, with the stylus, man writes memories on the tablet and forgets them” (religion).

7. Forgotten Archive

Threadbare rags and broken pottery litter the floor.

Here, the dreaming priests discard useless items that cannot be fed to the beetles. The clay is shards of tablets and a broken cup. The few visible glyphs on the shards are too fragmented to be deciphered. The inside of the cup is stained dark green.

8. Workshop

Three large bowls on the floor are filled with water and clay. Hanging from a wooden rack, a couple of filled linen sacks drip water. Two small mallets lay next to several damp clay tablets on a wooden table.

In the west end, carved into the wall, a human male figure with an ibis head stands eight feet high. He holds a tablet in one hand. The other hand rests on the mounting frame of a lever, which resembles a stylus and protrudes from the wall at an upright angle.

The dreaming priests recycle unfired clay tablets in this room.

Thawt’s Lever: Pulling the lever has two effects: One, the character who pulls the lever forgets everything that happened in the last 24 hours. No memories remain, including all spells, clerical or magical, acquired during that time. Two, any objects or creatures in 7. Forgotten Archive are teleported to 143. Labyrinth of Forgotten Dreams.

Sometimes, in their interpretation of the channeled dreams of Amon-Gorloth, its priests make errors. To rid themselves of any unfortunate manifestations as well as purge their memory of the error, a priest places the artifacts in 7. Forgotten Archive then pulls this lever.

Thawt’s Lever
Thawt’s Lever of Forgetfulness

Wandering Monsters

Wandering monsters on this level are Dreaming Priests, adepts (1-3), from level 4D on an errand.

Wandering Monsters, Level 2B (2d4)
2 To dispose of an item in 7. Forgotten Archive
3-4 To haul refuse to 5. Mausoleum of the Nine Companions
5-6 To feed the beetles in 4. Shrine of the Solar Goddess
7-8 To fetch tablets in 8. Workshop

1 An “ardent” is a paladin; a champion is 7th-level.

2 I use lower-case Greek letters to denote details within a level but outside encounter areas. I’m not sure that I’ll put them on the keyed map.

3 Given the bombardier beetle’s description in Blackmoor (OD&D Supplement II, 18), I assume its appellation is an alias for dung beetle, a species in the subfamily Scarabaeinae. In Egyptian mythology, the Scarabaeus sacer, or sacred scarab, is associated with the rising sun.

A Dungeon and Wilderness Adventure Campaign

Dreaming Amon-Gorloth is a dungeon and wilderness adventure campaign for a party of six to ten characters, levels 1 to 9, intended for use with any old-school edition of the world’s most superlative role-playing game.

As Melqart and the Company of the Blind Seer explore the Deep Halls, I make notes and stock the dungeon. The results are given by dungeon level and wilderness area. Information for each includes necessary background information, details of encounter areas, and wandering monster tables.

Your Own Deep Halls Campaign

You don’t have to wait for me to stock it for you. To run a similar Deep Halls campaign, see “These Deep Halls or Where to Start.”

I play the campaign solo, running a main character and two companions, plus an entourage of hirelings and henchmen, using Holmes Basic with Phenster’s Pandemonium Society House Rules.

Forbidden Knowledge

If you want to explore the Deep Halls as an adventurer, stop reading here. The tunnels beyond are twisted and nightmarish. Therein lurk creatures yet unimagined, neither living nor dead but dreaming—dreaming dreams of unknown ages, ages long past, ages that never were, ages that were never meant to be. The author of this work bears no responsibility for the perils that may befall the casual explorer in the Deep Halls.

The dungeon map is the Deep Halls by Dyson Logos. The wilderness environment is the Outdoor Survival map board.

The Campaign So Far…

We proceed with caution, for within the Deep Halls lies forbidden knowledge. Firmer minds than ours have been feebled by its acquisition.

A 1st- to 9th-Level Campaign
 

2A. An Unheeded Warning

Herein is described a sublevel of the Deep Halls, the site of our dungeon exploration in Dreaming Amon-Gorloth. Numbered encounter areas refer to the keyed map in “Keys to the Deep Halls.”

A century ago, after the war in which the Radiant Host eradicated the dreaming priests, the nomarch ordered the entrances to the Deep Halls blocked. Departing troops broke the lintel and provoked a cave in, which barricaded the entrance under rubble. To further discourage entry, the nomarch had engraved a warning message on the cliff face. The dreaming priests, on their inevitable return, made a way through the rubble. They left the message intact.

1. Entrance

A spur of the track leads to a level yard of packed dirt. Beyond it, a hill rises in an abrupt slope. A narrow passage opens in the hillside, dark, like an empty eye. On the ground, a long, carved stone, broken in three, edges the entry, which is shored up by a wooden beam on two posts. Outside to the left, in the face of a rock cliff, is carved an inscription:

DANGEROUS DUNGEON
DO NOT ENTER

Inspecting the broken rock at the entry, characters may note the following:

  • It is a lintel carved from granite.
  • The lintel bears a maker’s mark: the silhouette of a stepped pyramid.
  • (Dwarves only) The lintel’s exposed breaks and the inscription on the cliff face are the same age, several decades old and much younger than the lintel itself.

Through the doorway, the corridor is 15' wide. The barrel-vaulted ceiling is 10' high. On either side, murals, painted in once-bright hues, depict hyena-headed humanoids dancing, naked, in two rows, above and below a wavy line. Below the line, the humanoids all face down the corridor southwest. Above the line, they face the opposite direction, northeast.

Mural with Hyena-Headed Humanoids and Moon-Disc Motif
Mural with Hyena-Headed Humanoids and Moon-Disc Motif.

The murals are trimmed at top and bottom in a moon-disc motif. The bottom edge shows the moon’s waning phases, from full to new. The top edge shows the waxing phases, from new to full.

North Wall: A small stone, painted dark within a lower half-moon, opens the secret door when pressed.

Common Knowledge and Research

Information that is commonly known among the general populace, given under the heading Common Knowledge, should be given out as characters interact with the environment. Common knowledge often concerns the present culture.

Information about the previous culture may require research. I’m working on a simple system for use when PCs conduct research in the base town at the temple archive and the magic-user’s guild library. Information that may be learned through this method is noted in each room accompanied by the domain(s) to which it belongs: arcane, history, or religion.

Common Knowledge:

  • Hyena-headed humanoid figures escort the soul of the dead to the underworld and back to the world of the living, where it is reborn.
  • The soul’s journey is completed in a day.

Research:

In contemporary writings, the Amwan Culture refers to that of the peoples who lived during the time of Amon. (See “the Myth of Amon-Gorloth.”)

  • In the Amwan Culture, the soul travels to the underworld and returns in one month (religion).
  • The Amwan Culture divides a lunar cycle into 12 phases, with five phases between each full and new moon (arcane, religion).1

2. Reliquary

A flame burns in a rough-hewn depression in a central floor stone. It casts light in a 15' radius to fill the room. Fashioned in the north and west walls are twelve niches, six in each wall, at chest height. In nine of them, a skull is set, upside down.

Torches, lanterns, and light and continual light spells do not shed light in this room.

Upon reinvesting the dungeon, the dreaming priests found the decaying remains of the Nine Companions who fought aside the Ardent Champion Menturoc in the redoubt’s storming. The priests removed the heads, boiled them to remove remaining flesh, and mounted them upside down in niches.

They carved the depression in the central stone, cast continual darkness on the stone, and bid a fire kobold [described later] to protect the skulls.

Continual light cast on the central stone dispells the continual darkness.

If any skull is disturbed, the fire kobold extinguishes itself, leaving the room in darkness. The kobold then causes mayhem in its invisible state.

Fire Kobold (1)

Common Knowledge:

  • Decapitation prevents the soul’s return from the underworld.
  • Turning its skull upside down prevents the soul’s rest.

3. Grand Entry Hall

The dimensions of this chamber are lost beyond torchlight. Footfalls echo off unseen walls. Just within range of illumination, a wide central column, engraved and painted, reaches into the darkness.

Out of sight, two more columns in a line beyond the first support the vaulted ceiling 90' up. Painted engravings on each column show lunar phases and a symbol on the near and far sides. They also show, wrapping around the column, various scenes with human and non-human figures.

First Column
Lunar Phases (Near/Far) Symbol Scenes
Full Ankh Human figures, male and female, adult and child, in common tasks, such as sowing grain, baking bread, picking flowers, catching fish.
Full
Second Column
Lunar Phases (Near/Far) Symbol Scenes
Greater Waning Gibbous1 Eye Hyena-headed humanoid figures dancing (as in corridor 1. Entrance).
Greater Waxing Gibbous1
Third Column
Lunar Phases (Near/Far) Symbol Scenes
Lesser Waning Gibbous1 Scales Large hyena-headed figure, this one human male wearing a kilt, weighs a heart on a scale against a feather. A smaller human figure stands in a boat. Other human figures, still smaller, walk through a gate. Another small figure hangs above the open jaws of a crocodile head atop a lion body.
Lesser Waxing Gibbous1

West Door: Crude scratches shape the form of a scarab beetle on this door. Smell of offal.

South Door: Skillfully engraved into this door and embellished with inlaid silver is a glyph in the form of two diamonds, one inside the other. Close inspection of the door reveals a faint odor of lavender and ammonia.

Hartshorn Gas: When the south door is opened, gas spews from above. It smells of lavender and ammonia. Any characters in the doorway must save vs. Poison (+4 on the dice) or die. Dreaming characters within 20' must save vs. Spells or wake. [The states dreaming and waking are explained later.]

Wandering Monsters

Wandering Monsters, Level 2A (2d4)
2 Dreaming Priests, adepts (1-3)
3 Bombardier Beetles (2-5)
4 Gnomes, trading caravan (6-36)
5 Gnolls (1-3)
6 Goblins (2-12)
7 Orcs (2-8)
8 Harpies (1)

1 In our world, we generally describe eight lunar phases, with three phases between new and full moons. In naming the additional phases, I split each gibbous and crescent phase in two and add prefixes lesser and greater.

The Shunned Cairns

A narrow band of craggy rocks breaks through the semiarid plain to form the foothills of the northern mountains. Scattered throughout, heaps of lose stones appear to have been piled high by giant hands.

Tender grasses and thorny scrub brush push up between rocks. Orb-weaver spiders stretch webs between the brush. Feral goats, escaped from plains herders, crop the grasses to the root and trim the lower leaves of the thick-branched lentisk trees that block passage through narrow ravines.

Location: One hex northwest of the base town (Base 2 on the Outdoor Survival map).

Points of Interest

Old Track

An old cart track runs northwest out of town. Apart from the Radiant Host, which patrols the border of the Shunned Cairns, few tread its path.

Stela

About three miles from town, a granite stela rises above a briar thicket in the middle of the track. The brush is cleared away from the stela’s near side coming from town. Breaking through the thicket, PCs may examine the other sides.

  • South: Interdiction
  • West: History
  • North: Sigil
  • East: Commemoration

Traces in the dust circumvent the thicket to rejoin the track opposite the stela.

Interdiction

On the stela’s near side, the nomarch’s seal is carved above an epigraph in the glyphic script of the common language:

FORBIDDEN
NONE SHALL PASS BEYOND THIS MARK

Below the inscription is engraved the Resplendent Medallion, the Great Seal of the Sun King, which lends the weight of the monarch’s authority to the nomarch’s edict.

History

IN THE TWELFTH YEAR OF HIS REIGN THE SUN KING AKHOTAHN CAME FORTH AT THE HEAD OF THE RADIANT HOST

THE SUN KING ANNIHILATED AN EVIL CULT IN A WAR THAT LASTED THREE MOONS

THE SUN KING LAID LOW THOSE WHO DREAM

NINE HUNDRED MERCENARIES WHO FOUGHT FOR THE CULT WERE CAPTURED AND BEHEADED

ALL OTHERS WERE OUTLAWED

THE SOLAR GODDESS SHINES FOREVER ON THE SUN KING

Sigil

Facing the Shunned Cairns, the stela’s north side bares a symbol in the form of an open eye beneath an inscription:

NO DREAMER SHALL APPROACH

Detect magic reveals the eye to have an aura of protection.

Commemoration

THE SUN KING RELINQUISHES TO THE WEIGHER OF HEARTS THOSE WARRIORS OF THE RADIANT HOST FALLEN IN BATTLE

THE SUN KING HONORS THE ARDENT CHAMPION MENTUROC AND THE NINE COMPANIONS WHO FELL IN THE STORMING OF THE INNER REDOUBT

Outlaw Hideouts

A band of outlaws scrounges a living within the Shunned Cairns. The outlaws move frequently, holing up in numerous remote locations. They hunt feral goats and raid demi-human trading caravans, who travel to and from the town and the Deep Halls.

Faneforlorn

Where the Shunned Cairns climb into the mountains, a stonework barbican projects from the base of a cliff. Behind it, a dwarf clan carved homes from a series of natural caves and set up workshops in the larger caverns. Over the centuries of their habitation, the dwarves have left no surface unchiseled, for they are skilled stonemasons and sculptors. The dwarves sometimes take commissions for work in the town, but they are hesitant to interact with the human community. The clan symbol and maker’s mark is the silhouette of a step pyramid.

The Deep Halls

A couple miles after the stela, the track leads by a dark opening in a hillside. This is the main entrance to the Deep Halls (Level 2A). Atop the hill, about 200 yards west, is a secondary entrance (Level 1B).

Upstream Egress

A half mile southeast of the Deep Halls is a narrow gorge. One side suffered a landslide some long time ago. Obstructed by the escarpment, where a tangled copse of lentisk trees now hold the scree, a narrow tunnel winds down to the subterranean river that flows into the Deep Halls. The exit is not discernible from the exterior. It must first be dug out from the inside.

Wilderness Encounters

On or off the track within the Shunned Cairns, roll a 6-sided dice in the morning and the evening. A 6 result indicates a wilderness encounter. The Radiant Host, marked with an asterisk (*), is encountered only on the town side of the stela.

Wilderness Encounter Table: The Shunned Cairns, Track (2d4)
2 Dwarves (3-18)
3 Radiant Host (20)*
4 Elves (2-12)
5 Outlaws (4-16)
6 Gnomes (6-36)
7 Gnolls (2-12)
8 Trolls (1-2)
Wilderness Encounter Table: The Shunned Cairns, Off-Track (2d4)
2 Outlaw hideout, occupied (60)
3 Outlaw hideout, unoccupied
4 Outlaws, hunting party (3-12)
5 Giant Centipedes (2-5)
6 Cockatrice (1)
7 Gnolls (2-12)
8 Trolls (1-2)

Dwarves:1

  • Stonemason work crew from Faneforlorn.
  • Avoid contact with humans.

Radiant Host:

  • Patrol of soldiers (chain mail and sword) led by a warrior (2nd-level fighter).
  • Patrol does not go beyond the stela.
  • Leader warns any citizens (all humans are citizens) headed toward the Shunned Cairns that entry into the territory is forbidden.
  • Penalty is one year of indentured servitude.
  • Patrol arrests any citizens coming out of the Cairns and takes them before the nomarch.

Elves:1

  • Reconnaissance patrol from elf-land (northeastern forest).
  • Elves monitor activity in the Shunned Cairns.
  • Parley with travelers to discover news.

Gnomes:1

  • Trading caravan from the northern mountains, pushing carts, makes stops at the Deep Halls and the town.
  • One cart for every six gnomes.
  • All wear chain mail, armed with light crossbow and war hammer.
  • Leader 2nd to 7th level.
  • These gnomes are metal smiths.
  • All goods (fine metalworks and jewelry) are hidden and trapped.

Gnolls:

  • Attack any party using hit and run tactics.

Trolls:

  • Hunt on the trail when hungry.

Outlaws:

  • Treat as bandits.
  • Raiding party:
    • Attacks weaker, treasure laden parties, from ambush.
    • Otherwise, surveys from hidden position.
  • Hunting party:
    • Avoids confrontation.
    • If party carries wealth, outlaws survey movement while reinforcements arrive.

Outlaw Hideout:

  • Outlaws move frequently, staying not more than 10 days in a place.
  • Move hideout whenever discovered.
  • Take care to remove evidence of occupation when leaving.
  • Occupied:
    • 60 bandits.
    • Plus 15 non-combatant females and 25 children (100 total).
    • Live under rocky overhangs and in temporary, make-shift tents.
    • Make small cooking fires in pits.
  • Unoccupied:
    • 1 in 6 chance to discover a discarded burnt branch, other burn mark, or forgotten bit of human detritus.
    • Otherwise, only evidence of occupation is small fire pits covered by stones.
Stela - The Shunned Cairns
Stela on the Old Cart Track into the Shunned Cairns.

1 I am considering ancient Near Eastern variants for demi-humans. They may not stray far from their special abilities given in Holmes, but their culture and appearance should not be medieval European.