Base Town Emden

I thought to cover the last three steps of the D&D Expert Rulebook’s Designing a Wilderness (X54) in a single article. I try to keep the word count between 400 and 1,000. This one, covering the next step, approaches the limit. So, I cut the remainder again into parts, one article per step, and the “short” series becomes less so.

Reading Map

This is the sixth article of a short-ish series outlining a B/X D&D campaign.

F. OUTLINE THE BASE TOWN.

Description and Population

Emden is a fortified town. A river borders the south side, and defensive walls enclose the remaining perimeter. Four gatehouses at drawbridges allow entry. Canals divide the town into large quarters and give access to one small port, maybe two. The population is 10,000.

A large town gives PCs access to all the usual resources, while allowing room for growth through their actions. As the campaign progresses, PCs might reduce the monstrous threat from Darkmeer, remove the Pale Moor curse, and extract great wealth from the interior. Population increase follows.

Emden.
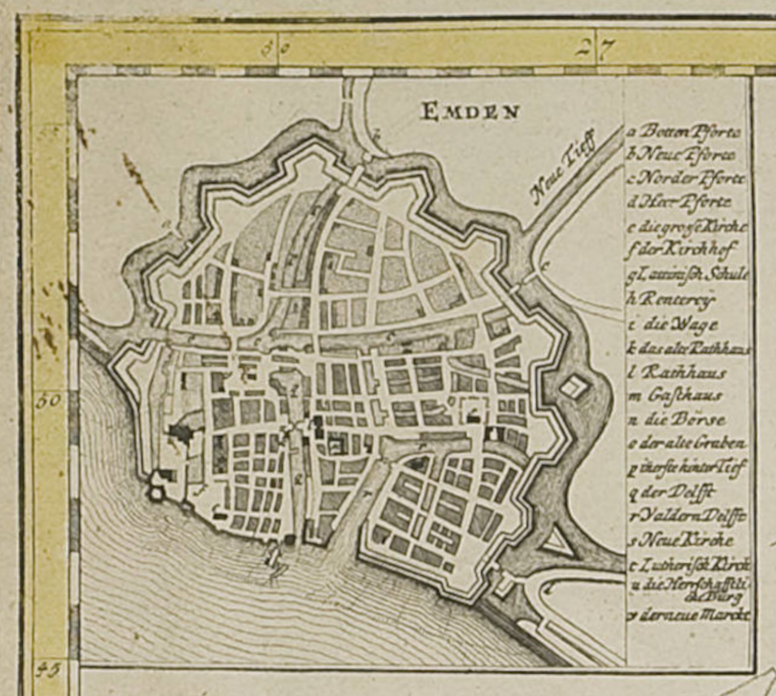
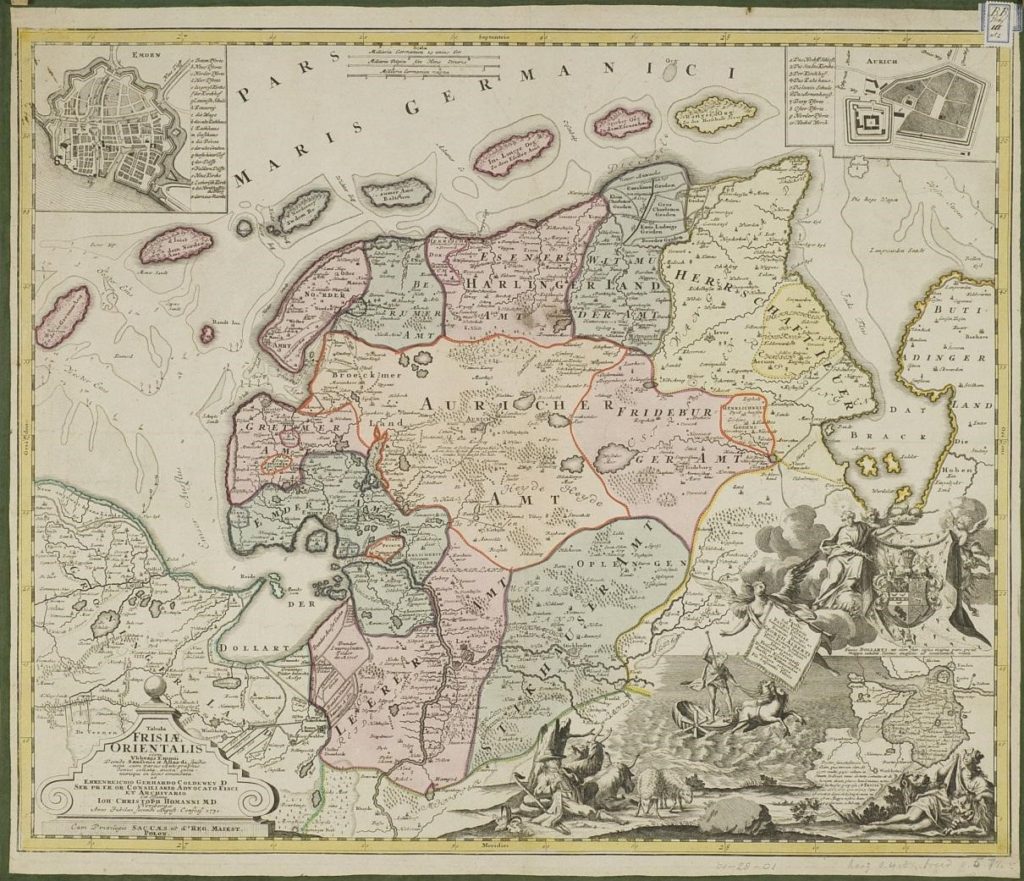
Inset from Tabula Frisiae Orientalis, Ubbo Emmius, 1730.

Government and Defense

The herzog maintains the seat of government in Emden. He resides in a palace (which may well be under construction or recently constructed at campaign start) and keeps a palace guard. In addition, the sovereign may raise an army. While the herzog manages affairs of the duchy,1 an appointed burgrave is charged with the administration of the grave itself, including the town. A town guard maintains order within its precincts. In case of outside threat, the burgrave may call upon the local militia.

Supporting Services

Church

The church holds great sway in the Thirteen Graves. The landgraves need the church’s support to combat the undead and the infernal menace from the Pale Moor. The church takes advantage of the situation to gain secular support to give its edicts the weight of law. A bishop (7th-level cleric) runs the church in Emden and leverages the herzog’s power to establish the church hierarchy throughout the duchy.

Secret #8: The bishop believes the church is much more capable of defending the realm and defeating the infernal hordes. He schemes to take over the duchy and make it a theocracy.

Religious Factions

Here we have an opportunity to come up with some factions within the church that promote a particular doctrine. Here follow three examples:

Crusaders: A knightly order of warriors who battle demons and devils wherever they encroach upon civilized lands. When an infernal horde gathers, the knights petition the bishop to proclaim a crusade, and they lead expeditions into the Pale Moor. Members are clerics, paladins, and fighters, knighted by the herzog.

Inquisitors: A sect that believes witchery is the root of all evil. Their inquisitors search out any practitioners of the black art. Witchery is the practice of witchcraft. In the context of our setting, witchcraft, strictly defined, is any dealing with a devil or demon. Therefore, warlocks and witches are the primary target. But sometimes the sect’s definition of witchcraft may become overly broad.2

Undead Slayers: A band of clerics that recruits warriors to destroy the abomination that is the walking dead. The band is known to make daring raids into the Pale Moor.

The Ghouling Gauntlet

Given the opportunity to reuse—or in this case pre-use—an already created element, we take it. The Ghouling Gauntlet is an ancient order of undead slayers that appears at the end of Wyrm Dawn and the beginning of Wyrmwyrd, thousands of years in our current setting’s future. Perhaps the order is recently formed in response to the moor wraiths. (See the heading The Ghoul of Tower Mill in Wyrm Dawn’s “Empire of the Undersun.”)

Guilds

Magic-Users: While it accepts members regardless of alignment, the Magic-Users Guild is dominated by lawful members, many with ties to the noble family. It maintains strong relationships with the magic-users guilds of the other lawful graves, often working together to further the herzog’s goals, which its lawful members believe coincide with their own. Chaotic members may join together temporarily to foil the efforts of the lawful group when they interfere with their own objectives.

Thieves: The Guild Master of Emden’s Thieves Guild is a member of Broeckemeer’s ruling clan. Her major ongoing operations include spying on the ducal hierarchy, harassing trade routes in and out of the capital, and political assassinations.

Lodging

Travelers and locals may find accommodation, restoration, and entertainment in a few inns, several boardinghouses, and numerous taverns. Following are examples, lightly sketched.

Gasthaus Herzogs: Situated just outside the palace gates, the herzog’s inn provides luxury quarters and gourmet meals to its wealthy clientele. It is patronized by diplomats, aristocracy, the richest merchants, and the spies who note their comings and goings and pretend not to be listening to their conversations.

Gasthof der Langenruhe or Inn of Long Repose: All sorts of travelers, including merchants, adventurers, and the occasional aristocrat, stay at this inn on the main square. Locals sometimes dine in its private dining hall. Mercenaries and men-at-arms frequent the inn’s public taproom.

Geitenhoef Taverne or the Goat’s Hoof Tavern: The southeast quarter has declined in recent years. Geitenhoef Taverne once catered to more affluent patrons. Now, its regulars are laborers, low-ranking soldiers, and adventurers down on their luck. The Geitenhoef is reputedly a hangout of members of the local Thieves Guild.

Widow Walpurga’s Pension: After her husband died 30 years ago, childless Frau Walpurga—known to everyone as Widow Walpurga or “the Widow”—began renting rooms of her large house. Her reputation is that of a kindly old woman, hard of hearing. One or two lodgers may be permanent residents. The Widow keeps one small room for herself at the top of a spiral staircase in the widow’s watch.

Witch Hunting

The landlady is named after Walpurga Hausmannin of German legend. The historic Frau Hausmannin was a tragic victim of a witch hunt. Our Walpurga may be more malefic.

Secret #9: I leave this candy to the DM. For inspiration, I refer you to the transcript of Hausmannin’s trial: “Judgement on the Witch Walpurga Hausmannin.”

To give context to the trial as well as to the general setting, I recommend Chapter 7 of Carl Sagan’s Demon-Haunted World.3 The chapter gives its title to the book.


1 I find it awkward in speech, but a DM might replace duchy with the German herzogtum.

2 An inquisition scenario might be fun. I’d be careful about letting it dominate the campaign.

3 I recommend Sagan’s book, as a whole, for it gives context to the present real-world situation. Carl Sagan, The Demon-Haunted World: Science as a Candle in the Dark, New York: Ballantine, 1996.

Monstrous Denizens of the Pale Moor

Reading Map

This is the fifth article of a short series outlining a B/X D&D campaign.

After determining human-controlled areas, it may seem little space remains for monsters. But the interior is wild and infested with ferocious beasts, walking dead, and tribes of chaotic humanoids. Surrounding the Thirteen Graves are the sea and three territories. Being borderlands, these last are wilderness areas, whose inhabitants may encroach upon civilized lands.

Secrets and Names

I debate with myself about disclosing the secrets I come up with or letting the DM make his own secrets. On the one hand, publishing them here gives them away should players become overly curious. On the other, I’m likely to build on some of the secrets in later articles. The reader must be in the know. Of course, the DM may change the secrets or devise others. I have added one secret each to “A Forsaken Peninsula” and “Thirteen Graves.” The debate continues.

I have also resisted putting names on the map, thinking to leave that to the DM as well. But place names are useful in writing as references. “The county that claims the Pale Moor” is wordy as well as awkward. I’ve written on the map a few names used in the text.

E. PLACE AREAS UNDER NON-HUMAN CONTROL.

I mention PC races at the end. Otherwise, monsters are divided by geography:

Not all monsters described are shown on the map.

Monstrous Denizens of the Pale Moor

Pale Moor

Troglodytes (not shown on map): Native inhabitants of the peninsula, the troglodytes were pushed out by human settlers. Remnants of their caves, found throughout the region, testify to their former territory. Restricted now to the interior, they often raid human settlements out of necessity if not revenge.

Kobolds (not shown): The dog-men infest the Pale Moor. They shelter in any dense thicket or tangled copse of trees.

Goblins (not shown): Goblins seek uninhabited troglodyte caves in which to make their lairs. They may be encountered most anywhere on the Pale Moor.

Hobgoblins: Inhabiting the Pale Moor’s southeast, hobgoblins frequently raid the southern graves all the way to the Gruttemar, the lake shown on the moor’s western border. To augment its army, Valhallan enlists hobgoblins, goblins, and bugbears. Parties crossing the grave’s perimeter are likely to encounter these goblinoids in border patrols.

Moor Wraiths: The result of the Pale Moor curse, these undead creatures plague the interior. Their appearance is much like a zombie: bloodless corpse, pallid complexion. Despite a vacant stare, they seem to act in concert and with a will.

Pale Moor Curse

Any creature that dies within the confines of the Pale Moor becomes a moor wraith within one day. Denizens adapt to this situation by burning their dead in impromptu ceremonies.

Secret #5: When the Battle of Throrgrmir was lost, remnants of the Chaos Armies disbanded. The Wraithwright, having arrived at the head of his undead legion near the battle’s end, still commanded the entire force. He withdrew into the Pale Moor. It is the Wraithwright who laid the curse upon the land. And it is the Wraithwright to whom the animated dead are enthralled.

New Monster: Moor Wraith

The Pale Moor curse acts as an animate dead spell, except a moor wraith has two more hit dice than the original creature. Rumors imply a moor wraith may gain additional hit dice.

Skeletal moor wraiths also exist, though they are less common. A so called “bone wraith” is created when a skeleton is brought into the moor or when the flesh of the recent dead is boiled. Bone wraiths have one more hit dice than the original creature.

Whether skeletal or fleshed, both are wraith-like in that they can only be hit with silvered or magical weapons. Moor wraiths do not drain energy levels.

Clerics turn a moor wraith as a wight or the undead creature with equivalent hit dice. A moor wraith may be dispelled. For purposes of spell failure, treat the curse as a 12th-level magic-user.

All moor wraiths act according to the desires of the Wraithwright.

Infernal Hordes: Though infrequent, demons and devils may be encountered on the Pale Moor. Hordes of these infernal creatures sometimes ravage the land, crossing into the graves to wreak havoc among the mortals.

Demons and Devils and Alignments

By adding demons and devils to a B/X game, we’re creating work for the DM. We can rob from AD&D, which is what I did in the ’80s. The biggest question lies in alignments. For me, demons and devils are distinguished by their cultures, which are tied to their alignments: havoc-wreaking demons versus Machiavellian devils. The one chaotic, the other lawful, both evil.

In a three-point, single-axis system, demons are aligned with chaos, clearly. But devils with law? Do we call them chaotic with their organized society? Or should we introduce a dual-axis alignment system?

Holmes’s five alignments are enough. DMs may decide for themselves. If incorporating more alignments, we might throw out alignment languages or restrict them to the three original alignments of the first axis. I’m thinking to experiment with only two languages: Law and Chaos.

Surrounding Lands

Lizard Men: Prowling the swamps east of the Jade Bight, the lizard men cross the bay on dark nights to raid coastal villages. They also harass shipping in and out of Port-of-Sands.

Orcs: Broeckemeer incites the orcs of the Dragons Watch Mountains to raid the southern graves. Because the orcs are unruly, the raids are infrequent, untimely, and therefore ineffective.

Gnolls: Several bands of gnolls range south along the west flank of the Dragons Watch. Broeckemeer is in contact with the gnolls, hoping to recruit them into an army when diplomatic contention comes to military conflict with the duchy. For the time being, though, the gnolls want nothing to do with the Pale Moor and its curse.

Secret #6: Broeckemeer, whose ruling family is made up of witches and warlocks (secret #4), endeavors to call upon the demon lord of gnolls to bring the rapacious bands under their dominion.

Nomads (not shown): While avoiding the Pale Moor, the Sadhakarani [introduced in Wyrm Dawn] wander throughout the peninsula and beyond, trading goods from remote lands. Also called Runefolk, they have an innate ability for magic-use.

Dragons

The Wyrm Prophecy yet unfulfilled, any number of dragons might lair on the peninsula, keeping watch over events in Throrgrmir. The most powerful among them are a black and a green (not shown). The black dragon lairs on the Moor. The green, at the edge of the Elding.

Northern Sea

Mermen: This submarine folk inhabits the deeper waters off the north coasts of the island chain. They keep to themselves and are rarely seen by fishermen and sailors.

Storm Giants: A clan of storm giants resides in a submarine castle, built from coral and giant mollusk shells. They are potential allies of law.

Secret #7: The cause of the Atlantean flood was not divine but giant. The storm giants and the knightly order were working together against chaos. I don’t know yet what was the transgression, but the order’s hierarchy crossed the storm giants in some manner. The giants’ retribution was swift, and the knightly order all but washed away.

Buccaneers and Pirates (not shown): There is a long tradition of piracy in the Northern Sea. From bases along the Fear Coast, pirates ply the channels that give access to ports in the bays either side of the peninsula. Though it is no longer a pirate holding, when referring to Thror’s Gate (off map, east, see Valormr: Pre-War Disposition of Forces), the pirates still call it Skullhaven. Broeckemeer is a reputed sponsor of pirate activity.

PC Races

Halflings: The Forsaken Peninsula is no place for such gentle people. The few haffolk who dwell here migrated with the humans from the Shire Hollows in the Throrgrmir Valley. They settle in small shires near human settlements in the lawful lands.

Elves: Any elves are from the Ellriendi Forest (Elding, Grunnthraesir, or Groennendr) also in the Throrgrmir Valley.

Dwarves: Dwarves come from either of two clans of Forn Fjallaheim in the Dragons Watch Mountains a few days march south. One clan is the Galti-Gler, the other not yet named.

Thirteen Graves

Continuing from “A Forsaken Peninsula,” we take the next step through Designing a Wilderness (Cook and Marsh, X54).

Reading Map

This is the fourth article of a short series outlining a B/X D&D campaign.

D. LOCATE AREAS UNDER HUMAN CONTROL.

Oft repeated on Emmius’s Tabula is “Amt” in conjunction with names of marked political regions. An amt is an administrative area akin to a province or county. Such small regions ruled by counts or nobles of similar rank seem appropriate.

Emmius shows ten provinces bordering the central region. Including the two small, more remote provinces—one on the river east of the Dollart, another on the opposite side of the map (left of the eastern inlet)—brings the count to 12. Twelve is a good number. Too good for a campaign with warlocks and witches, when we’re so close to 13. I’m going to carve one more county off the central region’s west end. It’s a “soft” border: the county claims, though does not control, the central region, which is the Pale Moor.

Competition

Going further with that notion, we already know that the warlock discovered much wealth and magic in the Pale Moor. So, the counties compete in some way for the forsaken interior’s resources, but they are confounded by the moor’s denizens. To increase the tension, we’ll add a curse: any who die within the confines of the Pale Moor return as undead, which also hinders incursion into the interior.

Opposition

Now, we have counties that desire something. Let’s also give them something to fear: an outside force. From the Valormr Campaign, we know that the dwarven empire of Throrgrmir lies to the east, and to the west, Darkmeer, a collection of belligerent fiefs. While Throrgrmir is a potential ally, Darkmeer is a certain enemy to civilized realms. Some time—decades or centuries—has passed since the Throrgrmir war. Darkmeer has recovered its losses and now threatens the counties with invasion, subjugation, and enslavement.

Character

Our thirteen counties should each have its own character to differentiate one from another. Space prohibits going into great detail, but we can sketch an overview of the political landscape and let the DM fill in the blanks. A handy way to divide the counties is by alignment.

Law: The counties united in an alliance against Darkmeer, a common threat. The alliance formed a duchy and elevated the ruler of the strongest county, whose seat is our base town (Emden on the Tabula), to the office of duke. The duke’s domain is shown in purple on the map, the other lawful counties in blues.

Thirteen Graves
Map of the Forsaken Peninsula Showing Political Boundaries.

Chaos: Among the counties were some abstentions from the alliance. Notably, the county that claims the Pale Moor did not join and considers itself an independent state, as does the large county on the moor’s eastern border. These counties, and others shown in reds, are chaotic.

Neutrality: A few counties that joined the alliance are less keen on subjugation to a higher ruler. Some may pay homage to the duke, but when it comes to either defending the larger realm against chaos or making fruitful gains in the Pale Moor, their fealty is uncertain. Neutral counties are shown in greens and oranges.

Atlantis of the Clay

We don’t ignore the mythical source of our inspiration (see “Atlantis of the Clay”). An order of knights once held land on the west bank of the western inlet, where now is a bay. The order charged itself with the protection of the counties against the threat of chaos. Some decades ago, the land was submerged by a sudden deluge, possibly an act of divine retribution for some transgression. Villages were covered in mud. Castles were flooded, their lower floors inundated with silt. Many knights were lost. Survivors reaffirmed the order and its mission, and the strongest county gave to the order a tract of land on the river, where the knights established a palatinate.

Titles

Taking title names from English’s Germanic roots, I exchange duke for herzog, or feminine herzogin, and count for landgrave or landgravine. A vassal to a landgrave is a graf or grafin. A more martial province is ruled by a margrave. The head of the knightly order and ruler of the palatinate is a pfalzgraf. Then, for the ambiance in it, I want to play with words a little and, instead of counties, the political districts are graves.

Secret

Secret #4: Members of the ruling family of the chaotic grave that claims the Pale Moor are witches and warlocks, who consort with demons. Maybe they are possessed, maybe willing. Their goal is not to annex the Pale Moor but to reopen the gate beneath the ancient demon city.

Added a secret. [07:16 9 August 2022 GMT]

A Forsaken Peninsula

How many times I’ve stepped through the process I cannot count. Maybe there are other ways. Maybe those ways are better. But the D&D Expert Rulebook’s Designing a Wilderness (X54) has the advantage of brevity and, after long use, familiarity. Furthermore, even after all these years, the lettered steps never fail to spark the imagination.

After determining the campaign hook in “Warlock of the Pale Moor,” we embellish the old map, original source of our inspiration.

Reading Map

Outlining a B/X D&D campaign. As sometimes happens at the outset, I thought to do this all in one article…

A. DECIDE ON A SETTING.

The setting is based on a historical map, Ubbo Emmius’s Tabula Frisiae Orientalis. On the map, a broad, lowland peninsula lies between two inlets, east and west. It shares a long land border with the mainland in the south and is accompanied by a chain of islands in the north.

Tabula Frisiæ Orientalis - Ubbo Emmius 1730
Tabula Frisiae Orientalis, Ubbo Emmius, 1730.
Find this map in high-resolution on the University of Groningen website at https://facsimile.ub.rug.nl/digital/collection/Kaarten/id/1410.

The map’s political boundaries (in color) define a large central region that extends to the peninsula’s west coast and is otherwise surrounded by smaller areas. To incorporate our campaign hook—opposition to the warlock and infernal hordes—I imagine that the center is a forsaken wilderness. The surrounding areas are civilized fiefs, inhabitants of which dare not enter the interior for fear of the aforementioned hordes. Each of the islands belongs to one or another of these fiefs. Beyond the colored boundaries, a few other domains, extending off the map, make land neighbors of lesser importance to the campaign. All this keeps the setting contained, focusing on the Pale Moor.

B. DRAW A MAP OF THE AREA.

We could just print Emmius’s map at a suitable scale and lay a hexagon grid over it, possibly borrowing the transparent hex sheet from the 1987 Forgotten Realms Campaign Setting box. Or we could use that as the starting point and tailor a new map to the campaign needs.

Moreover, nothing says we can’t make the peninsula larger than its real-world instance. But, as the area is part of the greater DONJON LANDS setting, I use its actual size. Another DM might do different.

Emmius’s scale (top center) is in German and Belgian miles. Forgoing the conversion, I conjure a modern satellite map. Between the points where the coast meets map’s edge, east and west, I get a distance of about 72 miles and, from north to south, around 60.

Some might balk at these dimensions. Fourty-two hundred square miles is not large for what we usually think of as a campaign area. But I am sufficiently intrigued by the map’s offerings. Plus, I’m interested to find out if we can run a campaign up to domain-level play in such a small area.

At the standard six miles to a quarter-inch hex, the map would measure a minuscule 3" × 2½", and the “postcard campaign” would become all the rage. One mile per hex would make it 18" × 15", out-sizing a US tabloid or international A3 page. Going to the extreme, if we up the one-mile hexes to a half-inch, we’d have a beautiful poster map 36" × 30" for the game room wall.

A tug on the reins and we find a happy medium at six miles per inch. The map area is 12" × 10", which fits nicely on a tabloid/A3 page with space for a legend. The larger page size allows more data. While the campaign area lacks breadth, it might compensate with detail.

One-inch hexes lack granularity. Three miles to the half-inch hex might work. Smaller one-mile hexes would be 16″. Tiny but tempting. Because, if we draw a beautiful map, we can let go the reins, print our work at 300%, and have it mounted.

Forsaken Peninsula - one-inch hexes
Forsaken Peninsula - half-inch hexes
Forsaken Peninsula - sixth-inch hexes
A Preliminary Map, Showing Coastlines and Counties.
Each version employs a different hex size: one-inch, half-inch, and sixth-inch.

C. PLACE THE DUNGEON AND THE BASE TOWN.

Magic words. “Place the dungeon and the base town” hold power. Whether read silently to oneself or spoken aloud, they deliver a zap! to the mind that brings the process of wilderness design alive. This small step joins the wilderness environment and the adventure locale to create the microcosm that is to be a campaign setting.

Primary Dungeon

On Emmius’s map, the upper right inset shows the domain of Aurich, which is near the center of the interior region—ideal placement for the campaign’s principle adventure locale. We may well preserve the domain’s design: fortress with walled garden. We might embellish the garden with a necropolis, excavated by the warlock, built by the demons in ancient days or, earlier, from the time of the Greater Ones.1

Base Town

The upper left inset depicts Emden, a port city protected on its land flanks by a formidable wall. An obvious base town. I’m thinking to scale it down from city to a large town, leaving room for it to grow into a larger metropolis through the efforts of high-level PCs. We call this the “base town,” but PCs might begin their careers in smaller towns or villages, especially at campaign start.

Secondary Dungeon

Of course, we don’t forget the Pale Moor Keep itself. Laying the Valormr campaign map over the Tabula, I find the fortress in the lower east corner of the Pale Moor, in close proximity to what might be a village marked by Emmius as Straitholt. The landmark, which lies within a wooded area, serves as the location of the now ruined keep.

Secret

Secret #3: Deep below the former demon city is a gate to the Abyss. Its closing marked the downfall of the infernal metropolis. In his tower on the surface above, the warlock either works to reopen the gate or to keep it closed.


1 I should apologize for obtuse references to unexplained aspects of the DONJON LANDS setting. Instead, I promise a forthcoming article that will shed more light.

Added a secret. [07:10 9 August 2022 GMT]

Atlantis of the Clay

A few months ago I was looking at some old Dutch maps—as one does, when I ran across an article called “Maps of Meaning.” In it, authors Meggy Lennaerts and Jan van der Molen of the University of Groningen Library tell the story of German cartographer Ubbo Emmius, who advocated for historical accuracy in mapmaking in the 16th and 17th centuries.

Incredible to us in our days of satellite imagery, half a millennium ago maps were rarely accurate and often based on less than fact. One such historical inaccuracy, which is discussed in the article, is the bay now called Dollart and the myth of the Atlantis of the Clay.

Sixteenth-century maps showed, correctly, the Dollart, an inlet that formed the west coast of East Frisia (Frisiea Orientalis). Today, the water is so shallow as to reveal the mud at low tide. Many early cartographers included an inset, showing the area of the bay as a lowland dotted with villages. The insets were labeled “the Reiderland,” and indicated a flood which occurred in the year 1277. The information was based on a 1574 map by Jacob Vermeersch.

“[Ubbo Emmius] criticized [established cartographers] for affording local folklore a credibility that it did not merit.” Emmius omitted the deluge in his 1616 map of the area, discounting fables and legends, preferring to rely on primary sources.

According to the myth of the Atlantis of the Clay, the Reiderland was submerged beneath the sea due to the transgressions of its inhabitants. We have discovered since that, while the land did indeed suffer inundation, the flood occurred in 1509—only 65 years before the first map showing it to have been three hundred years prior.

Tabula Frisiae Orientalis - Ubbo Emmius (1730)
Tabula Frisiae Orientalis, Ubbo Emmius, 1730.

What caught my eye was Emmius’s 1730 (posthumous) map. We see the Reiderland flood inset (lower right), added by the publisher after the cartographer’s death in 1625. We note, as well, nicely delineated borders dividing a landmass surrounded by an island-strewn sea. We remark additional insets in the upper corners: one a city (left), the other a fortress (right). When we identify these two, respectively, as base town and ruined castle, the historical map transforms into something more magic. That is, a map depicting an area we may explore in a fantasy adventure campaign.

When we identify these two, respectively, as base town and ruined castle, the historical map transforms into something more magic.

While the date is incorrect, and the flood’s cause may have more to do with nature’s whim than human foible, still, the Reiderland’s 33 villages lie beneath the silt of the tidal flat in this Atlantis of the Clay.

The Wizard’s Castle

My grandmother—her grandchildren called her “Nanna”—lived in the small Middle Tennessee town where Garth and I used to live. Crows flew less than a mile from Nanna’s house to our old neighborhood. Encircling a murky lake, the neighborhood was bordered on the outer edges by woods and fields with a two-lane highway on one side.

During our elementary school years, Garth and I spent long summer days exploring the woods and fields or paddling the lake in a canoe. It had been only a year since I was last there. I would start high school in the fall. Not too old to go exploring—but everything now seemed changed.

The dry summer heat shrank the lake. Brown algae covered the shallow end. The fields, where we used to play “war” and “cowboys and Indians,” were thick with brambles. The grass, that hid us to the waist, was low and stubbly.

The woods appeared less dense. The trees not so high, their trunks more widely scattered. Leaves more brownish-green than the rich emerald I remembered. The bubbling stream we once built a dam across was dried up. Its rocky bed was quiet, narrow, and gray.

The whole world was less bright, like a pale reflection of itself, and I missed my best friend. It was too late to pick up where we left off, too soon to feel nostalgia.

I remember sunny days that week at Nanna’s but no bright fields or dappled woods. Instead, the sunlight splayed across the living room floor, where I had arranged sheets of graph paper like tiles. After the brief foray to the old neighborhood, I entertained myself by making a map.

I asked Nanna if she had graph paper. She had. She gave me a pad full. I asked for a pencil. She hadn’t. She gave me a Bic roller. It was red. That will do.

Kneeling between the sofa and the coffee table, I teased a sheet from the pad and set the roller at a point where two light blue lines crossed.

I wanted to draw a castle. I wanted it to be a big castle, where a wizard lived. I dragged a red line down the page’s long edge, made a corner, then another line along the short edge.

Pulling three more sheets, I laid them two by two on the table. I had to move a bouquet centerpiece to make enough space. Similar lines on the other sheets made a large red rectangle.

It seemed not big enough. I added sheets between each corner. Three by three didn’t fit on the coffee table, so I had to draw the lines at the table and move the arrangement to the carpeted floor. Now there was plenty of room, and the castle under construction was too rectangular. I added sheets on two opposite sides to make it four portrait pages wide by three deep.

In the center of a long wall, I put a double door, which were two small rectangles end to end. I knew how to draw doors, because I had seen them on Garth’s dungeon map. The center of four pages put the door on the edge at the meeting of two sheets. One door on each sheet, they lined up together when I laid them on the carpet.

Drawing the castle meant a lot of back and forth between the coffee table, where I got more sheets and added details, and the floor, where I laid sheets in place and admired the grandness of the wizard’s castle.

I thought the wizard must live in a forest. On more sheets around, I drew a moat and the edge of the woods. Trails crisscrossed the forest, and streams met the moat. I imagined Garth and myself exploring the woods—wearing chain mail and long cloaks—discovering the castle where a trail followed moat’s edge. That reminded me to add a drawbridge over the moat at the double doors.

I imagined Garth and myself exploring the woods—wearing chain mail and long cloaks—discovering the castle where a trail followed moat’s edge.

Outside the forest, a final sheet protruded from the six-by-five-page wizard’s domain. Straight, parallel lines and a few rectangles made streets and buildings in a town.

A rectangle beside the first street corner coming into town would be the tavern where adventurer’s could get the hook for expeditions to the wizard’s castle. I didn’t know how a tavern should be named. After a few minutes thought, I wrote “Joe’s Bar” next to the rectangle.

I didn’t know what a castle’s interior looked like, either. I knew only that adventurers should find monsters and treasures inside. Looking at my lists of monsters copied from the blue book, I guessed they must be hiding in corners and roaming the vast open space that was the one-room castle, while the wizard chants incantations from his books of spells.

The castle should have traps too. I knew about the covered pit trap, that it was ten feet deep, might be filled with spikes or monsters, and it was shown on the map with an “X” inside a square.

I knew about the covered pit trap, that it was ten feet deep, might be filled with spikes or monsters, and it was shown on the map with an “X” inside a square.

I drew an X in both squares after the double doors. Lacking imagination for other kinds of traps, I put more Xs inside squares at arbitrary places inside the castle. I had a lot of white space, so I drew a lot of Xs. Covered pits were the major hazard of the wizard’s castle.

I thought a pit might drop straight down to a level below. I also knew about sliding stairs that carried the unwary to a lower level. That gave me the idea to add upper levels to the castle.

I outlined the second floor, the same as the first, and drew Xs in a few squares. Then I switched to rectangles, one-by-two squares, with a long arrow to show a chute. Laying the leaf over its corresponding first-level sheet, I noted where the pit or the chute would come out and drew a square in dotted lines at that location.

With more overlays I made more levels above. Towers sprang up from the third level’s four corners. A large square central tower rose up to a fourth level. Then I thought to add support columns beneath the towers. Stairs at various locations went up and down between floors.

The wizard’s castle was full of means to get from top to bottom, some more quickly than others.

The Wizard’s Castle
A Reproduction from Memory of the Wizard’s Castle, Ground Level.
At ⅛ the original scale, this one fits on a single sheet. Light blue rectangles mark page edges. Red lines are made with a Bic.

When Nanna asked what I was drawing, I said, “It’s a castle.”

She said, “It doesn’t look much like a castle.”

I had to point out the forest and the moat. “This is the drawbridge that goes into the castle. Watch out for those traps.”

I didn’t think to tell her it was a plan view, looking down on the castle, not the perspective view she might have expected from a grandchild. Instead, I showed her how you had to walk up the stairs to each level, being careful to avoid prowling monsters.

I laid the top sheet over the third level of the central tower. It had a square, outlined in red. At the center, stairs went down.

“The best view is from the top floor. That’s where the wizard lives.”

Nanna was nonplussed. But at the end of the week, she made a good report to my mom. “That Steve is a good boy. He’s quiet and plays all day at his drawings.”

As then, still now, D&D for me is much about the maps.

Civilization and Diplomacy Map Boards on the Globe

Apart from Outdoor Survival, two other games have map boards that attract me as campaign world settings. I put them together to imagine the map of DONJON LANDS’ “Known World.”

I always thought Avalon Hill’s Civilization map board looked odd. I couldn’t put my finger on why it didn’t look right, but the shapes on the board didn’t match up with the Mediterranean map in my American-educated mind. I figured the map board artist was obliged to distort coastlines to fit land masses within a limited space or otherwise failed to color inside the lines.

I was surprised, when I laid a scan over a Google Earth screen projection, to see that the board artist only rotated the map a few degrees from north.

Both the geography and history of the Mediterranean and the Near East inspire adventures in ancient lands with seagoing voyages, threatened by mythological creatures from the deep, and desert treks to visit distant realms and explore forgotten temples atop stepped pyramids.

At the same time, pseudo-medieval is the “classic fantasy” I grew up with, before and after my introduction to adventure role-playing games. Northern Europe inspires adventures where vikings plunder coastal towns, armor-clad knights ride out from spired castles on quests for legendary objects, and druids chant rituals amid misty forests.

Unlike Civilization’s map, I thought the Diplomacy board was more or less correct—excepting Iceland, which I assumed was displaced to make way for the elevation legend. Not at all. I had to rotate the Diplomacy map a full 20 degrees to line up the coastlines on the globe. Thule is in its proper place.

Civilization and Diplomacy Map Boards on the Globe
Mappa Mundi.
Map boards from Advanced Civilization (Avalon Hill, 1991) and Diplomacy (Avalon Hill, 1976)—both rotated counterclockwise, 6.2° and 20.6° respectively—laid over a Google Earth image, oriented north (Google Earth imagery: Landsat/Copernicus Data SIO, NOAA, U.S. Navy, NGA, GEBCO IBCAO U.S. Geological Survey).

The Blackmoor Finger

“The basic campaign area… was originally drawn from some old Dutch maps.”

—Dave Arneson, First Fantasy Campaign, 11

Like many Blackmoor fans, I’ve often wondered about—and long sought—these “old Dutch maps.” It isn’t surprising that the naval wargamer would have on hand maps made by one of the great maritime powers of the Age of Sail. But would these Dutch maps depict the homeland or some distant discovery, like the Falklands or the Hudson Valley?1, 2

An Old Dutch Map


Yet, Blackmoor has in common with the Low Countries at least its soggy biome. In 2009, James Mishler of Adventures in Gaming took a 1520 map of Holland, flipped it over vertically, and rotated it 90 degrees to the left.3 He invites us to compare the results to the earliest then-known sketch map of Blackmoor, which is found in First Fantasy Campaign (12).

Mishler also notes that the image manipulation places any page footer text to the left of the map, that is, westward. Apocryphal or no, the legend goes that the Duchy of Ten, west of Lake Gloomy, is named after a “10” on the map. This, as Mishler postulates, might mean we should be looking for a map from a book that uses intaglio plates, the reverse side of which are blank.

Map of Holland - Flipped and Rotated Blackmoor Sketch - First Fantasy Campaign
Map of Holland, Flipped and Rotated, and Blackmoor Sketch, First Fantasy Campaign.
Frankly, I can make the Blackmoor sketch look like just about anywhere if I squint just right.

To wrap up a multi-part review of First Fantasy Campaign, Bat in the Attic Rob Conley searched out an old Dutch map to dress up as a fantasy realm. But, he writes, “I couldn't quite figure out which old Dutch map to use or how it looked anything like Blackmoor.” Finally, Conley used Mishler’s method to create the map for his Blackmarsh old-school setting supplement.4

Rob Conley’s Blackmarsh
Rob Conley’s Blackmarsh.

Not satisfied with the results obtained from the Mishler method, I continued the search for “old Dutch maps.” As often happens during these rabbit-hole explorations, I learned lots of things—one of many reasons D&D is a superior game.

Having heard the legend of the little Dutch boy who plugged with his thumb a leaking dike, most of us are aware that the Netherlands has been sinking into the North Sea for centuries. Since the middle ages, the inhabitants have drained lakes to reclaim land, and an extensive engineering project called the Zuiderzee Works, in the 20th century, damned the central bay and created a number of polders.5

The practical upshot of all this is that not all old Dutch maps look the same. As man struggles against nature, land creeps above the waterline then slips below, year by year, as though subjected to the crests and troughs of a long-period tide.

Since Mishler’s go at matching Blackmoor to Holland, an earlier Blackmoor map surfaced. Most online references point to an article on Secrets of Blackmoor, which shows a colored version of what it calls the “Original Blackmoor Map.” The map is accompanied by a one-page document describing a “medieval project.”6 The document’s first enumeration reads as follows:

“See the enclosed map which represents the area known as the Northern Marches which guard the frontier of the great Empire of Geneva from the ever present threats presented by those who lurk beyond the light of our great empire and its great king.”

Blackmoor Facts - Hoyt Blackmoor Map - Hoyt
Document and Map Concerning the Northern Marches, Courtesy William Hoyt.

Stamps (not shown above), presumably placed by Secrets of Blackmoor, on both document and map credit the source as Twin City gamer and Arneson contemporary William Hoyt. The document’s text concludes with the initials “D.A.”

OSR Grimoire compares this earlier map to Mishler’s 1520 Holland map without alteration.

Original Blackmoor Map Compared to a Holland Map
“Original Blackmoor Map” Compared to a Holland Map.

The U-shaped coastline matches up fairly well, the extreme west coast, though short, matches better, the Dutch location looks fearsome enough to accommodate the Egg of Coot, and a few Dutch roads share a similar angle as some Blackmoor waterways.

Still, though, I’m not convinced. The search continued until I saw the finger.

A salient feature of the earlier Blackmoor map, reproduced on the foldout map in First Fantasy Campaign, is a strip of land that extends from the Glendower peninsula, pointing northwest toward the Egg of Coot. I always thought Dave must be giving someone the finger—I don’t know who…

Map of the Republic of the Seven United Netherlands  Janssonius  1658
Map of the Republic of the Seven United Netherlands, Janssonius, 1658.

This 1658 Map of the Republic of the Seven United Netherlands7 (above) shows a similar land mass, perhaps a tidal flat (upper middle). Considering the fist behind, it is pointed the opposite direction. Applying the Mishler method, however, orients the finger to align with that of the earlier Blackmoor map. The fist becomes the Glendower peninsula.

Earlier Blackmoor Map Overlay on Janssonius 1658 Map
Earlier Blackmoor Map Overlay on Janssonius 1658 Map.

To align the finger just right, I rotated the Blackmoor map 10.29 degrees. I note also that, on importing the Blackmoor map, I didn’t have to change the scale. Coincidence, perhaps.

Earlier Blackmoor Map Transparent Overlay on Janssonius 1658 Map Cropped to Blackmoor Area
Earlier Blackmoor Map Transparent Overlay on Janssonius 1658 Map, Cropped to Blackmoor Area.

The finger of land aligns well, but nothing else matches. Maybe the Blackmoor map is an amalgam of different takes on the same or several maps.

I am yet far from convinced. But a coincidence of geography seems unlikely. Arneson may well have traced features on the reverse of a “Plate 10.” Future searches for “old Dutch maps” might keep an eye out for those showing the Blackmoor finger.


Notes

1 A thread on the OD&D Discussion forum bounces around the idea that Arneson may have been inspired by the Minnesota coast of Lake Superior.

2 Browse a few dozen old Dutch maps on Stanford’s Renaissance Exploration Map Collection.

3 Mishler’s article “Original Blackmoor Maps,” no longer available at the original address, is now found at Adventures in Gaming v2 as “[Throwback Someday Post] Original Blackmoor Maps.”

4 Blackmarsh: A Setting Supplement Compatible with the Delving Deeper Rules and All Editions Based on the Original 1974 Roleplaying Game, Robert Conley, 2011. Available in print or PDF on DriveThruRPG.

5 Polders: My untrained eye spots some of these areas of reclaimed land on a satellite image.

6 In response to a question in the comments to the Secrets of Blackmoor article, Griff Morgan writes that several pairs of the map and document exist.

7 Wikimedia Commons identifies Joannes Janssonius as the cartographer of the Map of the Republic of the Seven United Netherlands from the collection Belgii Foederati Nova Descriptio, Amsterdam, 1658.

Schlafender Drachenturm, the Lonely Tower

Spurned by her lover, the wizard Agodt built the tower that now crouches below the crest of a high crag in the remote foothills of the Western Mountains. Other than the occasional apprentice, she lived alone.

Agodt named her home Schlafender Drachenturm—or Sleeping Dragon Tower—after the motif with which she adorned the structure. But even in the wizard’s day, folks called it “the Lonely Tower,” for Agodt pined after her lost love. Since her disappearance some decades ago, the tower has been undisturbed. Only time takes its toll on crumbling stones.

Before the summertime distraction that was the Valormr Campaign, I played the first session of Wyrmwyrd. Wyrm Dawn, the Battle of Throrgardr, and Valormr were invaluable in fleshing out the dungeon’s history and culture as well as the geography of surrounding lands. Though short campaigns, the three together took up the better part of the game-playing year.

The autumn passed in house-moving, “there and back again” to the beach-front apartment, where I’ll be through April at least. A nomad’s is a precarious lifestyle. I intend to get in at least one more session of Wyrmwyrd before the end of B/X’s 40th-anniversary year. In any case, the campaign continues.

The Lonely Tower
Schlafender Drachenturm, the Lonely Tower

Player Characters

Thorsdottir serves as an acolyte of the Allfather Church in the Elding Wood village. Her friend Gandrefr is apprenticed to a sorcerer, who lives in a nearby hamlet.

Now, an adventurer has come to the Elding Wood village. Ansgar the Bold speaks of a powerful magic sword once possessed by the wizard of the Lonely Tower. Proof of the claim is a parchment he found among the belongings of Arkadin Hoarcloak, Agodt’s last apprentice, long-dead. Ansgar shows this parchment to anyone who expresses interest in joining his adventuring party. The calf skin is yellow with age, its edges burnt.

“I saw it only once,” reads the crooked scrawl, “before she was aware of my presence. The sword lay on the worktable before her. It was magnificent: a serpent coiled around the hilt, from bejeweled pommel to crossguard, and runes ran the length of the bronze blade. When Agodt noticed me, she covered the sword and bid me away.

“Later, in the dungeon below the tower, she built a secret vault. Among many wondrous treasures she stored there was a yew-wood case, narrow and long, bound in brass, a serpent engraved on the lid.

“Agodt closed the vault behind a solid stone-block wall. I dared to ask: How do you get in? She answered: The key is on the lintel. I searched the entire tower from upper works to dungeons below. I found no kind of key nor anything else on any lintel.

“It was soon after this that I was dismissed. Agodt gave no reason, and she never took another apprentice.”

Arkadin Hoarcloak
Eversden Hamlet, Odenwoad

From the village and surrounding communities, a score of hopeful adventurers gathered at the Elf King’s Inn. The company discussed plans for the expedition. Ansgar hired a local guide to escort the party to the Lonely Tower. They would depart at dawn on the morrow.

Short festivities followed. The ambiance was jovial. Afterward, Ansgar retired to his room. When he didn’t come down in the morning, two of the company banged on the door before entering. They found Ansgar in a blood-soaked bed, his throat slit. The parchment was not found.

With the company now divided between those who would venture to the Lonely Tower as planned, those who doubted the parchment’s veracity, and those who would find the killer, the inn erupted in boisterous debate. Amid the cacophony, Gandrefr approached a quiet fellow who stood apart from the crowd, while Thorsdottir sought the guide. After brief negotiations, the four departed.

The guide escorted the party to the Lonely Tower then waited outside as agreed. Thorsdottir, Gandrefr, and the retainer Ardur explored the tower’s three upper levels. They discovered, above the entry door and on each floor, something of interest.

Entrance

Engraved in the arch over the entry door is the following inscription:

LOST ALONE TOGETHER FOUND

First Floor

A fresco covers the west wall, between the two stair bases, from floor to 20-foot ceiling. It depicts two robed figures, man and woman, he in blue, she in lavender. He carries a short blade. She holds a ball of light overhead. They walk through a wood. Ahead of them, a circle of stones. On the stones are carved eight-legged serpentine creatures. Above the circle’s center floats an object wreathed in a radiant aura.

Second Floor

A statue of a human female and a dragon coiled around. The paint is chipped and worn, showing alabaster beneath. The woman’s face is triangular, the nose thin. She wears a lavender robe, trimmed with white flowers. The dragon’s tail circles her waist, leaving arms free, and turns up at her knees. It’s head rests on a shoulder, peering up at her.

Third Floor

An iron statue, covered in a layer of rust, of a dragon standing, wings displayed, tail wrapped around the base. One eye is closed. The other is open, but the socket is empty. A claw held to its chest is clenched tight in a fist.

The Thing About a Dyson Logos Dungeon Map

Watching one of Dyson Logos’s time-lapse videos is mesmerizing. Finger tips squeeze close to nib. Black ink trails as the pen glides along straight lines, jerks through hatch marks. Parallel lines become a long corridor, a protruding rectangle a door frame. Rubble strews across the floor.

Then the hatching. Short, quick strokes: one, two, three—one, two, three… That’s when we know: this guy’s wired different.

There’s a thing about a Dyson Logos dungeon map. By the hatching we recognize the style, because we’ve been admiring his work for more than a decade. But it ain’t the hatching.

The thing is the design.

To make the point, I chose a Dyson Logos map without hatching. Tunnels of the Shrouded Emperor is an example rare and fine.

Tunnels of the Shrouded Emperor
Tunnels of the Shrouded Emperor, Map by Dyson Logos.

The tripartite doorways either side of the entry hall, middle north, a blind stairway landing just south of it, rounded triangular daises in an octagonal room, a balcony overlooking half a chamber, stairs to the side, the generous use of dungeon furnishings—these catch the eye and draw us in.

But there’s more. Charting an imagined course through the dungeon, we follow branches, turn around at dead ends, weave one way or another along parallel routes, until we progress, via a wide thoroughfare, into the southern caverns.

This long trench reminds of a dry watercourse, perhaps a former Darkling tributary, which leads us to the dungeon’s end, where we find only stones and dry bones and lurking creatures. For we’ve missed the diamond-shaped central chambers where its priests work to repair “The Shrouded Emperor.”

That’s the thing about a Dyson Logos dungeon map.


Dyson Logos has been creating hand-drawn maps for fantasy role-playing games since 2009. You can support the creator on Patreon.