Terrain Effects

Strategic Movement

This is the fourth of five articles, which discuss strategic movement in the Valormr Campaign.

Movement by Terrain Type

The table below gives the point cost to move into a hex of each terrain type. Some terrain types have other considerations, described below.

Terrain Cost (Move Points)
Clear 6
Forest 9
Hill 9
Swamp 9
Mountain 12
Road ×⅔*
Track ×1*
Sea or River 6
* This factor is multiplied by the move point cost of the terrain type the road or track traverses.

Spending Move Points: On the strategic map, a commander figure moves into a hex, expending the required points. If it hasn’t enough points to move into the next hex, it moves no farther.

Saving Move Points: A commander may save unused points for the following day’s movement. If the unit remains stationary, the points are lost. If a unit halts movement or if it makes enemy contact, excess points are lost.

Note: Saving points for the next day allows movement at ⅔ normal rate, such as through swamp and hills, while avoiding the situation where a figure straddles the line between hexes, which is awkward when we consider enemy contact.

Advanced: Getting Lost

In the advanced game, a small-unit commander, a lieutenant say, may get lost unless following a road, track, or water course. Commanders of larger units do not get lost under normal circumstances.

Forest and Swamp

Only infantry can move in formation through forest or swamp without a road. Ellriendi elves move at Clear rate through their home forest. Lizard men move at Clear rate through swamp hexes.

Mountains

Mountainous terrain is crossable by formed bodies of troops only by road (two parallel lines on the map) or track (line of crosses).

Units, Formed and Unformed

To cross certain terrain, a force may move unformed.1 Thereby cavalry moves off-road through forests, and armies cross mountains. At the end of unformed movement, at a rally point, one day must be spent to reform the troops.

Furthermore, 5 to 15% (half-dice2 × 5, round up to nearest figure) of the force will be lost to stragglers per day of unformed movement. A unit at the rally point may wait for stragglers to catch up (half-dice × 5 per day). On departure from the rally point, any remaining stragglers are lost.

In case of enemy contact, units of an unformed force begin the engagement in a non-rallied state as if in retreat. Though their backs may or may not be to the enemy, each unit rallies at the end of the first turn of mass combat, unless it is attacked. See Retreat and Rout and Continued Retreat or Rout (Chainmail, 16).

Sea

Coastal Waters

Longships and galleys must remain within coastal waters, which extend out to two sea hexes from a coast hex. That is, the vessel can have no more than one sea hex between its current hex and a coast hex.

The north coast from East Port westward is a mud flat at all but times of high tide. Therefore, all vessels must use a channel (marked on the map as dashed lines).

Longships, galleys, and sailing ships may move through coast hexes to another coast hex or to a sea hex. Troop transports may only move into a coast hex that contains a channel or a port.3

Longships and galleys may beach on any coast hex. Sailing ships do not beach but must anchor offshore; troops debark by rowboat. A troop transport requires a port for docking.

Open Sea

Only sailing ships and troop transports may enter hexes beyond coastal waters. Troop transports straying into open sea lose any galley escort. Ships at this distance from the coast cannot see it. Nor can any shoreline observer see ships so far out.

Rivers

Navigating

Only river boats and longships may navigate rivers. All rivers shown on the strategic map, save one, are navigable. The northeast river is a canal last used by the Greater Ones. Now in disrepair, it falls at three points through cataracts (shown as crossing bars).

River boats and longships may beach on either side of any river hex.

Advanced: Upstream, Downstream

A vessel might move upstream at a slower rate and downstream faster. For example, a river boat might have 30 move points upstream and 42 down.

Advanced: Tide

In complex rules, where we track the tide, a vessel might take advantage of the incoming tide to move faster at a river mouth. Moving with the tide, the move cost is halved, against the tide doubled. Tidal reach varies by river. Though six or 12 miles from the sea is usual, up to 60 miles is possible.

Advanced: River Sailing

Longships and small sailed craft (like sailing boats but not sailing ships) might travel along river ways under sail. Rules for wind are required, however, as it is less frequent, and the river’s navigable channel must be wide enough to allow room for tacking against it.

Crossing

The portion of a river, on the map, where opposite shores are separated by white space is considered major river. Where the river is represented by a single line it is a minor river.

Any move cost to cross a river is in addition to that required to move into the hex. For example, infantry (12 daily move points), moving one morning into a clear terrain hex with a minor river crossing their path at a ford, spends 6 move points into the hex and 6 more points to ford the river. The unit makes camp on the opposite shore.

A force crossing a river by any means other than a bridge is considered unformed. The times required for the crossing below include reforming the troops.

Bridges: All arms may cross bridges at full speed—no extra move point cost. Bridges are marked by an arc over the river.

Ferries: Move cost for ferry crossings depends on the river category, described below. Ferries are marked by two dots, one either side of the river.

Fords: As these are navigable rivers, any ford is at least three feet deep but not more than four. These are sensitive to rainy periods. (A later article covers the effects of weather.) Move cost to ford a river depends on its category, described below. Fords are marked by two carets, one either side of the river, pointing to the ford.

Major Rivers

To cross a major river without bridge or ferry, a unit’s only recourse is to build rafts. Collecting timber, building rafts, and crossing require three full days—one day per activity. During the first two days—collecting timber and building rafts—the force is considered formed, but if attacked defends with only one-third its force. In any other than forest or swamp, throw a dice at the end of the first day. A roll of 1-4 reveals insufficient timber. The unit, having lost one day, cannot cross in this hex. Attempt to collect timber in the elven forest at your peril.

Ferries: All arms cross a major river by ferry in two days.

Strategic Movement
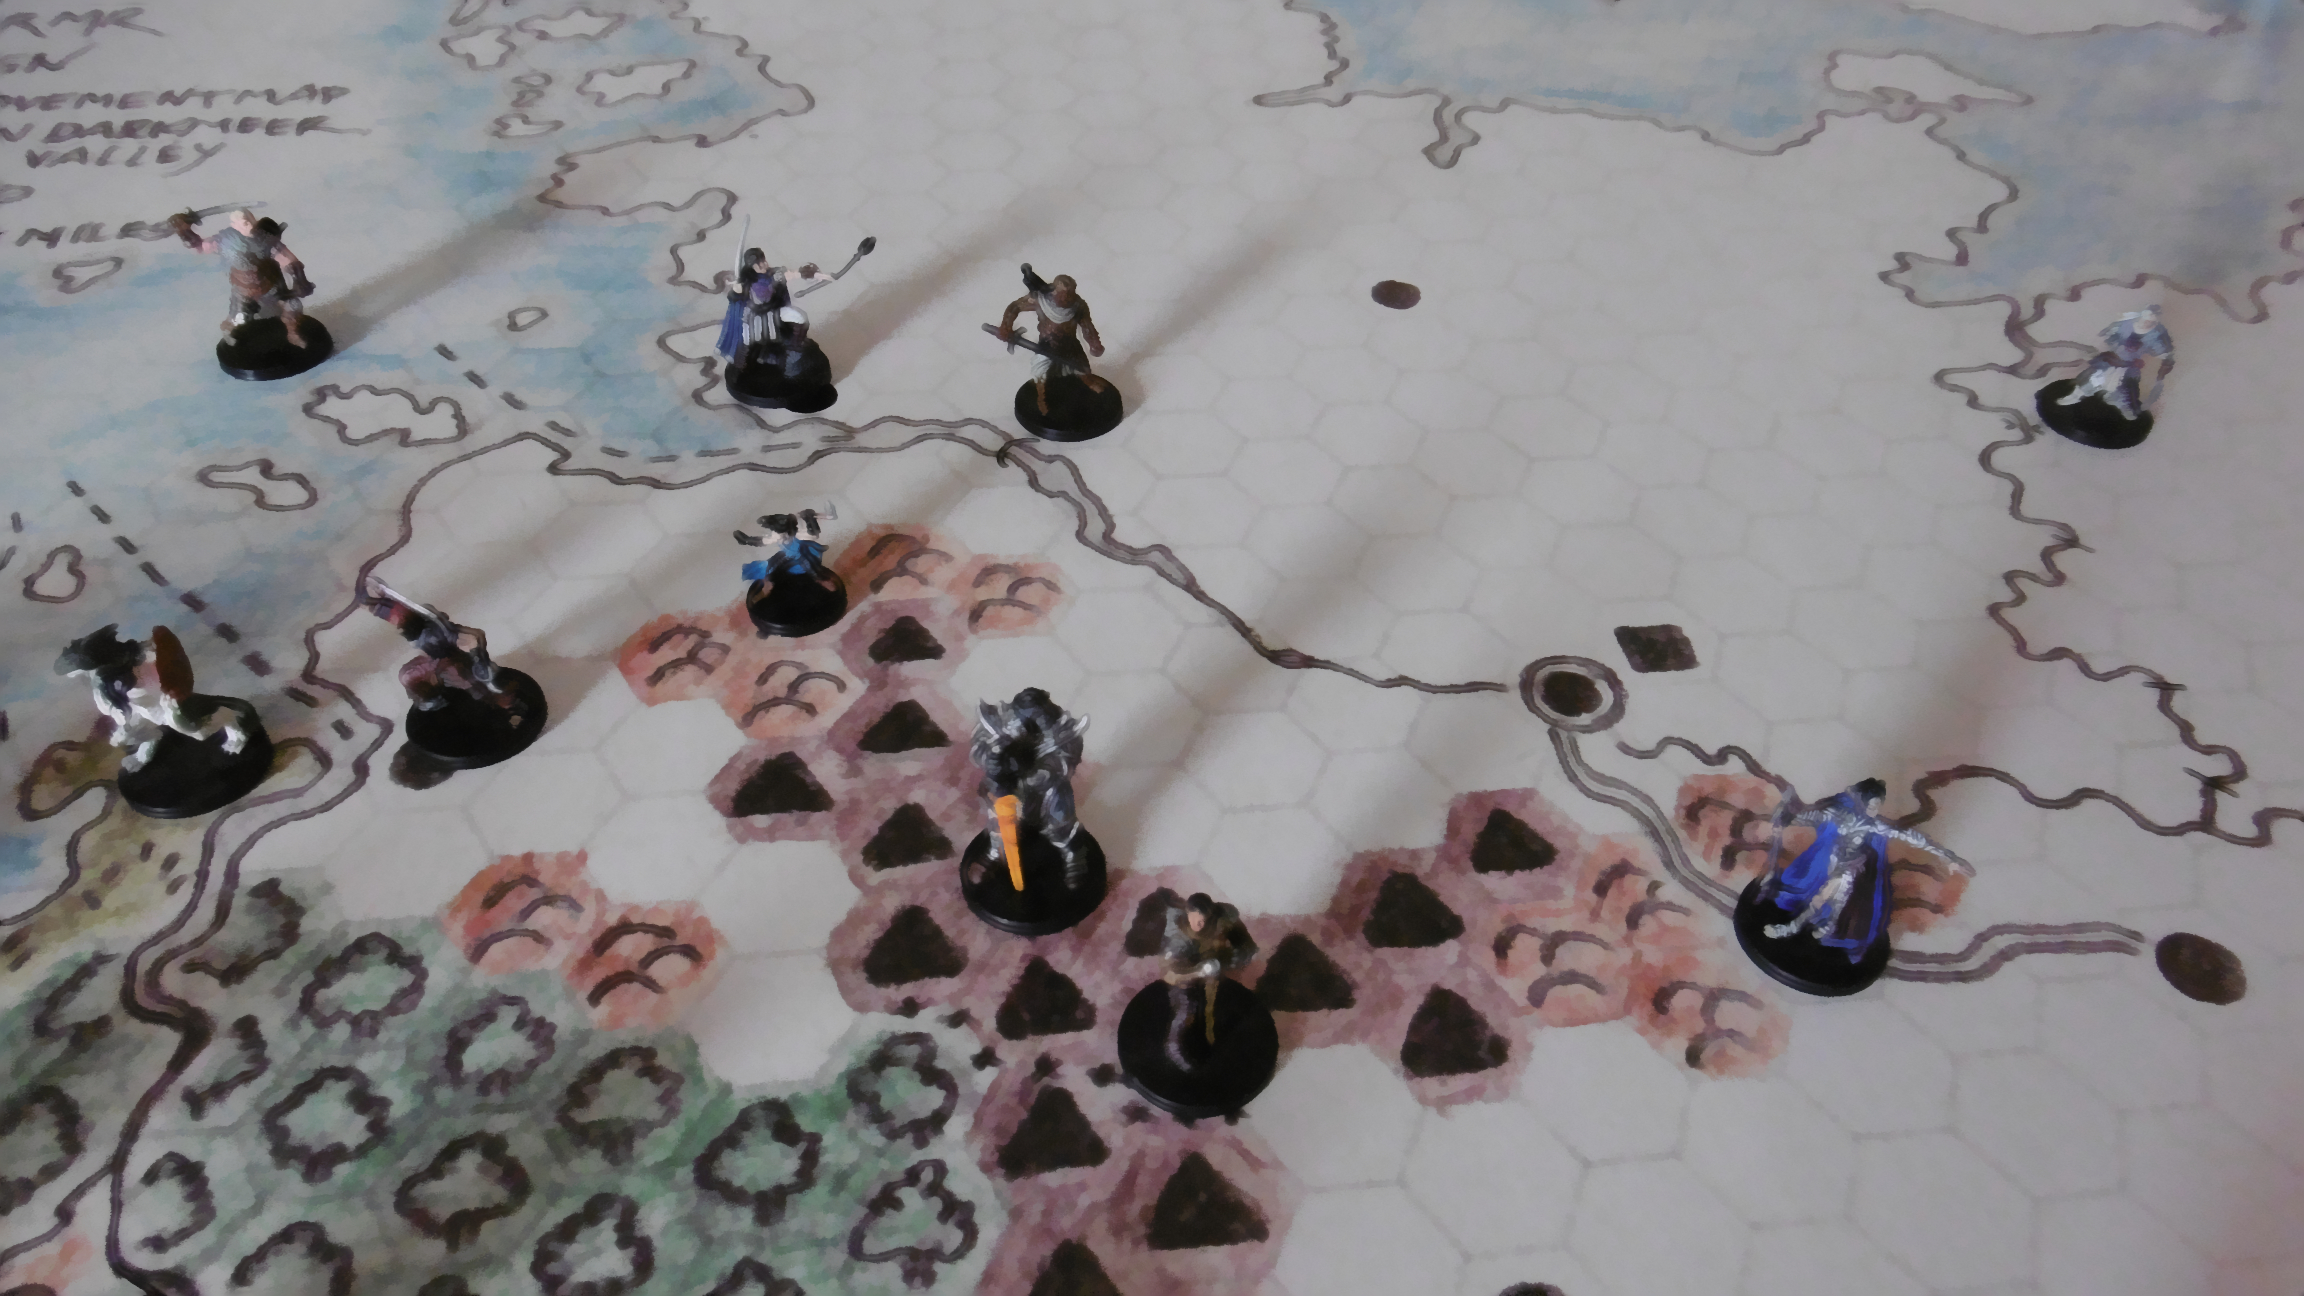
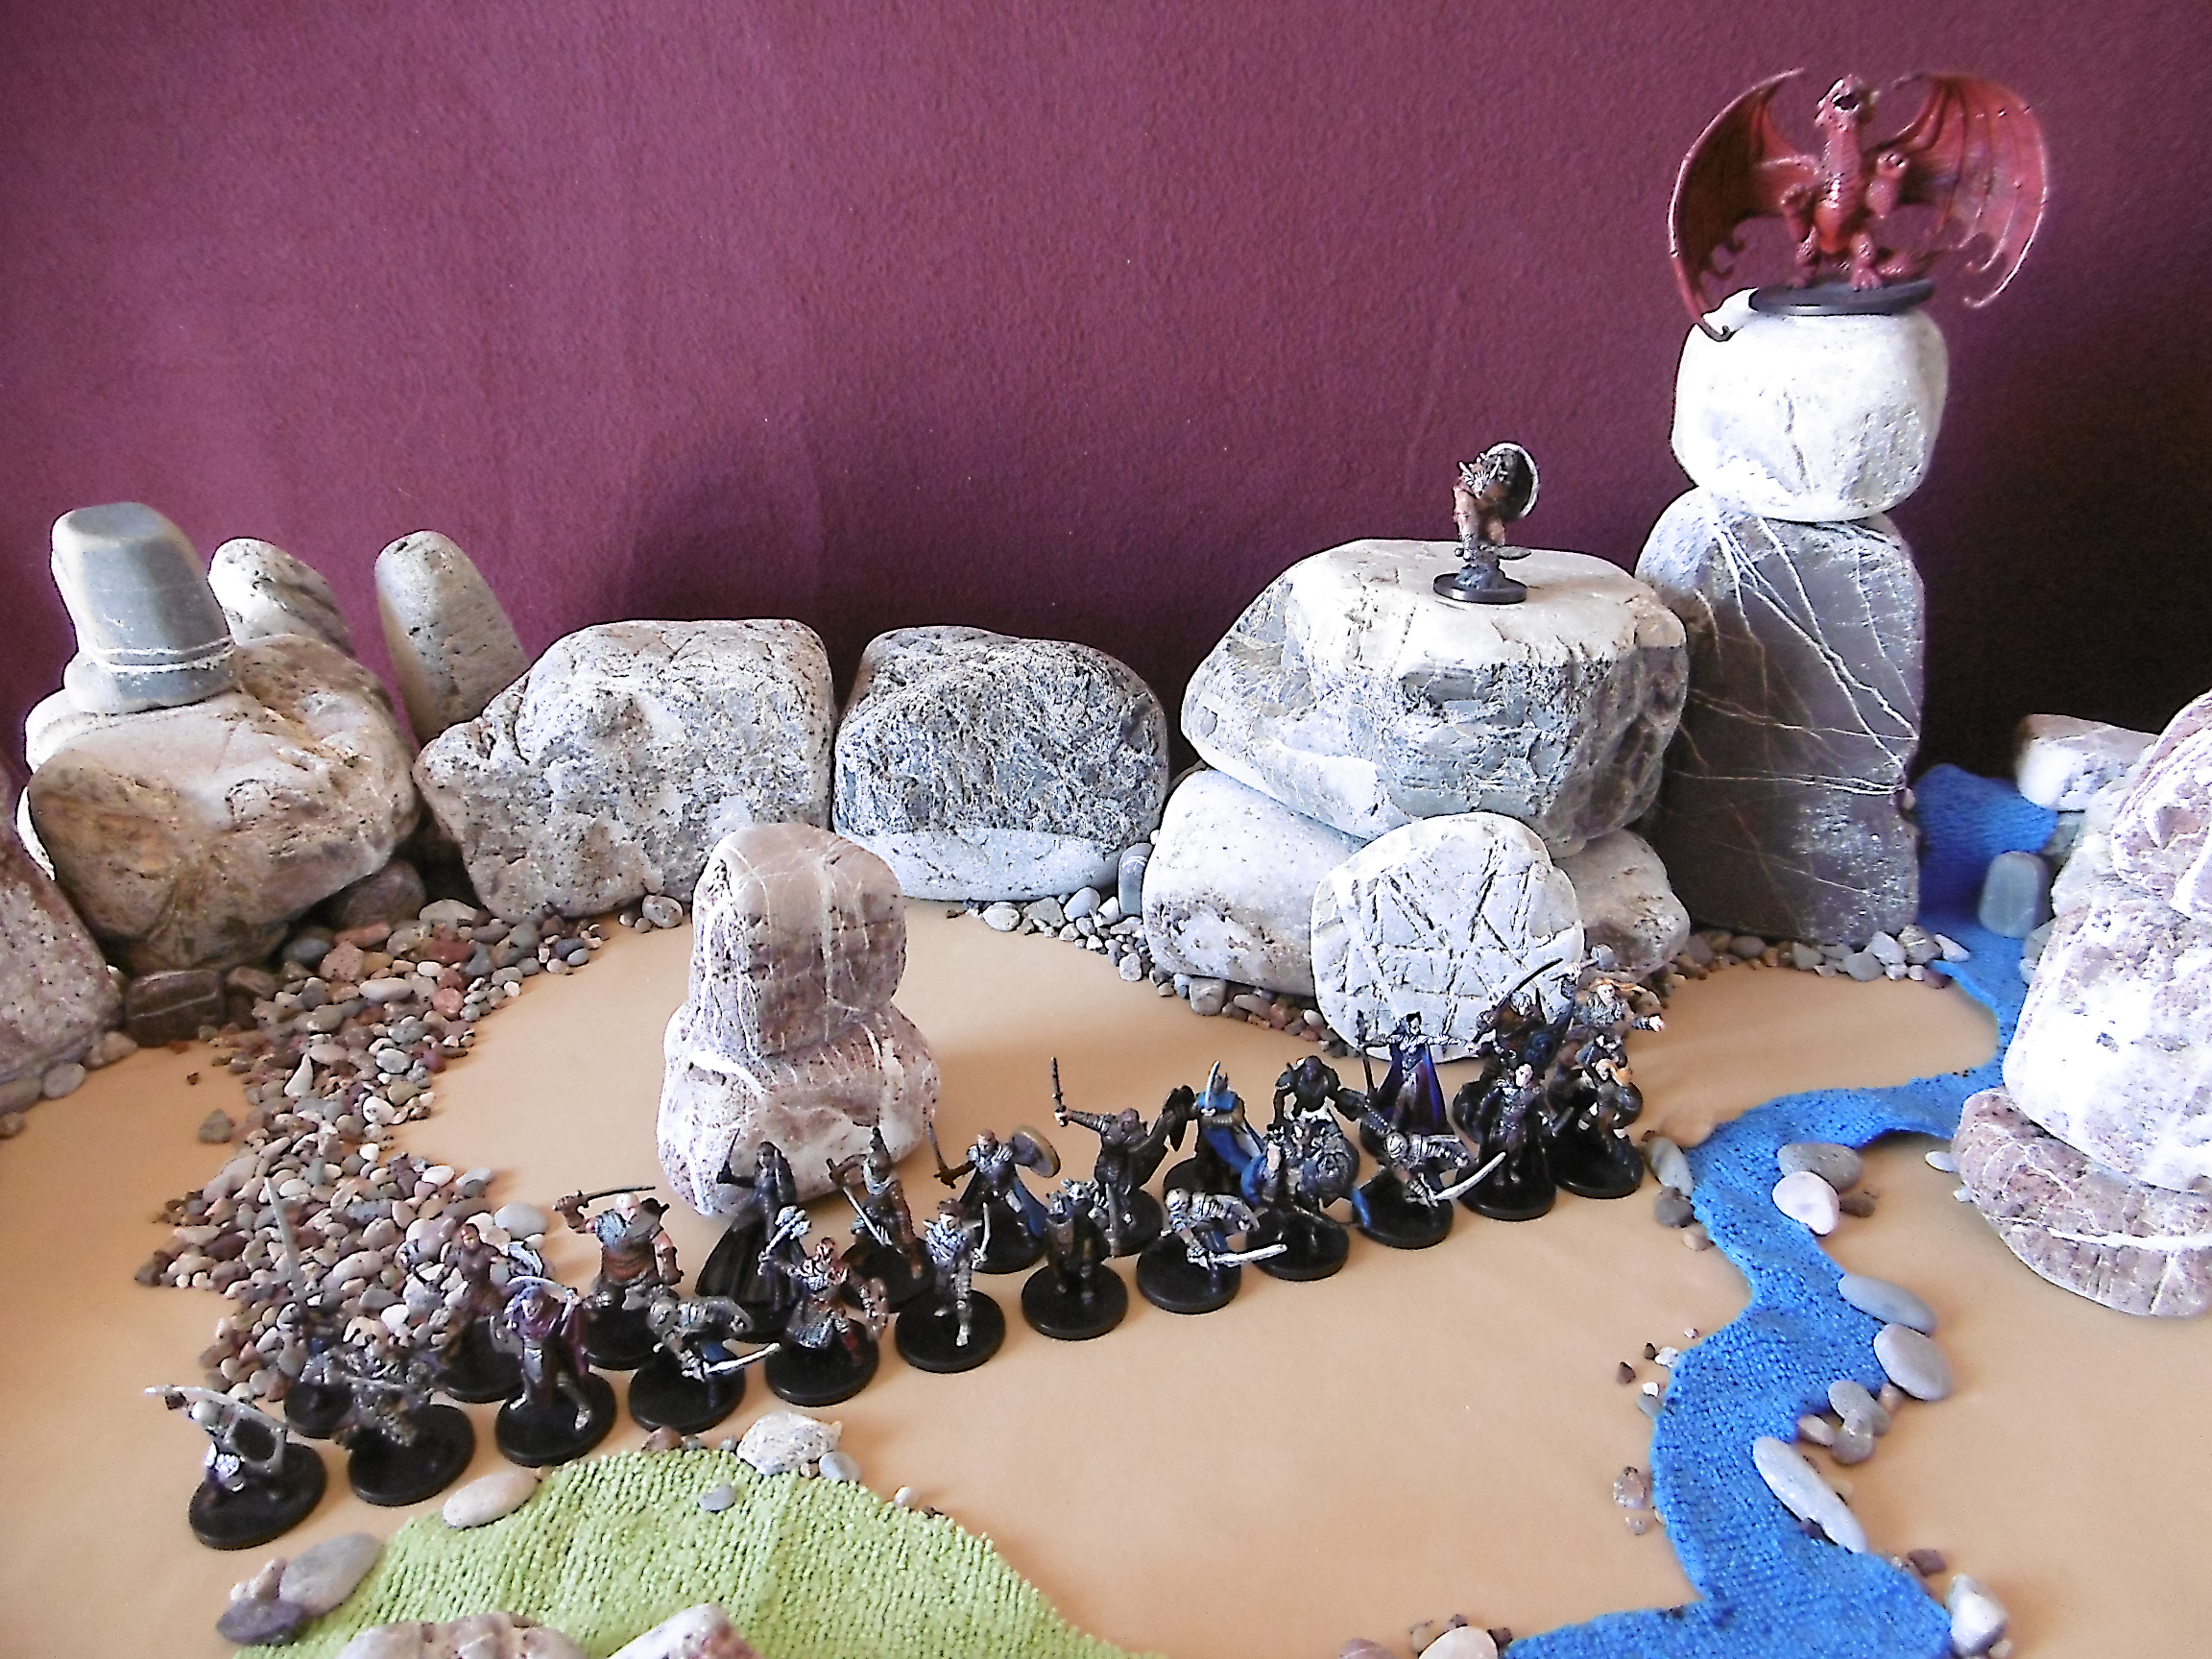
Arn approaches a bridge (upper middle), Mordred takes a mountain track (lower middle), Ingegerd travels by road (lower right), and farender mercenaries wade a ford (upper right).
Minor Rivers

Cavalry may cross a minor river without bridge, ford, or ferry, consuming 50% of its daily move points. Infantry may build rafts as in crossing a major river above.

Ferries: All arms cross a minor river by ferry in one day.

Fords: Cavalry crosses a ford on a minor river at full speed, while infantry uses 50% its daily move points.

Advanced: Engineers

Bath mentions a “bridging train” that allows major river crossings (66). In the advanced game, engineer trains might perform other tasks as well, including building bridges, siege engines (also mentioned, 66), and roads.


Notes

1 Rules for unformed units are properly part of a more complex game. In the present scenario, I want orcs and gnolls to be able to travel through mountains, so I include these rules. Still, as the disadvantages are great, a commander is advised to choose routes where units may move in formation.

2 A half-dice is the result of a dice throw divided by two rounded up.

3 Troop transports, converted from large sailing ships, may not hug coastlines due to a 10-foot draft.
Download the Valormr Strategic Map

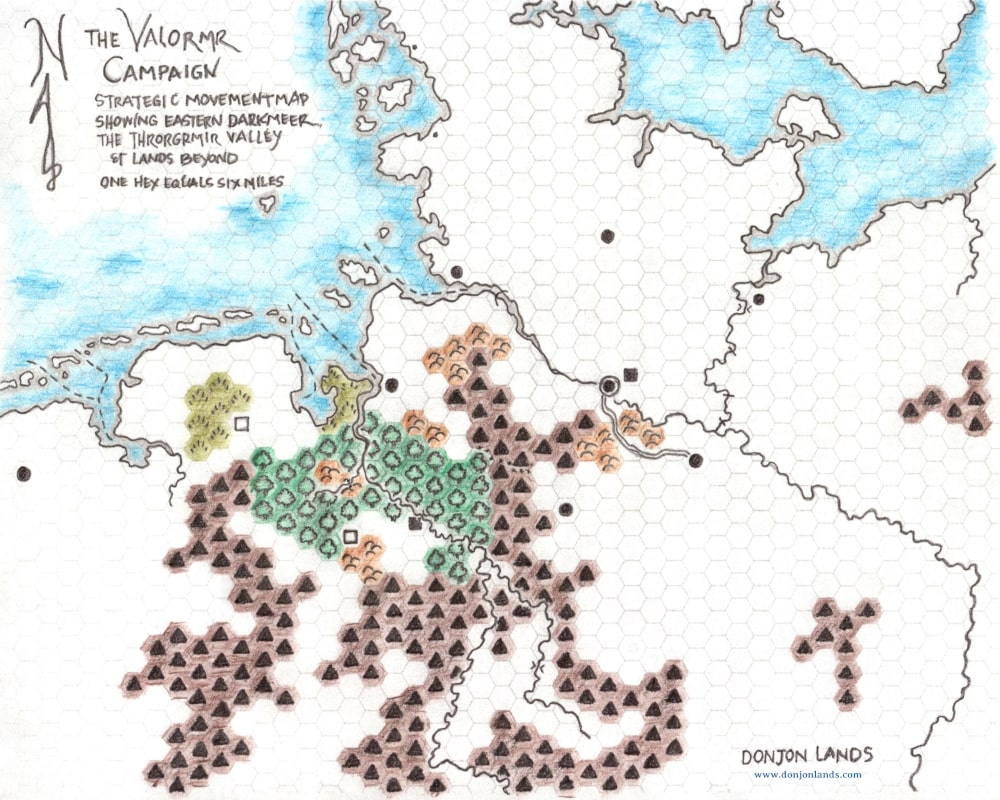
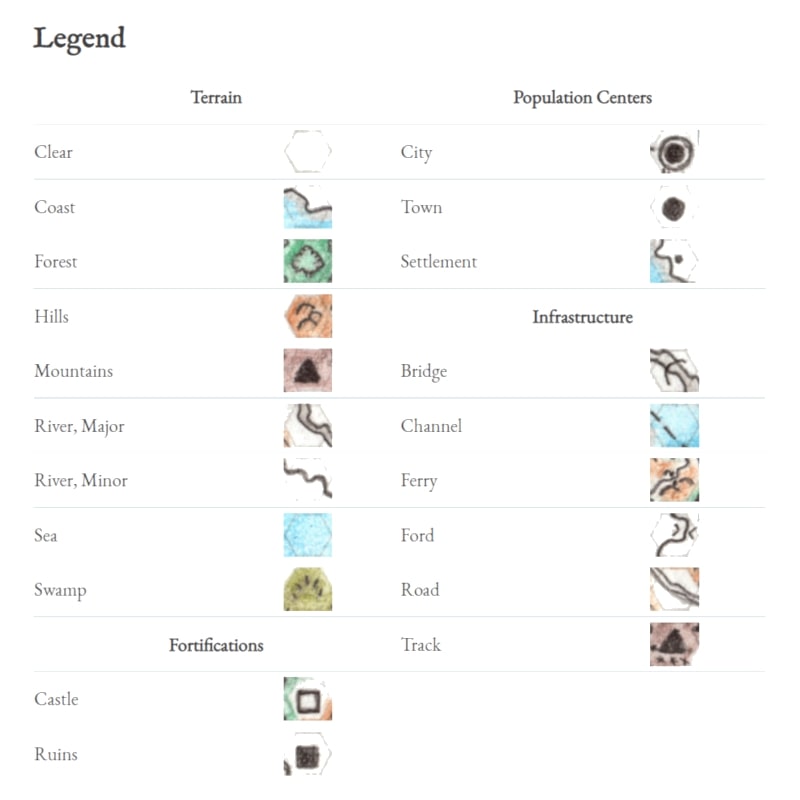
With the strategic movement rules almost ready, I added a few refinements to the Valormr Campaign Strategic Movement Map: two towns, cataracts, fords, a ferry, and a bridge. I updated the map in the original article. I also appended a legend. The map in higher resolutions, 100, 300, and 600 dpi, is available on the Downloads page.

The Valormr Campaign Strategic Movement MapLegend
The Valormr Campaign Strategic Movement Map and Legend.

Waterborne Transport

Strategic Movement

This is the third of five articles, which discuss strategic movement in the Valormr Campaign.

Move Rates

The following table is reproduced, for convenience, from “Overland Travel.” Move rates are expressed as a number of points, one point equaling one mile. The points given here are for one day of travel. A unit spends these points to move into a hex.

Force Type Move Points
Ground Troops†
Infantry 12
Cavalry 24
Special
Courrier* 48
Waterborne Transport
Galley 18/72**‡
Longship 18/90**‡
River Boat 36
Sailing Ship 90‡

Troop Transport

72‡

† Details on ground movement are given in the previous article.
* A lone rider; includes such individuals as spies and scouts.
** Rowed/sailed.
‡ Under sail, ships move during both the day and night periods of a turn.

Transporting Figures: Ships carry a number of figures,1 as noted below, plus any number of individual figures, such as heroes, wizards, leaders, and couriers. An army may be transported one regiment at a time but not in smaller units. This means a number of vessels to carry at least one regiment must be purchased.

Night Movement: As ships under sail move throughout a 24-hour period, their daily move points include travel during both the day and night periods of the turn. When necessary to know a ship’s location in the evening, assume it has consumed half its daily move points.

Debarkation: An army does not move until all regiments are assembled at the port of debarkation. To make way for other armies to embark or debark, the commander figure, awaiting regiments in transport, may move one hex off the port hex. While so waiting, a unit is considered formed, though, if attacked, may only bring to bear the present portion of its force.

Strategic Movement
With three regiments of six figures each, Northmen embark the entire force on nine longships. At East Port, the Prince of Aeskrvald embarks a regiment of 27 figures on nine troop transports, which cost 27 points plus 4 points for a galley escort.

Waterborne Vessels

Galley: Equipped with a ram and two light catapults, a galley moves as fast as a troop transport and may escort a fleet—to fend off lizard men going into Skullhaven, for example. For effective defense, one galley per regiment transported is required. As its marines are necessary to its mission, a galley cannot transport troops.2

Figure Capacity: —       Cost: 4

Longship: The Northmen sail their longships on the sea and row them in rivers. Northmen have enough longships to transport themselves. They do not pay army points for them, and no other army may buy longships.

Figure Capacity: 2       Cost: —

River Boat: These small boats may travel only on rivers. Due to limited carrying capacity (10 men), four river boats are required to move one figure.

Figure Capacity: ¼       Cost: ¼

Sailing Ship: Sailing ships are used by pirates, who do not pay army points for them. A sailing ship may be outfitted with one light catapult (additional cost: ¼). All pirate ships are so equipped.2

Figure Capacity: ½       Cost: ¾

Troop Transport: A troop transport is a seagoing vessel. In our simple campaign, we ignore any time required for embarkation and debarkation as well as the state of the tide. As a troop transport may travel in the night, once a unit is embarked, some part of the day may remain, plus all the night, for the voyage. Reduce the transport’s move points by 25% or 50% accordingly. Unlike those aboard longships or river boats, figures moving by troop transport are not crew. A full day in transport is, therefore, considered a day of rest.2

Figure Capacity: 3       Cost: 3

Advanced: Embarkation and Debarkation

Some amount of time is required to embark and debark troops. In addition, a departing ship must await a favorable tide. Without creating tide tables (or applying historical tables to the game world), we assume, in the advanced game, a seagoing ship waits six hours—that is, one-quarter a sailing ship’s move points or half that of a rowed vessel—during which time embarkation is effected. Debarkation may require half the time. Embarkation and debarkation at any point other than a port cost half daily move points of the unit (not the vessel). Still a simplification. Within the operation exists much room for complexity.


Notes

1 Valormr scale figures are 1:40. Convert as appropriate.

2 If you’re following along in B/X, the escort galley, here, is a large galley with armaments, the sailing ship is small, and the troop transport is converted from a large sailing ship.

Overland Travel

Strategic Movement

This is the second of five articles, which discuss strategic movement in the Valormr Campaign.

Move Rates

Move rates are expressed as a number of points, one point equaling one mile. The points given here are for one day of travel. A unit spends these points to move into a hex.

Force Type Move Points
Ground Troops
Infantry 12
Cavalry 24
Special
Courrier* 48
Waterborne Transport†
Galley 18/72**‡
Longship 18/90**‡
River Boat 36
Sailing Ship 90‡

Troop Transport

72‡

* A lone rider; includes such individuals as spies and scouts.
† Details on waterborne transport are given in an upcoming article.
** Rowed/sailed.
‡ Under sail, ships move during both the day and night periods of a turn.

Daily Rest: One period (or two half periods) of rest is required to recover full daily move points. At the end of the first half period of rest, half daily move points are recovered. A force may rest and move in half periods, that is, rest-move-rest-move, for up to two periods, before requiring two consecutive half periods of rest or be fatigued.

Weekly Rest: A unit can move up to six consecutive days. It must rest one full day of every seven.

Forced March: A unit may take an additional 50% of its daily move points, thereby moving half again as far. The unit must rest the following day or be fatigued.

Fatigued: A fatigued unit subtracts 25% from its daily move points (drop fractions). If the unit becomes engaged in battle, it is fatigued as per Chainmail (11). If it then performs combat actions that would normally make it fatigued, the effects are doubled. A fatigued unit must rest one full day to recover from the effects.

Strategic Movement
Northmen, in longships, sail from their coastal farmsteads to the mouth of the Grunnthraesir in a single day, while orcs and humans move into only one mountain hex.

Ground Troops

Humanoid Creatures

Infantry: Humanoids who march in formation are classed as infantry. Humans, orcs, elves, halfolk, gnolls, goblins, etc. all move at the same daily rate.

Cavalry: The only cavalry in the campaign are dwarven boar riders, orc rhino riders (both giant), and a single company of horsed mercenaries from far eastern lands.

Cavalry-Grade Horses

The campaign takes place in the early iron age on the DONJON LANDS time line. Horses in the region are not yet bred large enough to bear the weight of an armored rider and of the temperament required to do so in battle—our exercise of Chainmail’s Jousting rules notwithstanding.

Individual Fantastic Creatures

For creatures which do not move in formation, find the number of miles they travel per day in your favorite source.1 Convert miles, one for one, to movement points. Best to round up or down to the nearest multiple of six.

Special

Courier: Any commander figure can send a courier, which is assumed to be a lone rider. A courier costs no points. Its movement is tracked on the strategic map. A courier may move through and stop in a hex occupied by any friendly figure. A courier passing through an enemy occupied hex escapes on a dice roll of 4 or more. Stopping in such a hex requires a dice roll of 6 to avoid capture. A courier may be transported aboard a waterborne vessel but may not take a horse on a river boat.

Nocturnal Movement

Many fantastic creatures, including gnolls and lizard men, see in the dark as well as light (Chainmail, 43). These creatures may move and attack at night, resting during daylight hours. Often, they rather move at night to gain advantage over light-sighted enemies. Goblins, kobolds, and orcs, who suffer in sunlight, always choose nocturnal activity.

Light-sighted creatures, such as humans, may move on the strategic map during the night with the following limitations:

  • Cost: The cost is twice normal move points per hex and per any river crossing operation.
  • Terrain: Permitted only into clear terrain hexes or on a road into any terrain hex.

Notes

1 For move rates in the Valormr Campaign I use B/X so to align with Wyrmwyrd.

Strategic Movement

“Hey, we’re walking…”—Russel Ziskey (Harold Ramis), Stripes (Reitman, 1981).

Strategic Movement
Each commander figure occupies one six-mile hex.

Scale

A one-inch hexagon grid overlays the strategic map. One hex equals six miles.

Figures

Each force is represented on the strategic map by its commander figure, which occupies one hex. The commander’s entire force is assumed to occupy the same hex.

Only one commander may occupy a hex at any time. The space provides the army with forage and ensures units do not become mixed. A commander figure cannot move through a hex occupied by another commander figure.

Advanced: Passage of Lines

In the advanced game, a force may move through a hex occupied by a stationary allied force but may not stop on it. If enemy contact is made during a passage of lines, both forces are considered unformed.

Turns

Since many fantastic creatures may move in darkness and sailed vessels may also move throughout the night, a turn is defined as 24 hours, beginning at daybreak and divided into two periods: day and night. In some case, each period may be further broken into half-periods. These half periods are called morning, afternoon, evening, and night.

Light-sighted creatures prefer to move in the day period, while dark-seeing creatures may move in either period or split their movement, making half a move during each period.

Simultaneous Moves and Contested Hexes

All moves for a period, day or night, are simultaneous. In the case where two or more forces may move into the same hex at the same time, the force with the fewer number of figures moves into the hex. The figure count includes only troop figures. It does not count figures representing individuals, like leaders, heroes, wizards, and trolls.

If the number of figures on each side is equal, the force with the most move points remaining. If it’s still a tie, the commander with the most daily move points. Still a tie—dice for it.

Note: The case might arise in which cavalry gains the contested hex and continues movement, thus allowing the other force to move into it.

Reading Map

The remainder of Strategic Movement is divided into four parts.

The Valormr Campaign Strategic Movement Map
Get the Valormr Campaign Strategic Movement Map from the Downloads page.

A Simple Wargames Campaign

Valormr: Rules for Strategic Map Campaigns

This article is part of a complete series Valormr: Rules for Strategic Map Campaigns, in which I draw on Tony Bath’s work to outline rules for my own campaign.

In the introduction to Setting Up a Wargames Campaign, Tony Bath warns the neophyte campaigner against “plunging immediately into complicated campaign rules” (551). Though the preparation is much different, the risk is similar to that of the adventure game campaign creator: “For many it can end by getting bogged down in the complications and, in the ensuing frustration, vowing never to go in for that sort of thing again.”

To this I add my own constraint, shared by many modern wargamers, that of time. I aim to finish the Valormr Campaign by summer’s end. I prefer to spend these days fighting battles with fantastic creatures in murky swamps, not getting bogged down with the rules in them.

Setting Up a Wargames Campaign - Tony Bath 1973
 

Bath continues: “For that reason it is often best to start off with a simplified campaign.” Valormr is such a campaign. I draw from the first three chapters of Wargames Campaigns, wherein Bath discusses the map of the continent, the people and cultures which inhabit it, movement and weather, making contact with the enemy, transferring the strategic to the tactical scenario, and disengagement.

In later chapters, Bath delves into supply, characterization, and lots of fun and interesting bits he calls “campaign extras.” I’ll save these for more advanced games of the future. In setting up the Valormr campaign, where I make an obvious shortcut for simplicity or where I am so inspired, I record ideas concerning more complicated rules. As ideas, these are neither fully developed nor well thought through. If you go for a more complicated campaign, massage them as necessary to fit into your game.


Notes

1 As copies of the original text are less common, I cite page numbers from Tony Bath’s Ancient Wargaming (Curry, 2009).

Heroes of Chaos

Heroes trained, Solon Theros is ready to show them to Anax Archontas. He wants to showcase them—not kill them. But if the heroes are not challenged, the dragon will be displeased.

Champions of Chaos

“Heroes of Chaos” is the fantasy combat phase of Champions of Chaos, an introductory wargame scenario, in which Solon Theros chooses champions to fight for Chaos.

Heroes of Chaos Versus Ortuyk’s Horde
Heroes of Chaos Versus Ortuyk’s Horde.

Orders of Battle

The heroes are accompanied by heavy and armored footmen. Solon Theros charges the hobgoblin Ortuyk to assemble an army. To the goblinoid horde, Solon Theros adds lizard men, who inhabit the marsh south of Aldefane, plus lycanthropes, an ogre, and a true troll, all of which are found in the surrounding countryside. From the dungeon below Aldefane, he adds ghouls.

The point value of creatures that fight on the fantasy combat table should equal the point value of the total number of heroes that survived training. For example, I have eight heroes, which comes to 160 points.

Choose from ghouls, lycanthropes, and at most one ogre and one true troll. The first three are the easiest on the Fantasy Combat Table and still challenging as a group to the heroes, while the true troll is a significant challenge on its own.

The goblin horde and the lizard men should total 100 points and include a couple units of archers. The heroes can lead the forty points of foot troops, divided evenly between heavy and armored, to take out the goblinoid archers, which are a threat to lone heroes.

Orders of Battle   Heroes of Chaos Ortuyk’s Horde
Troop/Creature Type Cost Figures     Total Figures Total
Troops          
Heavy Foot 2 10 20    
Armored Foot 2.5 8 20    
Subtotal   18 40    
Fantasy Combat          
Heroes 20 8 160    
Subtotal   8 160    
Troops          
Goblins 1.5     10 15
Goblin Archers 4.5     4 18
Hobgoblins 2.5     12 30
Hobgoblin Archers 5.5     4 22
Lizard Men 2.5     6 15
Subtotal       36 100
Fantasy Combat          
Lycanthropes 20     2 40
Ghouls 10     3 30
Ogres 15     1 15
True Troll 75     1 75
Subtotal       7 160
Total   26 200 43 260

Notes on Orders of Battle

  • Choose one hero to be the Army Commander, who sets up not attached to any unit.
  • Ortuyk is the Army Commander of the Horde, which includes the lizard men. The lycanthropes, ghouls, ogre, and troll are unaffected by the Army Commander.
  • The usual pall over Aldefane obscures full sunlight, so goblins do not suffer from it.
  • Goblin and hobgoblin archers, using short bows, have a missile range of 15″.
  • Lizard men attack as Heavy Foot and defend as Armored Foot. With a move rate of 6″, lizard men traverse the bog at normal rate, though they cannot charge through it. Morale Rating: 10; Point Value: 2.5.
  • As heroes do not check morale, Solon Theros has no need for the torturer and executioner and leaves the east and west gates open. Roll morale for the foot soldiers and Ortuyk’s Horde as normal.

Setup

Heroes of Chaos deploys troops to the west of the killing field, Ortuyk’s Horde east of the stream—except the lizard men, who are deployed (hidden) in the bog.

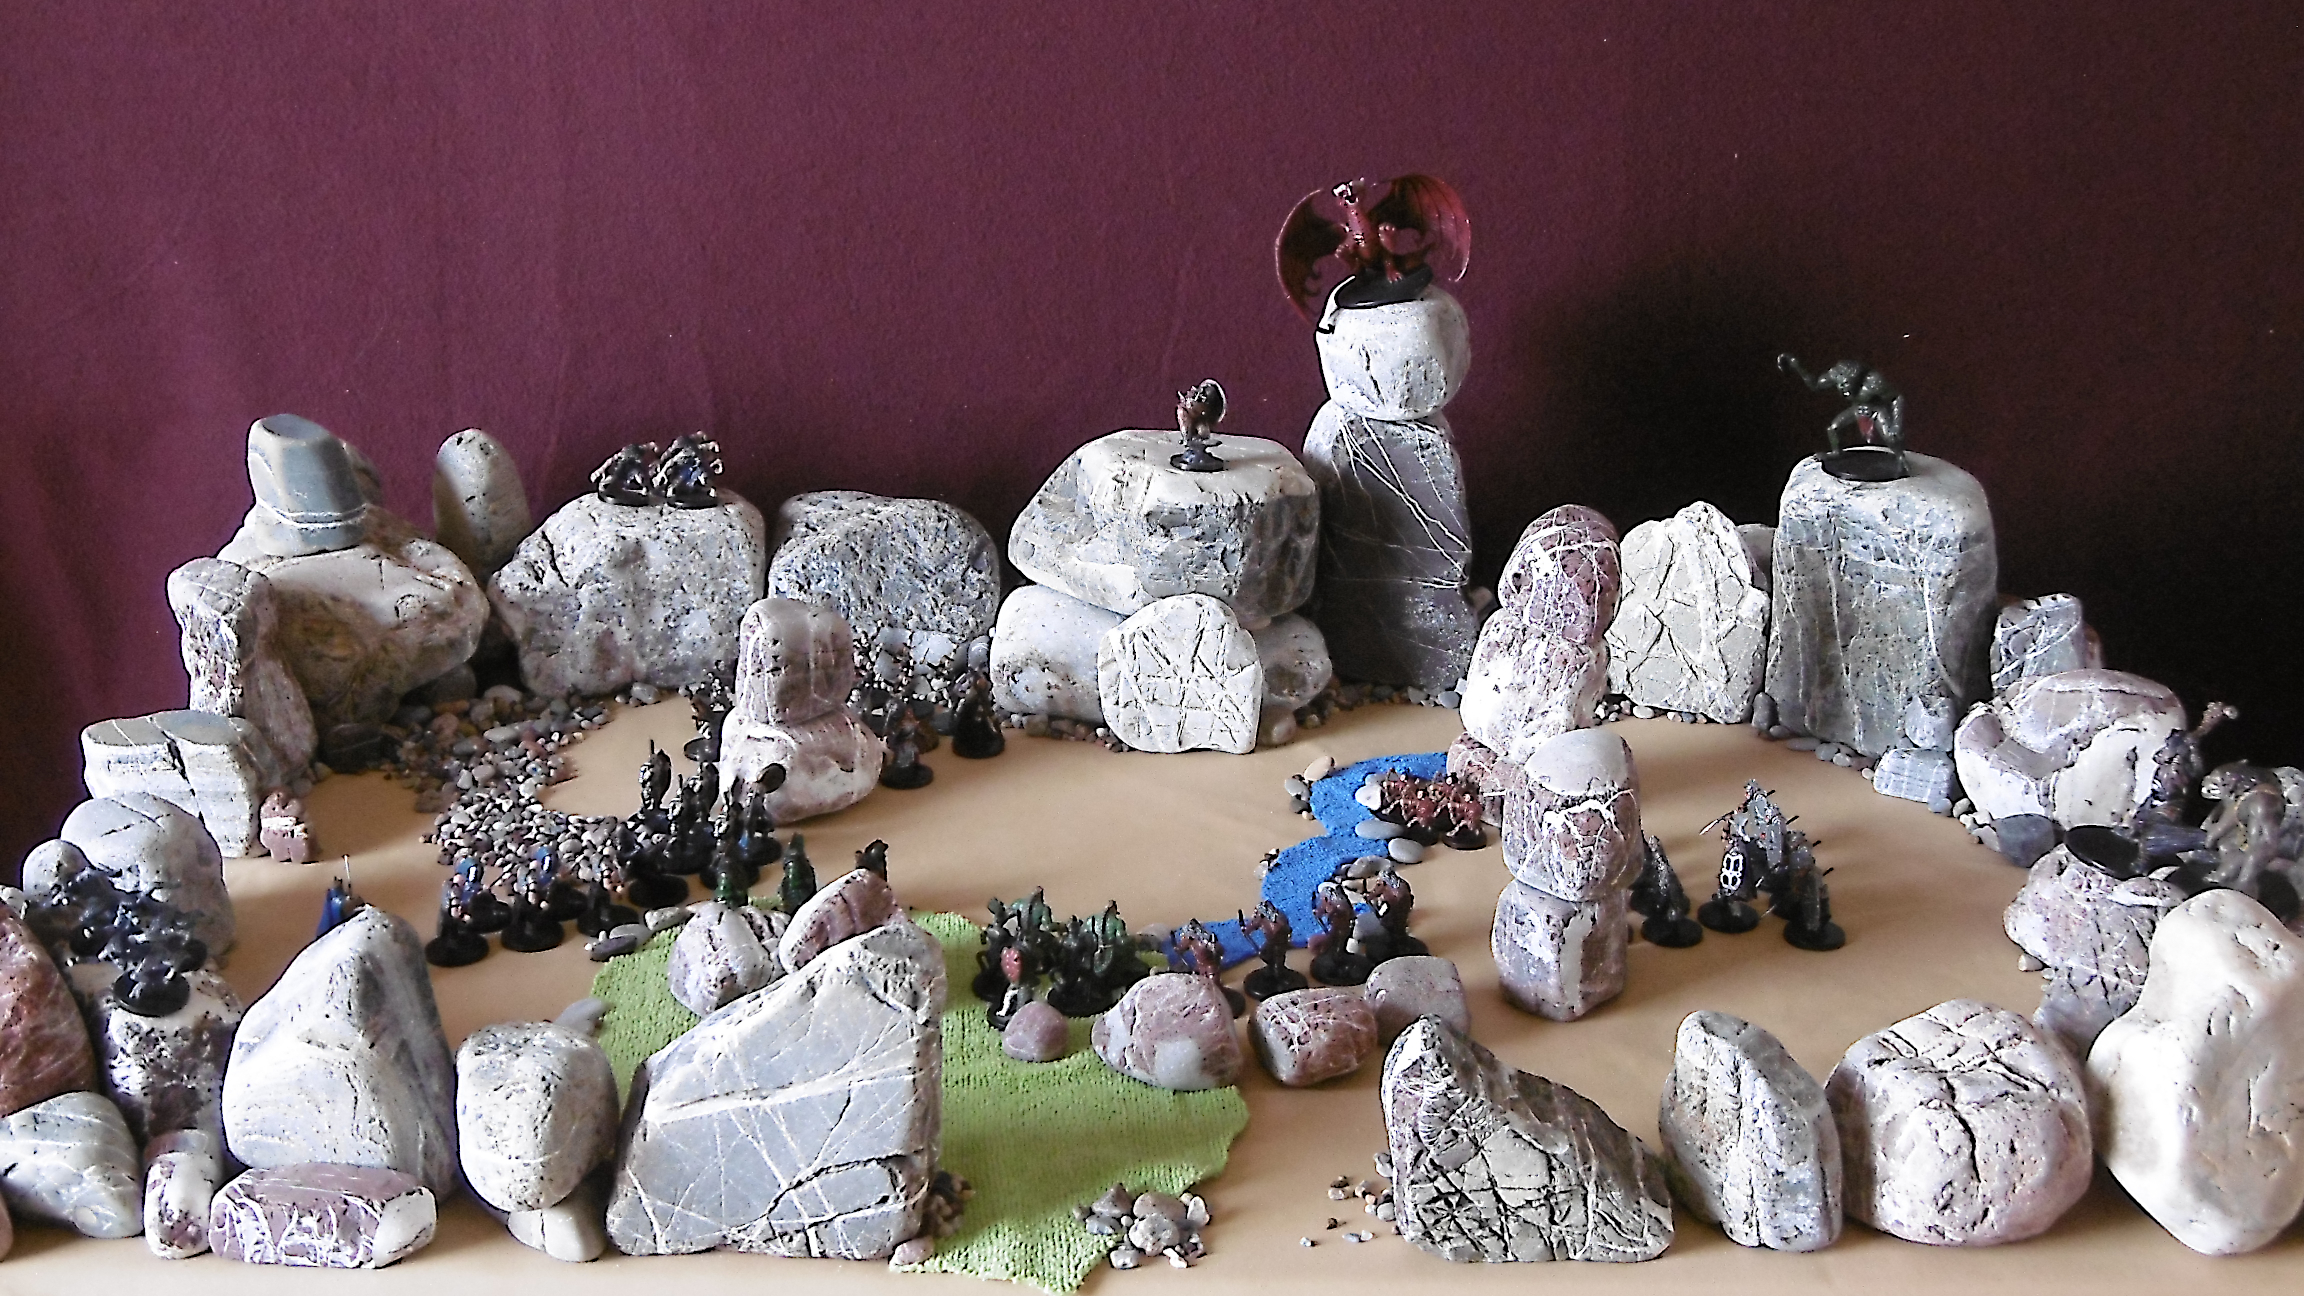
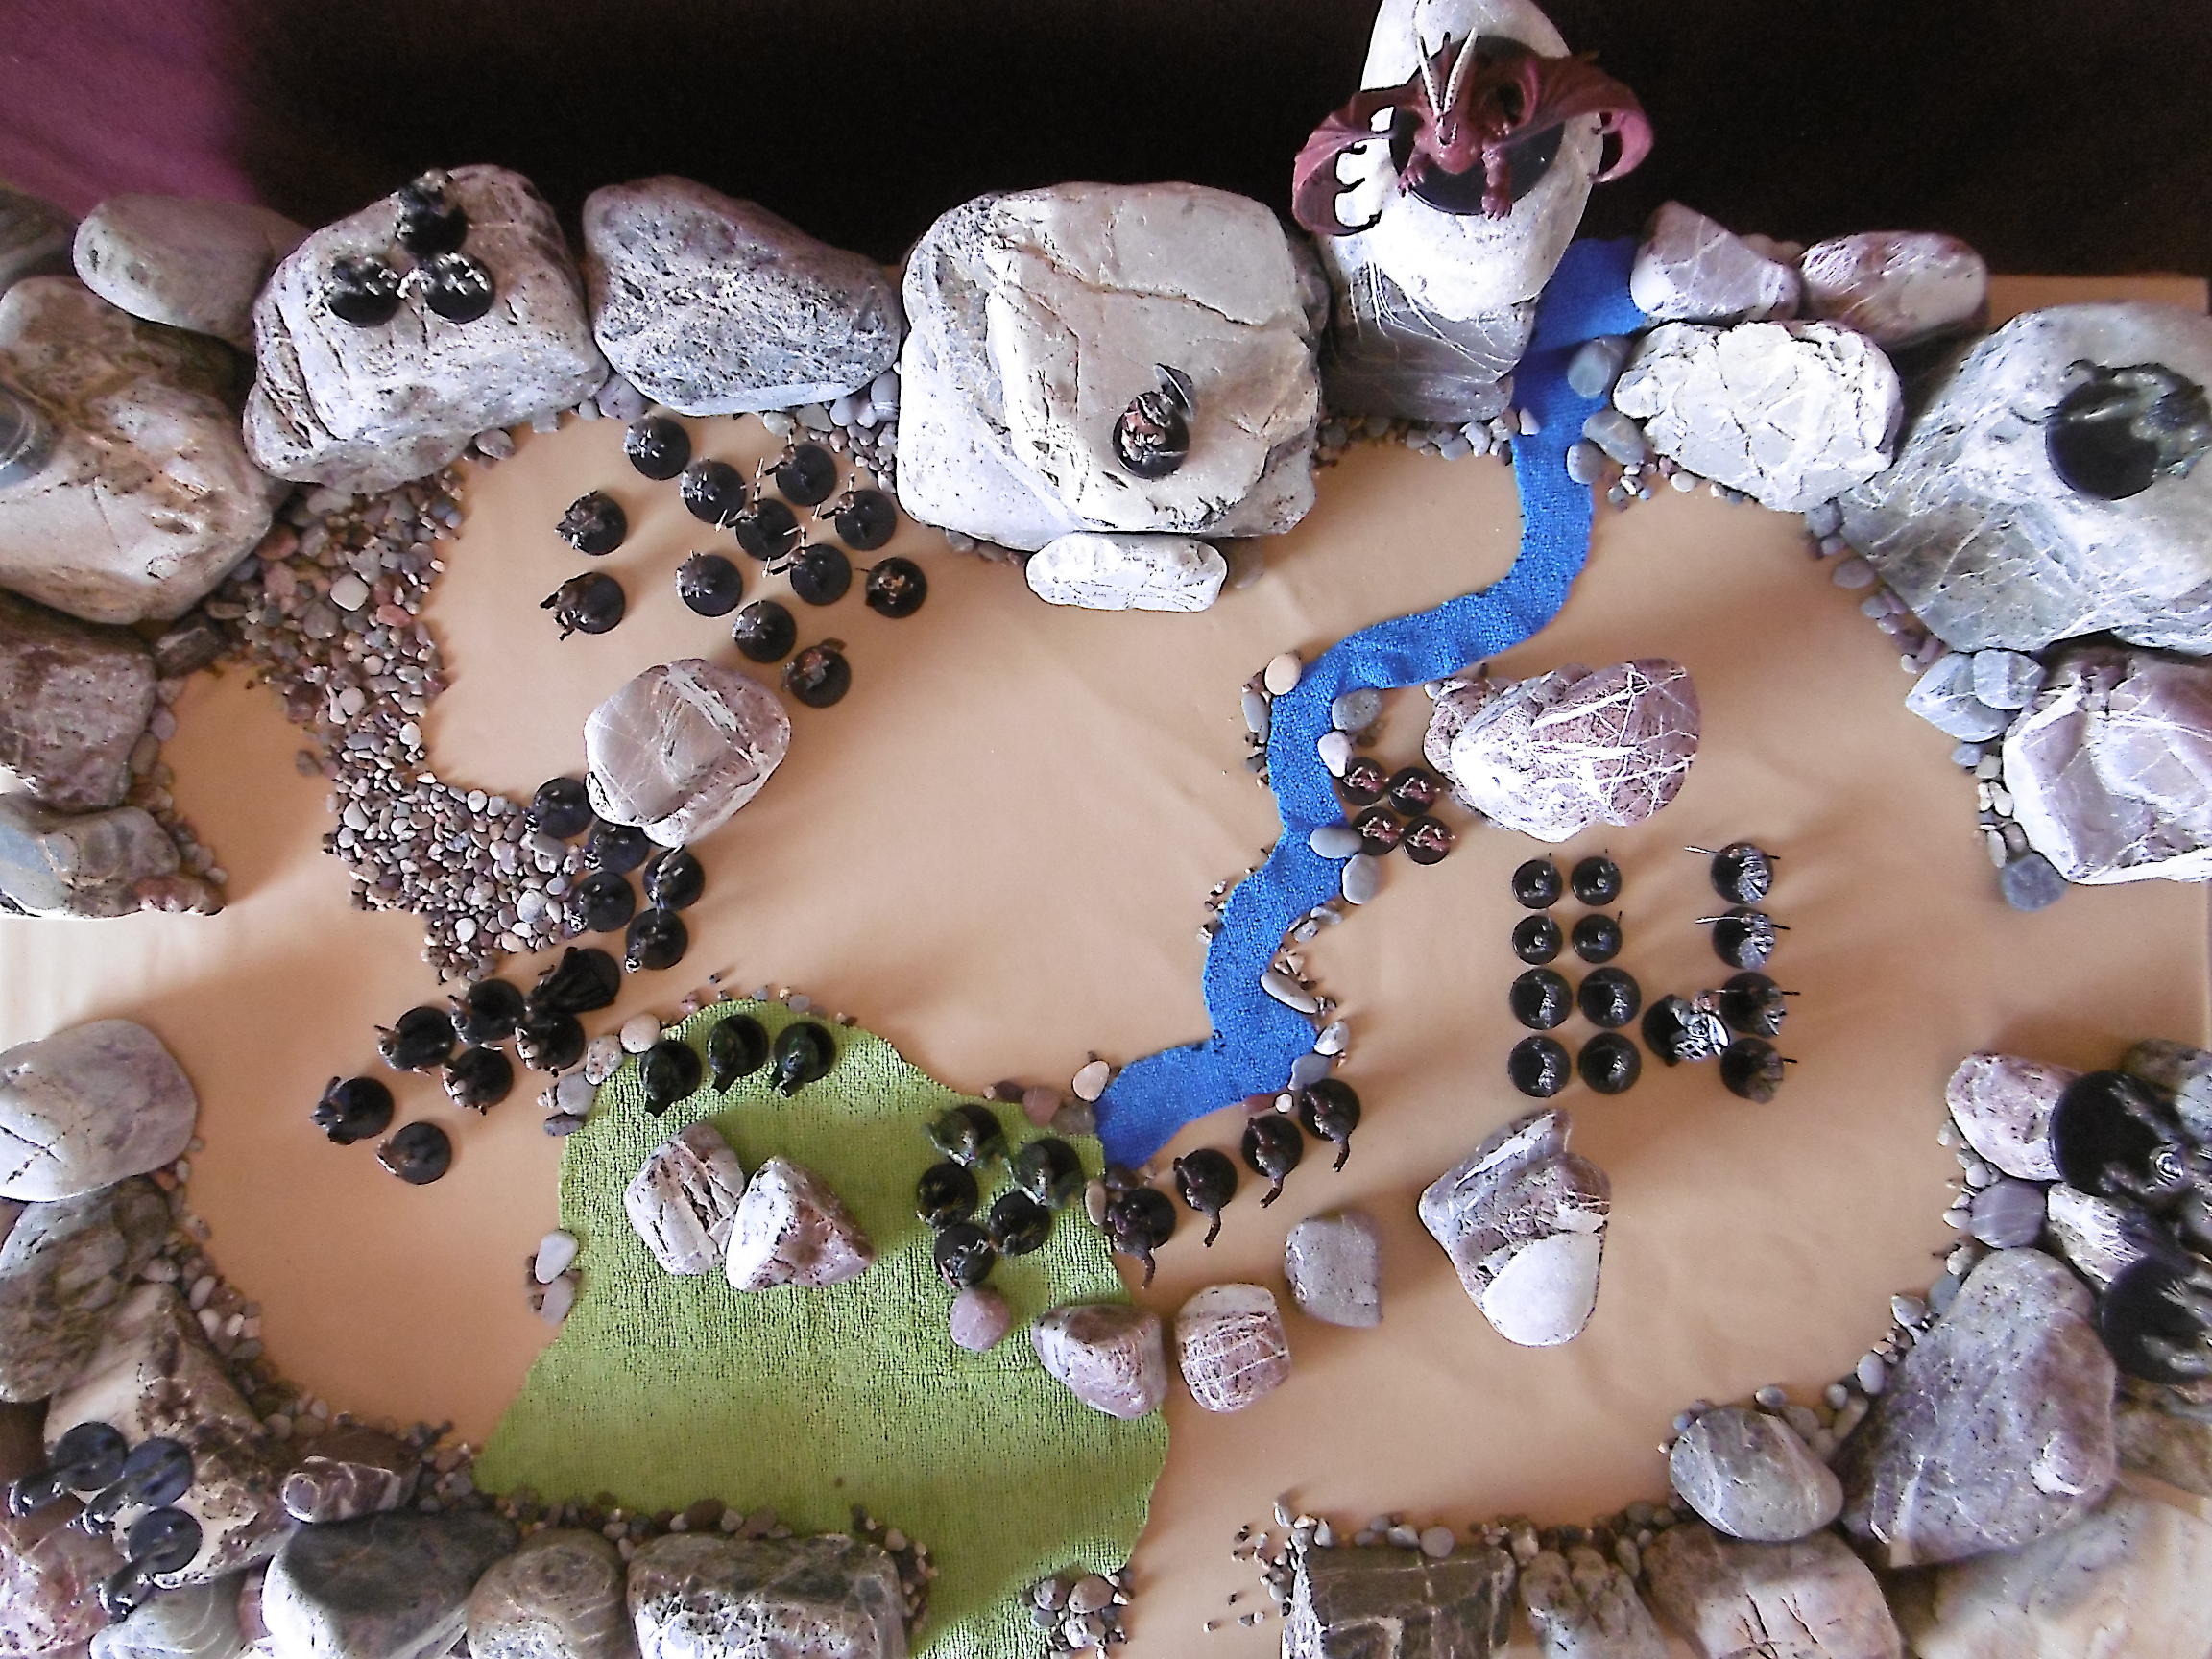
Army Deployment
Army Deployment.
Ortuyk arrays the goblinoid foot troops behind the two eastern columns, the archers forward at stream’s edge. The lizard men, hiding in the bog, emerge from beneath the water’s surface to attack from the flank and rear.

The lycanthropes, ogre, and troll enter the arena from different locations in the movement phase of the turn following a trigger, according to the table below.

Creature Type Start Location Trigger
Werewolves South gate First melee
Ogre East gate Werewolves enter
Ghouls Loggia base (center north) Horde at 25% or less
Troll West gate Ogre enters

The ghouls, in the dungeon, flee a cleric’s turning up the stairs out a door at the base of the loggia. As the ghouls tend to avoid conflict with the large fantastic creatures and rather enjoy humanoid flesh, Solon Theros signals the cleric once the goblinoid presence is thinned, i.e, when the Horde is reduced to one-quarter or less of its starting strength (9 figures).

Victory Conditions

Heroes of Chaos and Ortuyk’s Horde win when all enemies are defeated or forced from the field.

Solon Theros wins the dragon’s praise if at least six heroes survive. If eight or more heroes survive, Anax Archontas appoints the super-hero General Commander of the Chaos Armies.

So Long, Solon…

If five or fewer heroes survive, Anax Archontas has Solon Theros over to the lair for dinner. Menu: Super-hero Barbecue.

A Final Test of Courage

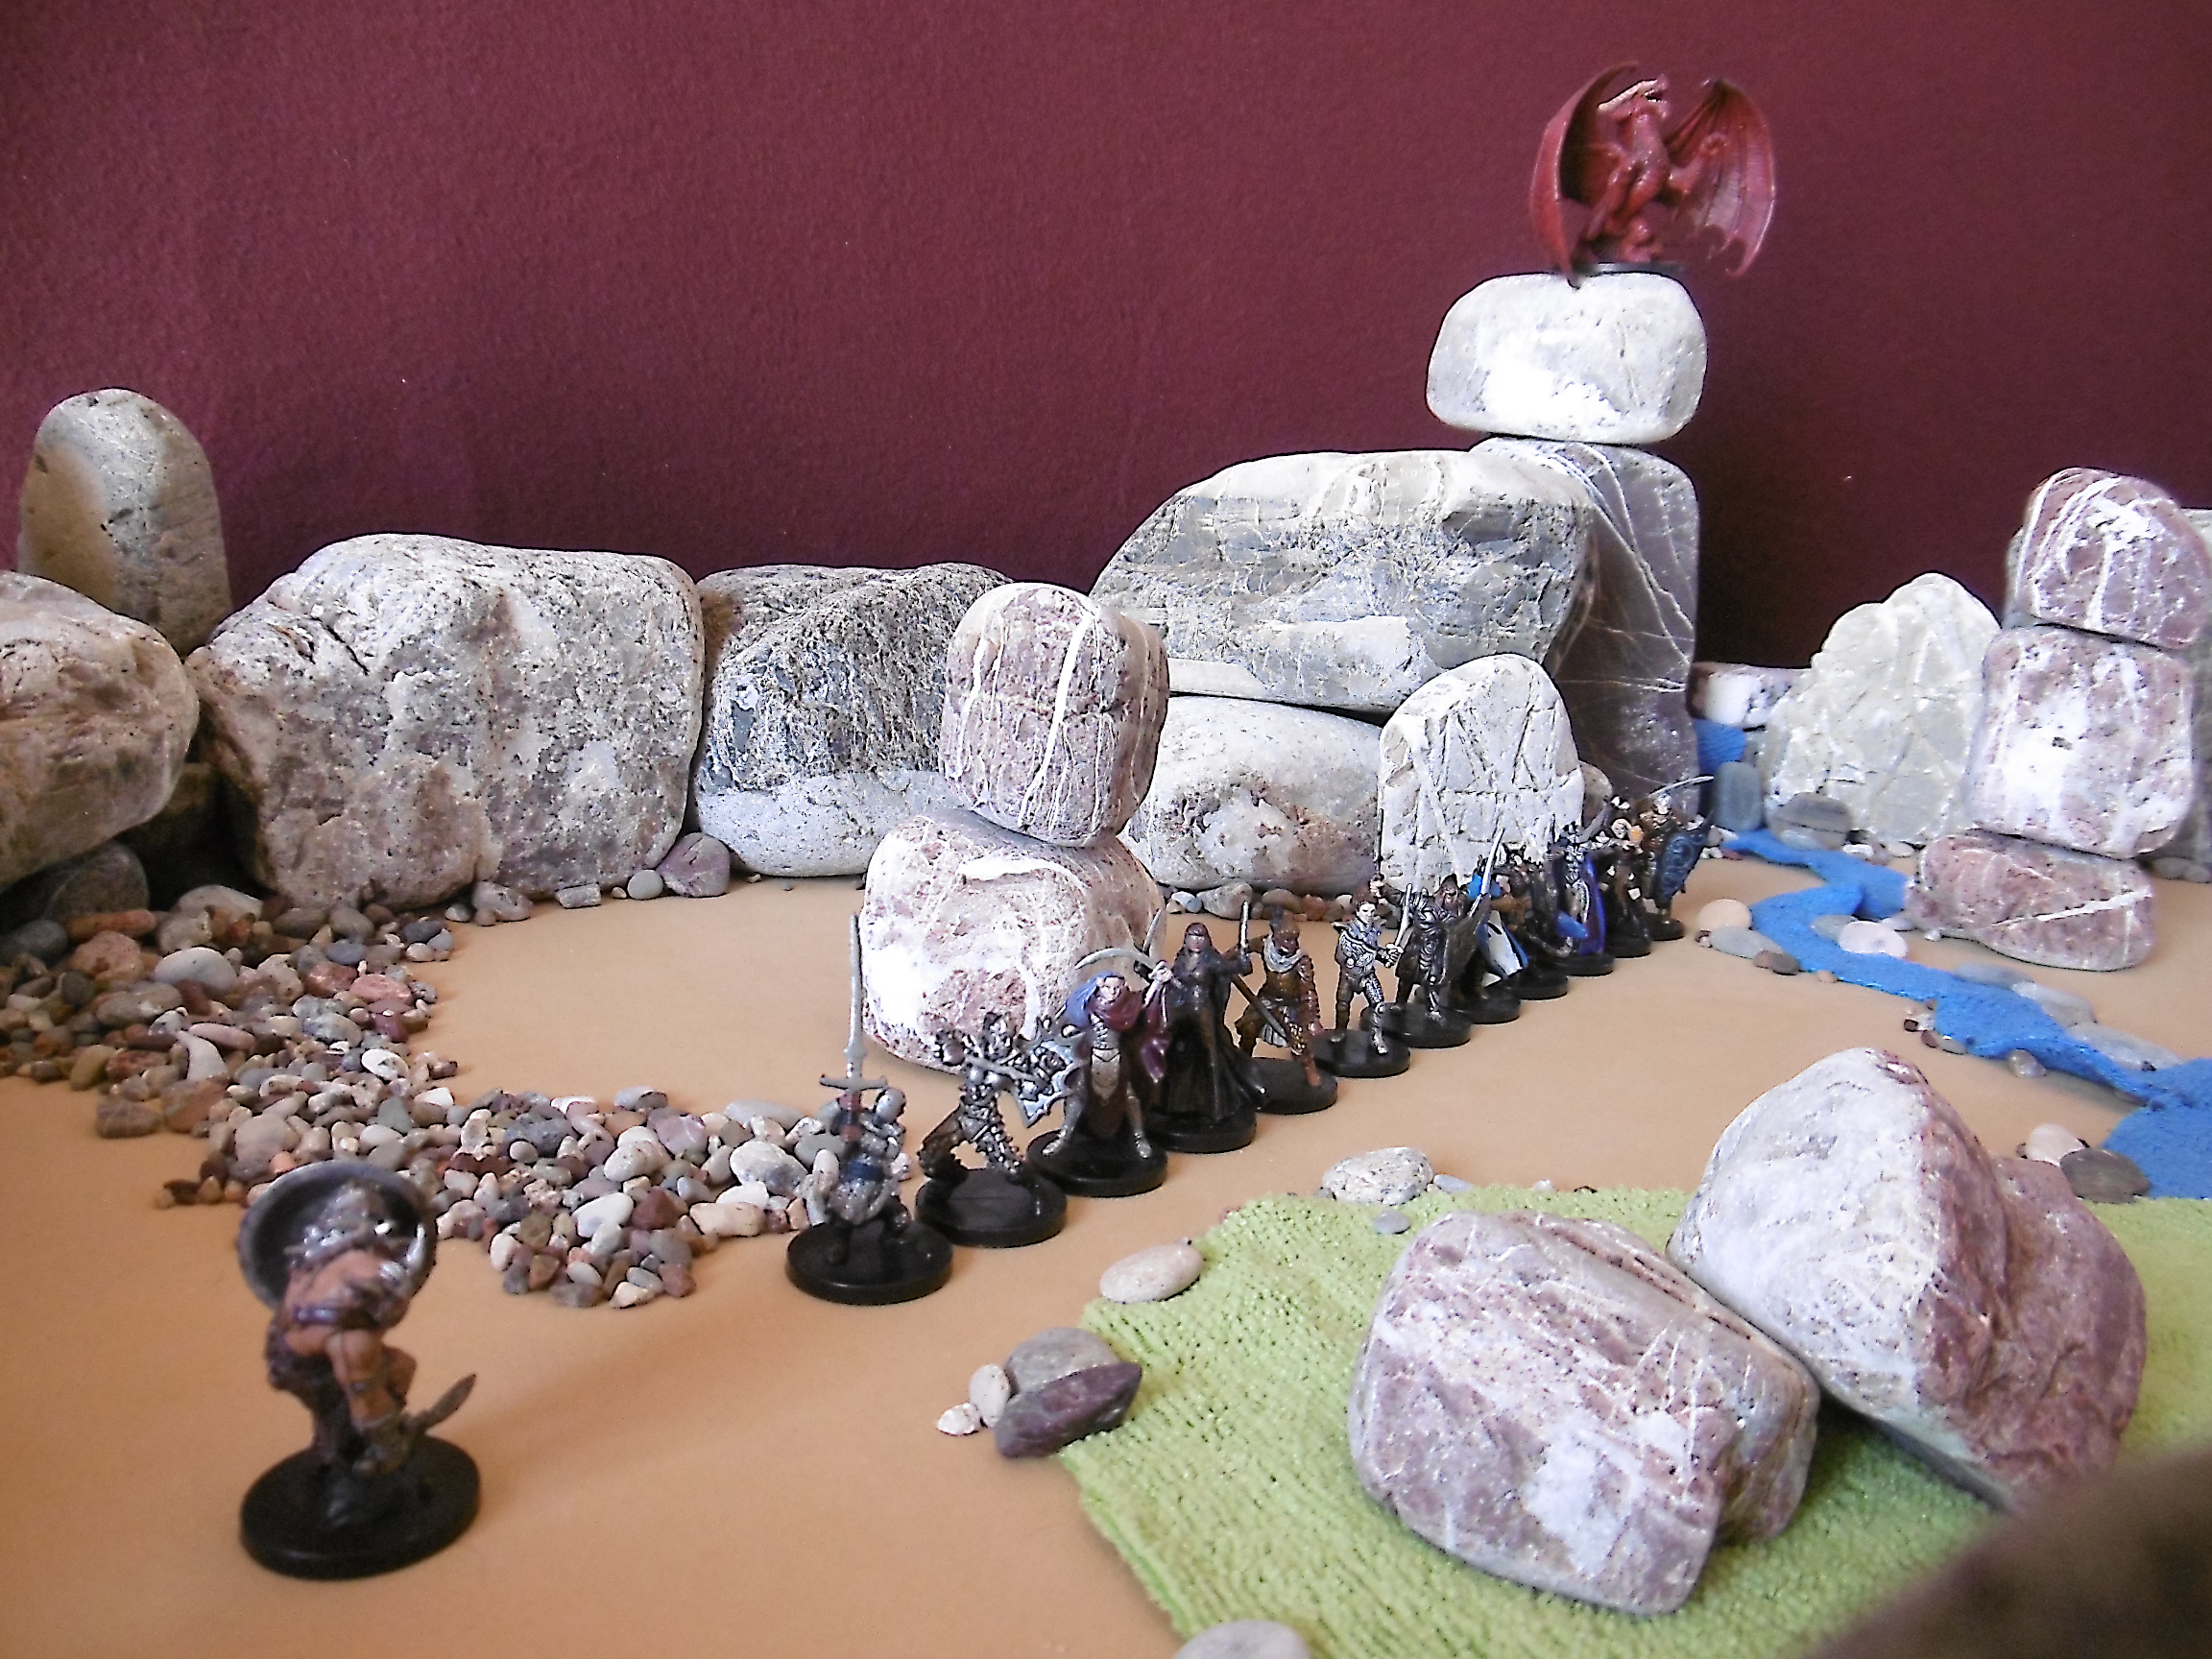
High in the sky, the sun seeped through the foggy shroud that covered Aldefane. The arena’s hard dirt, stained with blood, was silent. The victors stood in one rank. Swords sheathed, helmets under arm, mail dented, shields marked by scores of deflected blows. The day broke with hundreds on the field. These twelve warriors defeated all foes.

With a boom, the western door burst open, and Solon Theros strode through it. Red eyes glared from the mask of the winged helm. Mask and eyes fixed the rank of twelve. He approached the victors with one purpose. From these, Solon Theros would make heroes to fight for Chaos in the dragon’s army. But first, each must pass the final test.

In one hand, he grasped a broad-blade sword. In the other, a shield, demonic skull splayed across the face. Bare shoulder muscles rippled with the swing of his arms. Oiled leather creaked at every step. Scaled armor clinked at every other. Boots crushed the ground, grinding stones beneath.

“When a Super-hero approaches within his charge movement of the enemy, all such units must check morale as if they had taken excess casualties” (Chainmail, 30).

Following the joust, remaining figures are armored foot. Any who fail the morale test finish in the care of the torturer and executioner. All who pass undergo one year of training to become heroes. These will fight in the final phase of Champions of Chaos.

A Final Test of Courage
A Final Test of Courage.
“Heroes (and Anti-heroes) need never check morale” (30).


Strategy on the Jousting Matrix

“Jousting in Chainmail is like playing rock-paper-scissors.”

The analogy is as oft cited as apt. In Chainmail (3rd ed., Tactical Studies Rules, 1975), opposing knights each choose, in secret, an aiming point and a defensive position. Each aiming point is then compared against the other’s defensive position on the Jousting Matrix to determine results of one “ride.”

Jousting
 

Results range from a miss to breaking a lance to being injured or unhorsed. Based on the results, points are awarded for each ride. Unless one is unhorsed, the knight with the most points at the end of three rides is declared the winner, awarded the laurels, and gets his or her dance partner of choice at the after party.

Playing the hand game, probabilities for a win, loss, or tie are exactly equal. Your choice of three forms—rock, paper, or scissors—versus your opponent’s choice is either weaker, stronger, or equally matched.

Winning at Even Odds

Deprived of any rationale, strategies for winning rock-paper-scissors often involve being quick—watching the opponent’s hand to see what shape is forming, sneaky—waiting till the last possible instant to form your own shape, or tricky—calling out one shape just prior to forming another. These are denied us in Chainmail jousting, where we write our choice of aiming point and defensive position on a hidden sheet—outside of learning the rhythm of your opponent’s pen marks on a hard table, which is sneaky.

For more complexity, we might play rock-paper-scissors-Spock-lizard, which adds two more choices. Since each choice defeats half the remaining choices, no one is superior to another. Five choices does, though, reduce the odds of a tie to one-in-five.

The French play the game with four choices. In pierre-papier-ciseaux-puits, the rock and scissors fall into the well (puits), while the paper covers it as well as the rock. Here we have two options that outperform the others, which gets closer to jousting in Chainmail.

But Chainmail jousting is different from all those. Instead of one choice, each player in a joust has two: the attack (aiming point) and the defense (defensive position). But this only doubles the complexity, effectively playing the same game twice at one go—once as attacker, once as defender—without necessarily reducing the chance for a tie. Although we’ll see that a draw in Chainmail jousting is improbable.

Where Chainmail differs from the hand games is in the options. Instead of three, four, or five, each player has eight options for the attack and six for the defense. This, again, only complicates the matter, though by magnitudes.

“Results can vary from both opponents missing to both being unhorsed, as a study of the Jousting Matrix will reveal” (26).

To figure any strategy out of the Jousting Matrix, our study must go further than the range of results. More careful examination shows the attack options differ in their probability of success and limit the attacker’s possible defense options. As well, the defense options have differing probabilities of success. One successful defense result, “B,” ensures a favorable end to the joust in the next ride. A frequent occurrence, a “B” also subtracts 1 point from the attackers score, making a tie unlikely, though not impossible, in even a single ride. At this point, we see that the analogy is less apt, even if it isn’t entirely inapplicable either.

At this point, we see that the analogy is less apt, even if it isn’t entirely inapplicable either.

Evaluating Options

Point System

To evaluate the strength of each attack and defense, we use a simple point system.

Result Points
(U)nhorsed 1
(H)elm Knocked Off ½
(B)reaks Lance (without unhorsing) −½

Miss and Glance Off results are equivalent: no effects, no points. A glancing blow only lends dramatic effect.

We give and take ½ point for Helm Knocked Off and Breaks Lance, because once either is accomplished, the next ride ends in an Unhorsing. For if a defender’s helm is knocked off or an attacker’s lance breaks, he or she must take a Steady Seat the next ride. Knowing this, the opponent aims FP. The other can only hope to achieve an unhorsing as well.

Because a Breaks Lance with Unhorsed (B/U) result penalizes the attacker only 1 point while it wins the joust, we don’t subtract any points in the evaluation system when they occur together. Similarly, the Injured result with Unhorsed (U/I) awards extra points to the attacker but does not impact our assessment. We use these results—and the combination B/U/I—to break any ties in the evaluation.

  Defensive Positions  
Aiming Point Lower Helm Lean Left Lean Right Steady Seat Shield High Shield Low Total
Helm       +1   +1½
DC +1 −½   −½ −½   −½
CP +1 +1   −½ +1 +1 +3½
SC     −½     +1
DF −½ +1   −½   −½ −½
FP +1   −½ +1 +1 −½ +2
SF     +1       +1
Base −½   +1 −½ +1 −½
Total +2 +1½ +1 −½ +3½  

Aiming Points

Counting up the total points for each attack reveals the optimal aiming points assuming random defensive positions.

Aiming Point Score
CP +3½
FP +2
Helm +1½
SF +1
SC
Base
DC −½
DF −½

The tie between SC and Base might be broken in favor of Base due to the extra points for an Injury versus Shield High. We’ll see below, however, that Shield High ranks low on the defensive positions list, so the Injury is unlikely. More likely is the Breaks Lance result, which comes up three times when aiming at Base versus only once at SC.

The tie between DC and DF is broken by a lance which suffers in the later case against the Lean Right position.

“Aim pale; avoid dexter.”

This might be part of initial jousting instruction. For we see that CP is by far the best aiming point, with FP coming in second. While DC and DF are the worst.

Defensive Positions

To evaluate each defense, we apply the same point system. In defense, the lower score is better.

Defensive Position Score
Steady Seat −½
Shield Low
Lean Right +1
Lean Left +1½
Lower Helm +2
Shield High +3½

“Steady in the seat; don’t raise the shield.”

Steady Seat is the best defensive position, with Shield Low next. Lower Helm ranks above Shield High, which is by far the worst defensive position. In the best case, your opponent Breaks Lance against Shield High, but only when aiming DC. Plus, we see above that dexter is not a favorable side for the aim. In the worst case, your opponent aims Base, and you won’t be up for much dancing at the after party.

In Play

Now that we know the best and worst attacks and defenses, we might think it’s that simple and mumble the analogy under our breath as we turn the page to the fantastic parts of the book without first tilting. But unlike rock-paper-scissors, we only experience the interaction of rules and human psychology seated opposite an opponent. In that sense, it’s more like Diplomacy—to exaggerate the point in the opposite direction. We discover its virtues in play.

Simple to Teach and Learn

The rules consist of a few lines of text and the Jousting Matrix, which, once we learn to read it, contains the essentials of play. A few minutes and a couple demonstration rides and we’re off to the lists. Best if each player has a copy of the Matrix before them.

Change It Up

Once the players understand how the game works, it isn’t long until everyone is aware of the best and worst attacks—if that wasn’t the final instruction of their tutelage. Of course, we all use two or three best attacks and defenses. But we have to change it up with middle-ranked options for both from time to time to keep the opponent guessing.

Note Attacks and Defenses

To play, each player makes a secret note of his or her aiming point and defensive position. This done, both players reveal their choices, and results are read from the table.

Know Your Opponent

I recommend keeping a record not only of your own but of your opponent’s aiming points and defensive positions as well. For a single joust of three rides, it probably doesn’t matter as there isn’t much chance for patterns to emerge. But in a jousting tournament, they do, and it’s difficult to see the patterns in memory.

With a quick look at previous rides, you might notice that your opponent favors a particular attack. You might see also that he or she intersperses a second favorite every third ride. Thereby, you gain an advantage.

Know Thyself

Take a look at your own previous choices too. If you see a pattern in your attacks or defenses, your opponent may see it as well. Use any patterns in your opponent’s defense to choose a different aiming point, likewise for the defensive position.

The Jousting Matrix in Fiction

I used the Chainmail Jousting Matrix to add strategy to a fictional jousting scene. In The First Story of Littlelot, the hero must joust against the villain to rescue Gwenevere. If Lancelot wins, Maleagant frees the queen from his tower prison. If Maleagant wins, Lancelot becomes a prisoner too. Those familiar with the Matrix might decipher the knights’ aiming points and defensive positions in each ride. All action in less than two pages, “The Joust” is a quick read.

Range of Results

Examining the Matrix, we see the results of aiming points against defensive positions. In play, we see the myriad combinations of two aiming points and two defensive positions in a series of rides combined with a series of jousts.

May well Gygax and Perren mention the range of results as a selling point. Even in the not infrequent case of a broken lance: We are constrained to a defensive position, certain to be unhorsed in the next ride. In our final effort, should we aim pale to increase our chances to unhorse the opponent as well? Or will she expect that strategy and lean left. In that case, we aim sinister fess… But maybe she’s expecting that too?

The best strategy depends on knowing the opponent. Look for the pattern in your record.

Within a Scenario

As a stand-alone game, Chainmail jousting rejoins the hand games in the list of games you play once and never pick up again. There must be consequences to winning and losing a joust.

Simple stakes are built in to OD&D’s wilderness exploration (Vol. III, 15). If we wander too close to a castle, its lord might challenge us to a joust. Win, and the after party goes on for a month. Lose, and we continue our exploration of hostile territory sans armure.

We might build an entire scenario around a tournament, but the scenario should include high stakes on the tournament’s outcome. Since winners and losers are determined at the end, the stakes might propel the story into the next scenario—in one direction with a win, another direction with a loss.

Conclusion

So, while some may yet liken it to a simple game of blind choice and even odds, I think the analogy an exaggeration that unjustly discredits the game. For, while it is easy to learn, Chainmail jousting is complex, its outcomes diverse, and its judicious use can enhance our role-playing and wargame scenarios.

…while it is easy to learn, Chainmail jousting is complex, its outcomes diverse, and its judicious use can enhance our role-playing and wargame scenarios.

If you have any strategies for winning the game, ingenious uses for Chainmail jousting, or other comments about it, please leave a note in the comments. I’m always looking for ways to up my game.

Death Rides to Mortal Combat

Gygax and Perren describe the jousting event: “Knights in ‘friendly’ combat, armed with lance and sheild, and mounted upon mighty destriers” (Chainmail, 26).

The original quotation marks imply irony. Indeed, in the context of our scenario, this is no amicable tournament but mortal combat. The objective is to slay the opponent.

Start

The 24 victors of the man-to-man combat phase mount horses and face each other across the central arena. Each figure competes in one joust of three rides. Victors go on to the final phase of Champions of Chaos.

Notes on Jousting

Follow Chainmail’s Jousting rules (26-7, 42) considering the following notes.

  1. By now it is understood: one does not yield nor give quarter in the presence of Solon Theros.
  2. When a rider is unhorsed, combat continues on the Man-to-Man Melee Table (41).
  3. The other rider is not obliged to dismount. These are not knights; they follow no code. This is Chaos.
  4. Consider each rider to wear plate mail and helmet, carry a shield and lance, as well as a sword—all provided by Solon Theros.1
  5. Mounts, also provided by the super hero, are not barded.
  6. See the section on Mounted Men (26), including the table on the chances for an unhorsed rider to be stunned.
  7. A combatant injured as a result of a joust (an “I” result) subtracts 1 from any dice rolls—on the Melee Table, for instance.2
  8. If neither combatant is unhorsed after the third ride, both continue to the final phase.

Knights Among Us

A rider who unhorses the opponent on the first ride may have had significant training. Mark the figure for a mounted hero. Should he or she succeed the final phase, consider treating the figure as a Knight (not from Religious Orders of Knighthood) under Historical Characteristics (18).

Lists at Aldefane
Lists at Aldefane.
Twenty-four riders compete for the right to become heroes.

Figures

Miniatures are not at all necessary for the jousting phase. There is no difference from one rider to the next. In my case, having only one horsed figure and it without a lance, putting miniatures on the table adds nothing to the spectacle.

I do find one purpose for their use. As one of the competitors is a favorite—Pal Hargrane has some background developed through play—I plant two additional figures of the same likeness among them. By so doing, I triple Hargrane’s chances to continue to the final phase.


Notes

1 The Jousting Matrix assumes combatants are properly equipped.

2 I’m making this up. Other than losing 10 points, Chainmail includes no consequences to a jousting injury.